图像拼接Opencv源码重构
请看赵春江 https:// me.csdn.net/zhaocj 的主页,他已经对Opencv图像拼接流程中的代码做了很详细的解释。前人栽树,后人乘凉。
一.本文所做的事
1.重构了Opencv图像拼接的源代码,整个代码是面向过程的;
2.在赵春江源码分析基础上,对一些细节部分进行说明。
代码链接: https:// github.com/mhhai/ImageS titch
二.特征点检测
一切起源于这段代码
Ptr<OrbFeaturesFinder> finder;    //定义特征寻找器
finder = new  OrbFeaturesFinder();    //应用ORB方法寻找特征
vector<ImageFeatures> features(num_images);    //表示图像特征
for (int i = 0; i < num_images; i++)
     (*finder)(imgs[i], features[i]);    //特征检测
finder =newOrbFeaturesFinder(); 这段代码生成了一个 OrbFeaturesFinder 对象,其构造函数为:
OrbFeaturesFinder::OrbFeaturesFinder(Size _grid_size, int n_features, float scaleFactor, int nlevels)
    grid_size = _grid_size;
    orb = ORB::create(n_features * (99 + grid_size.area())/100/grid_size.area(), scaleFactor, nlevels);
可以看出这里面创建了一个 ORB 类。关于这一点,看 OrbFeaturesFinder 类的继承结构

真正实现 ORB 算法是在orb.cpp中的 ORB_Impl 类,其他的都是一些函数调用过程,这也是opencv难以看懂的部分。 OrbFeaturesFinder 类声明(在matchers.hpp)如下:
class CV_EXPORTS OrbFeaturesFinder : public FeaturesFinder
public:
    OrbFeaturesFinder(Size _grid_size = Size(3,1), int nfeatures=1500, float scaleFactor=1.3f, int nlevels=5);
private:
    void find(InputArray image, ImageFeatures &features) CV_OVERRIDE;
    Ptr<ORB> orb;
    Size grid_size;
可以看出 OrbFeaturesFinder 是没有重载()的,那么它为什么可以使用
(*finder)(imgs[i], features[i]);
这段代码呢,因为在其父类 FeaturesFinder 中实现了()的重载,派生类直接使用父类的公有方法。父类 FeaturesFinder 重载()代码如下:
void FeaturesFinder::operator ()(InputArray  image, ImageFeatures &features)
    find(image, features);
    features.img_size = image.size();
接下来,在函数operator()中,调用了find函数,由于 OrbFeaturesFinder 类实现了自己的find函数版本,所以,接下来执行 OrbFeaturesFinder 中的find函数,该函数有点长,但还是拿来说明一下:
void OrbFeaturesFinder::find(InputArray image, ImageFeatures &features)
    UMat gray_image;
    CV_Assert((image.type() == CV_8UC3) || (image.type() == CV_8UC4) || (image.type() == CV_8UC1));
    if (image.type() == CV_8UC3) {
        cvtColor(image, gray_image, COLOR_BGR2GRAY);
    } else if (image.type() == CV_8UC4) {
        cvtColor(image, gray_image, COLOR_BGRA2GRAY);
    } else if (image.type() == CV_8UC1) {
        gray_image = image.getUMat();
    } else {
        CV_Error(Error::StsUnsupportedFormat, "");
    if (grid_size.area() == 1)
        orb->detectAndCompute(gray_image, Mat(), features.keypoints, features.descriptors);
        features.keypoints.clear();
        features.descriptors.release();
        std::vector<KeyPoint> points;
        Mat _descriptors;
        UMat descriptors;
        //下面这段代码将图像分成1 * 3的网格,对于每个网格部分分别进行特征点检测,
	//这样做的好处是,你可以选择只在重叠区域进行检测
        for (int r = 0; r < grid_size.height; ++r)
            for (int c = 0; c < grid_size.width; ++c)
                int xl = c * gray_image.cols / grid_size.width;
                int yl = r * gray_image.rows / grid_size.height;
                int xr = (c+1) * gray_image.cols / grid_size.width;
                int yr = (r+1) * gray_image.rows / grid_size.height;
                // LOGLN("OrbFeaturesFinder::find: gray_image.empty=" << (gray_image.empty()?"true":"false") << ", "
                //     << " gray_image.size()=(" << gray_image.size().width << "x" << gray_image.size().height << "), "
                //     << " yl=" << yl << ", yr=" << yr << ", "
                //     << " xl=" << xl << ", xr=" << xr << ", gray_image.data=" << ((size_t)gray_image.data) << ", "
                //     << "gray_image.dims=" << gray_image.dims << "\n");
                UMat gray_image_part=gray_image(Range(yl, yr), Range(xl, xr));
                // LOGLN("OrbFeaturesFinder::find: gray_image_part.empty=" << (gray_image_part.empty()?"true":"false") << ", "
                //     << " gray_image_part.size()=(" << gray_image_part.size().width << "x" << gray_image_part.size().height << "), "
                //     << " gray_image_part.dims=" << gray_image_part.dims << ", "
                //     << " gray_image_part.data=" << ((size_t)gray_image_part.data) << "\n");
                orb->detectAndCompute(gray_image_part, UMat(), points, descriptors);
                features.keypoints.reserve(features.keypoints.size() + points.size());
                for (std::vector<KeyPoint>::iterator kp = points.begin(); kp != points.end(); ++kp)
                    kp->pt.x += xl;
                    kp->pt.y += yl;
                    features.keypoints.push_back(*kp);
                _descriptors.push_back(descriptors.getMat(ACCESS_READ));
        // TODO optimize copyTo()
        //features.descriptors = _descriptors.getUMat(ACCESS_READ);
        _descriptors.copyTo(features.descriptors);
之所以把这段这么长的代码贴出来,是因为这段代码从全局的角度讲述了怎样进行特征点检测。继续看
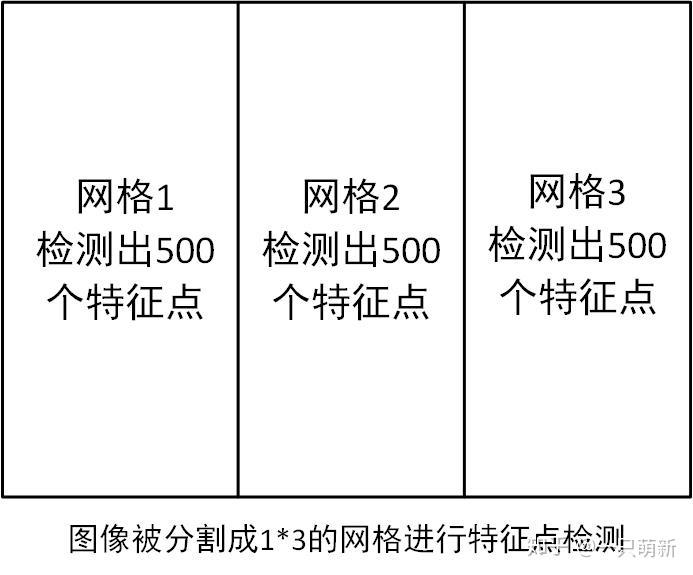
finder = new OrbFeaturesFinder();这段代码,由 OrbFeaturesFinder 类的构造函数可知,使用默认参数时是检测出1500个特征点,建立5层高斯金字塔图像,那么第一个参数Size(3,1)参数作何解释?Size(3,1)是说把图像分成1 * 3的网格,对每个网格进行特征点检测,每个网格检测出的数目是500,那么总共检测出的特征点数目就为1500,可以看下面的示意图:

不是检测出1500个特征点吗,在哪里设置500这个参数了?其实在你第一次写
finder = new OrbFeaturesFinder();这段代码时,构造函数中的这段代码
orb = ORB::create(n_features * (99 + grid_size.area())/100/grid_size.area(), scaleFactor, nlevels);create函数第一个参数的值被设置成了510,也就是每个区域检测出的特征点数目不是刚好500,而是多一点。通过设置find的函数中的r、c参数,你可以对想要的部分进行特征点检测。另外,从这里可以看出,Opencv实现的ORB特征点检测并不是对整幅图像建立高斯金字塔,而是对每个网格建立高斯金字塔。另外每层金字塔检测出来的数目是根据尺度实现分配好的,这方面可以参看赵春江的书或者博客。
三.特征点匹配
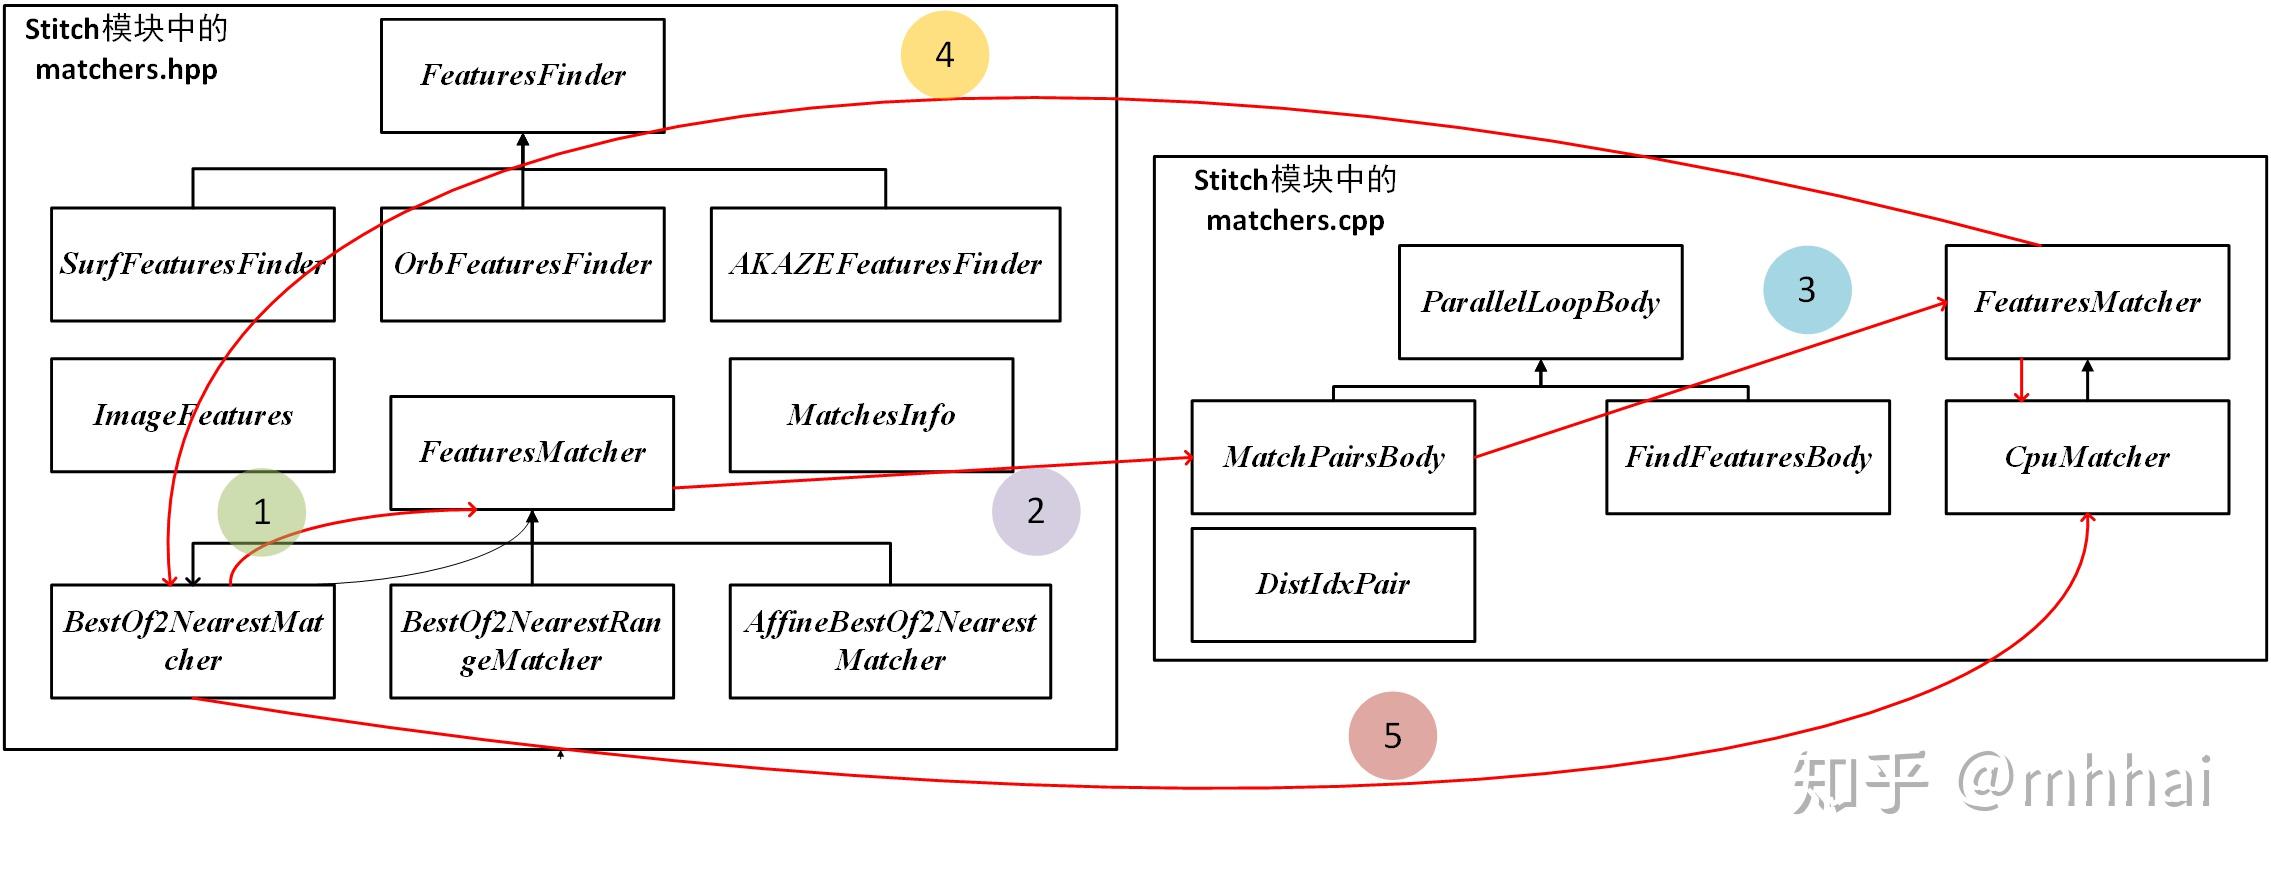
这一部分类与类之间的关系比较复杂,具体可以看下图:

特征匹配使用的是最近邻匹配( BestOf2NearestMatcher ),实现最近邻匹配可以使用暴力匹配法和K-D树最近邻搜索。不是说暴力匹配法一定不好。对于3000个特征点对以下的特征匹配,暴力匹配法是优于K-D树搜寻的,因为K-D树的构建本身就需要耗费时间。
当你使用下面代码时
BestOf2NearestMatcher matcher(false, 0.3f, 6, 6); //定义特征匹配器,2NN方法
其构造函数为:
BestOf2NearestMatcher::BestOf2NearestMatcher(bool try_use_gpu, float match_conf, int num_matches_thresh1, int num_matches_thresh2)
