本文内容由阿里云实名注册用户自发贡献,版权归原作者所有,阿里云开发者社区不拥有其著作权,亦不承担相应法律责任。具体规则请查看《
文章目录 网页集成软电话 配置freeswitch开启wss nginx配置自签名https域名 页面集成软电话开发 网页集成软电话 网页集成软电话需要使用https协议,页面与freeswitch平台建立websocket长连接。使用jssip库进行相关开发
生成https自签名证书 下载ssl.ca-0.1.tar.gz wget files.freeswitch.org/downloads/s…1 解压ssl.ca-0.1.tar.gz tar zxfv ssl.ca-0.1.tar.gz 1 执行以下命令 [root@localhost ~]# cd ssl.ca-0.1/ [root@localhost ssl.ca-0.1]# perl -i -pe 's/md5/sha1/g' *.sh [root@localhost ssl.ca-0.1]# perl -i -pe 's/2048/2048/g' *.sh 1 2 3 生成根证书 [root@localhost ssl.ca-0.1]# ./new-root-ca.sh No Root CA key round. Generating one Generating RSA private key, 1024 bit long modulus .....................++++++ ...............................................................++++++ e is 65537 (0x10001) Enter pass phrase for ca.key:  根证书密码 Verifying - Enter pass phrase for ca.key: Self-sign the root CA... Enter pass phrase for ca.key:  根证书密码 You are about to be asked to enter information that will be incorporated into your certificate request. What you are about to enter is what is called a Distinguished Name or a DN. There are quite a few fields but you can leave some blank For some fields there will be a default value, If you enter '.', the field will be left blank.
Country Name (2 letter code) [MY]:CN  国籍 State or Province Name (full name) [Perak]:bj 省份 Locality Name (eg, city) [Sitiawan]:bj  市 Organization Name (eg, company) [My Directory Sdn Bhd]:qd 公司名称 Organizational Unit Name (eg, section) [Certification Services Division]:ts 组织名称 Common Name (eg, MD Root CA) []:su 常用名 Email Address []:su@163.com  邮箱地址 1 2 3 4 5 6 7 8 9 10 11 12 13 14 15 16 17 18 19 20 21 22 23 24 执行完毕后,会在当前目录生成ca.key和ca.crt两个文件 为服务器生成一个证书 [root@localhost ssl.ca-0.1]# ./new-server-cert.sh  server Fill in certificate data You are about to be asked to enter information that will be incorporated into your certificate request. What you are about to enter is what is called a Distinguished Name or a DN. There are quite a few fields but you can leave some blank For some fields there will be a default value, If you enter '.', the field will be left blank.
1 2 3 修改vars.xml [root@254 ssl.ca-0.1]# vim /usr/local/freeswitch/conf/vars.xml 设置以下参数 1 2 3 4 如果是局域网使用,得做一个 ACL 配置,否则不通 conf/autoload_configs/acl.conf.xml 中,加入下面配置: 然后,conf/sip_profiles/internal.xml 中加入下列配置: 1 2 3 4 5 6 检查是否成功
执行此命令可以看到wss所绑定的端口 [root@254 ssl.ca-0.1]# fs_cli -x 'sofia status profile internal' | grep WSS-BIND-URL WSS-BIND-URL sips:
mod_sofia@192.168.0.254
:7443;transport=wss 1 2 3 最后再次重启或F6重新加载配置
nginx配置自签名https域名 确定nginx已经安装,且支持https [root@localhost ~]# nginx -V nginx version: nginx/1.9.1 built by gcc 4.8.5 20150623 (Red Hat 4.8.5-44) (GCC) built with OpenSSL 1.0.2k-fips 26 Jan 2017 TLS SNI support enabled configure arguments: --prefix=/data/nginx --with-http_ssl_module 1 2 3 4 5 6 一定确保出现:--with-http_ssl_module 否则需要自行安装 配置nginx.conf文件 vim /data/nginx/conf/nginx.conf #user nobody; worker_processes 1; events { worker_connections 1024; } http { include mime.types; default_type application/octet-stream;
sendfile on; #tcp_nopush on; #keepalive_timeout 0; keepalive_timeout 65; #gzip on; # HTTPS server server { listen 443 ssl; server_name fstest.com
www.fstest.com
; ssl on; ## server.crt 和server.key 是上面生成的证书文件 ssl_certificate /root/ssl.ca-0.1/server.crt; ssl_certificate_key /root/ssl.ca-0.1/server.key;
# ssl_session_cache shared:SSL:1m; ssl_session_timeout 50m; # ssl_ciphers HIGH:!aNULL:!MD5; # ssl_prefer_server_ciphers on;
location / {
        root /data/demo/;  #前端编译后的静态页面目录
server {
    listen 80;
    server_name fstest.com  www.fstest.com; #多个域名用空格分开
    #将请求转成https
    rewrite ^(.*)$ https://$host$1 permanent;
复制代码
}
1 2 3 4 5 6 7 8 9 10 11 12 13 14 15 16 17 18 19 20 21 22 23 24 25 26 27 28 29 30 31 32 33 34 35 36 37 38 39 页面集成软电话开发 使用jssip类库集成。详情参见jssip官方文档和官方demo或者本篇文章使用的demo(推荐)
测试通话
修改本机hosts文件,以Mac系统为例:
打开命令行窗口 或者 item sudo vi /etc/hosts 输入密码 加入:192.168.1.34
www.fstest.com
:wq保存退出 1 2 3 4 5 打开浏览器(chorme)地址栏输入:
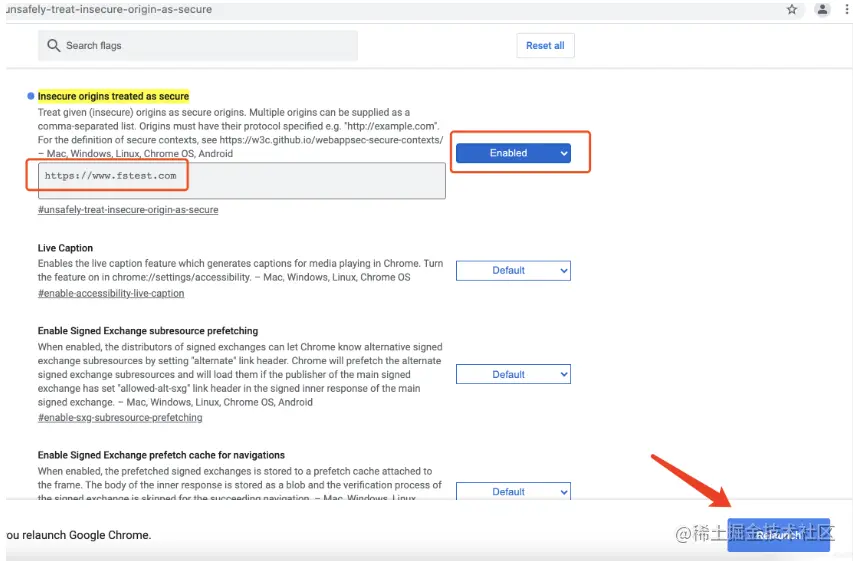
chrome://flags/#unsafely-treat-insecure-origin-as-secure 1 如下图设置

重启浏览器后地址栏输入:
www.fstest.com
(结合nginx配置)
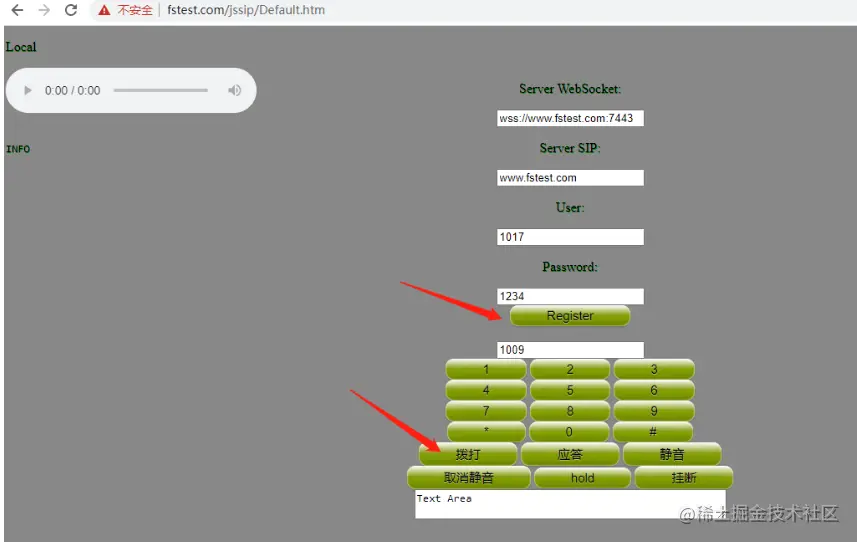
如下图设置

输入账号,密码,先注册,成功后即可拨打或者接听电话!
NGINX和浏览器、网页的关系-云服务器ssh登陆-安装NGINX-上传网页-压缩命令-xz-gzip-bzip2-zip-tar-配置NGINX服务器支持下载功能-备份脚本
Quick UDP Internet Connection(QUIC)协议是Google公司提出的基于UDP的高效可靠协议。有关协议的主要内容就不在本文过多描述了,本文主要是来讲一下,在Nginx当中如何去支持QUIC协议。
由于个人水平有限,如果哪里写的不对的地方,还请各位大佬们指正。
我们已经介绍了haproxy提出的proxy protocol协议,通过proxy protocol协议,服务器端可以获得客户端的真实IP地址和端口,从而可以进行一些非常有意义的操作。
为什么获得客户端的真实IP地址会非常有意义呢?
IP是分配给网卡的地址,用来找到网络上的一台设备,实现相互通信。
IP的格式是四个8位的二进制整数,可以转换成0-255的十进制数字。
因为接入网络的设备越来越多,IPV4不够用了,所以现在又诞生了 IPV6。
只有IP还不够,因为一个设备上运行的程序很多,如果要找到指定的程序,必须给
每个程序分配一个端口。端口的范围是0到65535。