LBP ( Local binary pattern) ,局部二进制模式.
LBP特征的描述
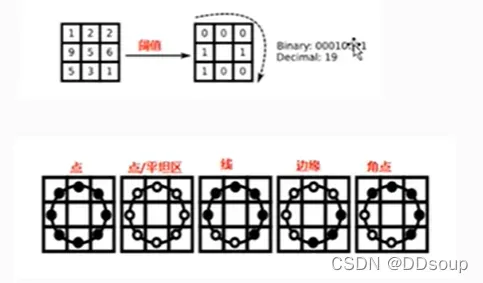
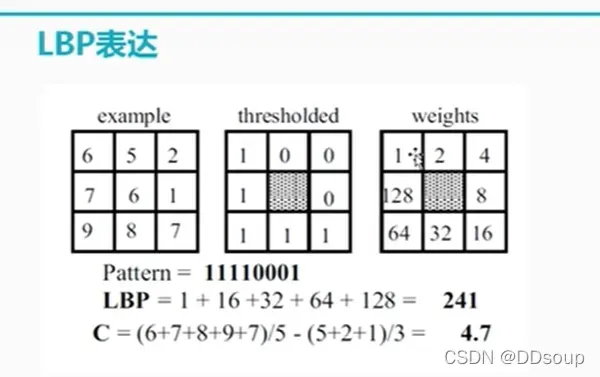
原始的LBP算子定义为在3 ∗ 3 的窗口内,以窗口中心像素为阈值,将相邻的8个像素的灰度值与其进行比较,若周围像素值大于等于中心像素值,则该点的位置被标记为1,否则为0。这样3 ∗ 3邻域内的8个点经比较可产生8位二进制数(通常转换为十进制数即LBP码,共256种),即得到该窗口中心像素点的LBP值,并用这个值来反映该区域的纹理信息。需要注意的是,LBP值是按照顺时针方向组成的二进制数。


上面的 C 是对比度(contrast). weights 就是阈值表示成十进制显示出来的。
LBP特征的圆形化改进
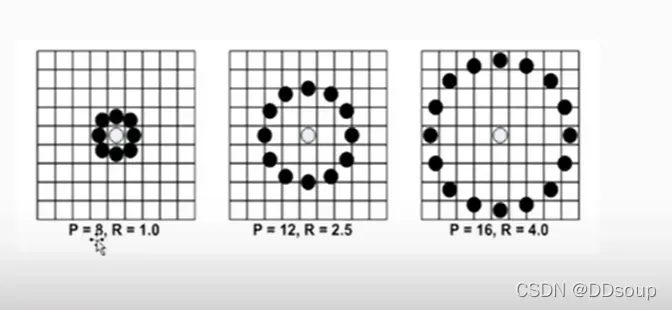
基本的 LBP算子的最大缺陷在于它只覆盖了一个固定半径范围内的小区域,这显然不能满足不同尺寸和频率纹理的需要。为了适应不同尺度的纹理特征,并达到灰度和旋转不变性的要求,Ojala等对 LBP 算子进行了改进,将 3×3邻域扩展到任意邻域,并用圆形邻域代替了正方形邻域,改进后的 LBP 算子允许在半径为 R 的圆形邻域内有任意多个像素点。从而得到了诸如半径为R的圆形区域内含有P个采样点的LBP算子,称为Extended LBP,也叫Circular LBP.

LBP旋转不变模式
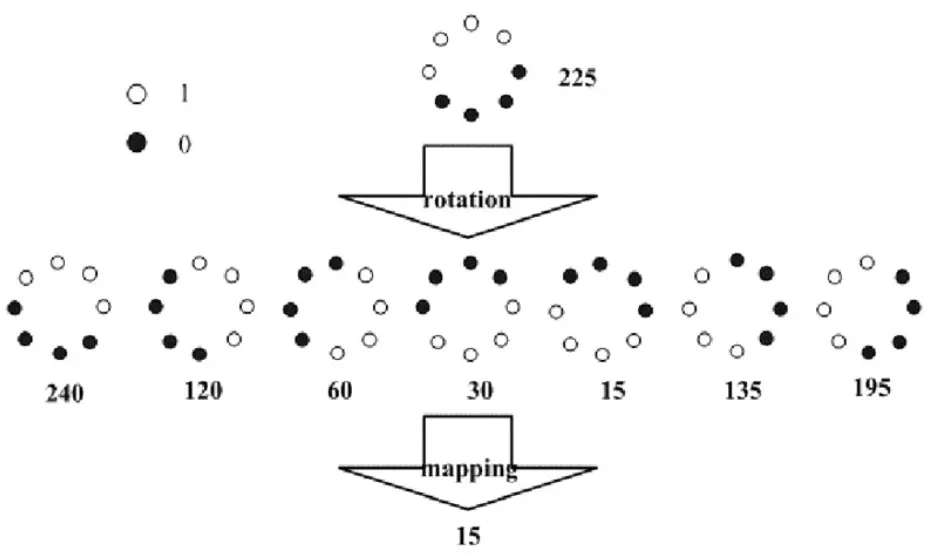
下图中的8种 LBP 模式,对应的旋转不变的 LBP模式都是00001111,即 LBP值为 15:

最为完整的LBP模式是 均匀+旋转不变模式,均匀模式就是限制一个二进制序列从0到1或从1到0的跳变次数不超过2次.
LBP特征用于检测的原理
上述提取的LBP算子在每个像素点都可以得到一个LBP“编码”,那么,对一幅图像(记录的是每个像素点的灰度值)提取其原始的LBP算子之后,得到的原始LBP特征依然是“一幅图片”(记录的是每个像素点的LBP值)。
LBP的应用中,如纹理分类、人脸分析等,一般都不将LBP图谱作为特征向量用于分类识别,而是采用LBP特征谱的统计直方图作为特征向量用于分类识别。
代码
#include<opencv2/opencv.hpp>
#include<iostream>
#include<math.h>
using namespace cv;
using namespace std;
int current_radius = 3;
int max_count = 20;
void Expand_LBP_demo(int, void*);
Mat src, gray_src;
int main(int argc, char** argv)
src = imread("rui.jpg");
if (!src.data)
cout << "图片未找到" << endl;
return -1;
namedWindow("input title", WINDOW_AUTOSIZE);
imshow("input title", src);
cvtColor(src, gray_src, COLOR_BGR2GRAY);
int width = src.cols - 2;
int hight = src.rows - 2;
//基本LBP演示
Mat lbpImg = Mat::zeros(hight, width, CV_8UC1);
for (int row = 1; row < src.rows - 1; row++)
for (int col = 1; col < src.cols - 1; col++)
uchar c = gray_src.at<uchar>(row, col);
uchar code = 0;
code |= (gray_src.at<uchar>(row - 1, col - 1) > c) << 7;
code |= (gray_src.at<uchar>(row - 1, col) > c) << 6;
code |= (gray_src.at<uchar>(row - 1, col + 1) > c) << 5;
code |= (gray_src.at<uchar>(row, col + 1) > c) << 4;
code |= (gray_src.at<uchar>(row + 1, col + 1) > c) << 3;
code |= (gray_src.at<uchar>(row + 1, col) > c) << 2;
code |= (gray_src.at<uchar>(row + 1, col - 1) > c) << 1;
code |= (gray_src.at<uchar>(row, col) > c) << 0;
lbpImg.at<uchar>(row - 1, col - 1) = code;
imshow("LBP", lbpImg);
namedWindow("Expand LBP", WINDOW_AUTOSIZE);
createTrackbar("current_radius", "Expand LBP", ¤t_radius, max_count, Expand_LBP_demo);
Expand_LBP_demo(0, 0);
waitKey(0);
return 0;
//扩展LBP demo
void Expand_LBP_demo(int, void*)
int offset = current_radius * 2;
Mat elbpImg = Mat::zeros(gray_src.rows - offset, gray_src.cols - offset, CV_8UC1);
int numNeighbor = 8;
for (int n = 0; n < numNeighbor; n++)
float x = current_radius * cos((2 * CV_PI * n) / numNeighbor);
float y = current_radius * (-sin((2 * CV_PI * n) / numNeighbor));
int fx = static_cast<int>(floor(x)); //向下取整,它返回的是小于或等于函数参数,并且与之最接近的整数
int fy = static_cast<int>(floor(y));
int cx = static_cast<int>(ceil(x)); //向上取整,它返回的是大于或等于函数参数,并且与之最接近的整数
int cy = static_cast<int>(ceil(y));
float ty = y - fy;
float tx = x = fx;
float w1 = (1 - tx) * (1 - ty);
float w2 = (tx) * (1 - ty);
float w3 = (1 - tx) * (ty);
float w4 = (tx) * (ty);
for (int row = current_radius; row < (gray_src.rows - current_radius); row++)
for (int col = current_radius; col < (gray_src.cols - current_radius); col++)
float t = w1 * gray_src.at<uchar>(row + fy, col + fx) + w2 * gray_src.at<uchar>(row + fy, col + cx) +
w3 * gray_src.at<uchar>(row + cy, col + fx) + w4 * gray_src.at<uchar>(row + cy, col + cx);
elbpImg.at<uchar>(row - current_radius, col - current_radius) +=
((t > gray_src.at<uchar>(row, col)) && (abs(t - gray_src.at<uchar>(row, col)) > std::numeric_limits<float>::epsilon())) << n;
imshow("Expand LBP", elbpImg);
【论文笔记】【ViT】 An Image is Worth 16×16 Words: Transformers for Image Recognition at Scale
2023年2月26日
什么是GAN网络?
2023年2月28日
【目标检测】YOLOv5针对小目标检测的改进模型/添加帧率检测
2023年3月5日
计算机视觉框架OpenMMLab开源学习(六):语义分割基础
2023年3月1日
机器学习——猫狗识别(入门案例)
2022年3月16日
数字图像处理 第二章 数字图像基础
2022年5月11日
基于Python的车牌识别系统的实现
2023年5月30日
FER2013人脸表情识别从零实现(Pytorch,FNN,CNN)
2023年6月4日
【经验分享】vs2019 pcl 点云处理开发环境搭建教程
2022年2月28日
【YOLOv5】LabVIEW+OpenVINO让你的YOLOv5在CPU上飞起来
2023年2月23日
【第68篇】多目标跟踪:文献综述
2023年2月23日
清华大学提出基于生成对抗神经网络的自然图像多风格卡通化方法并开源代码…
2022年1月17日


