Collectives™ on Stack Overflow
Find centralized, trusted content and collaborate around the technologies you use most.
Learn more about Collectives
Teams
Q&A for work
Connect and share knowledge within a single location that is structured and easy to search.
Learn more about Teams
I have an RGB image. I want to convert it to numpy array. I did the following
im = cv.LoadImage("abc.tiff")
a = numpy.asarray(im)
It creates an array with no shape. I assume it is a iplimage object.
–
You can use newer OpenCV python interface (if I'm not mistaken it is available since OpenCV 2.2). It natively uses numpy arrays:
import cv2
im = cv2.imread("abc.tiff",mode='RGB')
print(type(im))
result:
<type 'numpy.ndarray'>
–
PIL (Python Imaging Library) and Numpy work well together.
I use the following functions.
from PIL import Image
import numpy as np
def load_image( infilename ) :
img = Image.open( infilename )
img.load()
data = np.asarray( img, dtype="int32" )
return data
def save_image( npdata, outfilename ) :
img = Image.fromarray( np.asarray( np.clip(npdata,0,255), dtype="uint8"), "L" )
img.save( outfilename )
The 'Image.fromarray' is a little ugly because I clip incoming data to [0,255], convert to bytes, then create a grayscale image. I mostly work in gray.
An RGB image would be something like:
out_img = Image.fromarray( ycc_uint8, "RGB" )
out_img.save( "ycc.tif" )
–
–
–
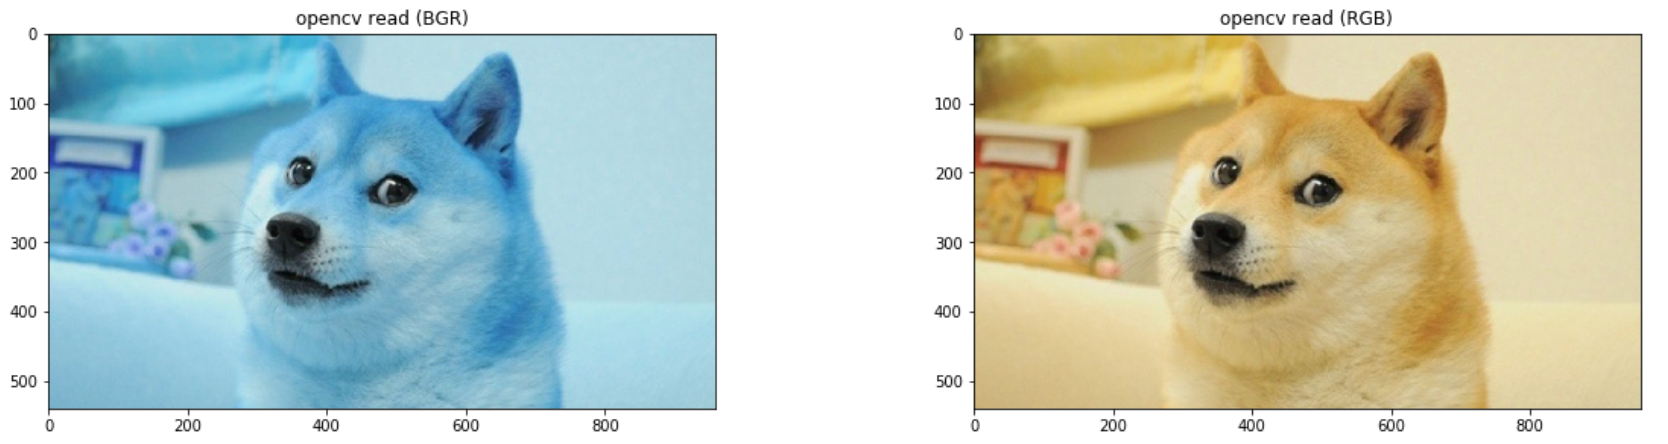
As of today, your best bet is to use:
img = cv2.imread(image_path) # reads an image in the BGR format
img = cv2.cvtColor(img, cv2.COLOR_BGR2RGB) # BGR -> RGB
You'll see img will be a numpy array of type:
<class 'numpy.ndarray'>
–
–
–
Late answer, but I've come to prefer the imageio module to the other alternatives
import imageio
im = imageio.imread('abc.tiff')
Similar to cv2.imread(), it produces a numpy array by default, but in RGB form.
–
–
You can get numpy array of rgb image easily by using numpy and Image from PIL
import numpy as np
from PIL import Image
import matplotlib.pyplot as plt
im = Image.open('*image_name*') #These two lines
im_arr = np.array(im) #are all you need
plt.imshow(im_arr) #Just to verify that image array has been constructed properly
When using the answer from David Poole I get a SystemError with gray scale PNGs and maybe other files. My solution is:
import numpy as np
from PIL import Image
img = Image.open( filename )
data = np.asarray( img, dtype='uint8' )
except SystemError:
data = np.asarray( img.getdata(), dtype='uint8' )
Actually img.getdata() would work for all files, but it's slower, so I use it only when the other method fails.
from keras.preprocessing import image
X_test=image.load_img('four.png',target_size=(28,28),color_mode="grayscale"); #loading image and then convert it into grayscale and with it's target size
X_test=image.img_to_array(X_test); #convert image into array
OpenCV image format supports the numpy array interface. A helper function can be made to support either grayscale or color images. This means the BGR -> RGB conversion can be conveniently done with a numpy slice, not a full copy of image data.
Note: this is a stride trick, so modifying the output array will also change the OpenCV image data. If you want a copy, use .copy() method on the array!
import numpy as np
def img_as_array(im):
"""OpenCV's native format to a numpy array view"""
w, h, n = im.width, im.height, im.channels
modes = {1: "L", 3: "RGB", 4: "RGBA"}
if n not in modes:
raise Exception('unsupported number of channels: {0}'.format(n))
out = np.asarray(im)
if n != 1:
out = out[:, :, ::-1] # BGR -> RGB conversion
return out
I also adopted imageio, but I found the following machinery useful for pre- and post-processing:
import imageio
import numpy as np
def imload(*a, **k):
i = imageio.imread(*a, **k)
i = i.transpose((1, 0, 2)) # x and y are mixed up for some reason...
i = np.flip(i, 1) # make coordinate system right-handed!!!!!!
return i/255
def imsave(i, url, *a, **k):
# Original order of arguments was counterintuitive. It should
# read verbally "Save the image to the URL" — not "Save to the
# URL the image."
i = np.flip(i, 1)
i = i.transpose((1, 0, 2))
i *= 255
i = i.round()
i = np.maximum(i, 0)
i = np.minimum(i, 255)
i = np.asarray(i, dtype=np.uint8)
imageio.imwrite(url, i, *a, **k)
The rationale is that I am using numpy for image processing, not just image displaying. For this purpose, uint8s are awkward, so I convert to floating point values ranging from 0 to 1.
When saving images, I noticed I had to cut the out-of-range values myself, or else I ended up with a really gray output. (The gray output was the result of imageio compressing the full range, which was outside of [0, 256), to values that were inside the range.)
There were a couple other oddities, too, which I mentioned in the comments.
from keras.preprocessing import image
img = image.load_img('path_to_image', target_size=(300, 300))
x = image.img_to_array(img)
x = np.expand_dims(x, axis=0)
images = np.vstack([x])
Try timing the options to load an image to numpy array, they are quite similar. Go for plt.imread for simplicity and speed.
def time_this(function, times=100):
cum_time = 0
for t in range(times):
st = time.time()
function()
cum_time += time.time() - st
return cum_time / times
import matplotlib.pyplot as plt
def load_img_matplotlib(img_path):
return plt.imread(img_path)
import cv2
def load_img_cv2(img_path):
return cv2.cvtColor(cv2.imread(img_path), cv2.COLOR_BGR2RGB)
from PIL import Image
import numpy as np
def load_img_pil(img_path):
img = Image.open(img_path)
img.load()
return np.asarray( img, dtype="int32" )
if __name__=='__main__':
img_path = 'your_image_path'
for load_fn in [load_img_pil, load_img_cv2, load_img_matplotlib]:
print('-'*20)
print(time_this(lambda: load_fn(img_path)), 10000)
Result:
--------------------
0.0065201687812805175 10000 PIL, as in [the second answer][1]https://stackoverflow.com/a/7769424/16083419)
--------------------
0.0053211402893066405 10000 CV2
--------------------
0.005320906639099121 10000 matplotlib
You can try the following method. Here is a link to the docs.
tf.keras.preprocessing.image.img_to_array(img, data_format=None, dtype=None)
from PIL import Image
img_data = np.random.random(size=(100, 100, 3))
img = tf.keras.preprocessing.image.array_to_img(img_data)
array = tf.keras.preprocessing.image.img_to_array(img)
Thanks for contributing an answer to Stack Overflow!
- Please be sure to answer the question. Provide details and share your research!
But avoid …
- Asking for help, clarification, or responding to other answers.
- Making statements based on opinion; back them up with references or personal experience.
To learn more, see our tips on writing great answers.

