


kubernetes源码阅读 kubelet对cni的实现
这是一篇关于CNI项目和kubelet实现CNI插件的源码分析的文章。这篇文章在春节前就已经写好大部分,春节两周多的时间,一笔没写,为啥上学时候曾经大年初二参加英语考试的自己,春节却再没Good Good Study,Day Day Up。明年春节再见,好怀念春节的日子。~(文章有不足和错误的地方,望指出)
CNI项目
CNI是CNCF的项目,它定义了容器网络接口和库文件,并且包括一些支持的容器网络插件;代码分别在:
https:// github.com/containernet working/cni
https:// github.com/containernet working/plugins
使用CNI插件创建Docker容器
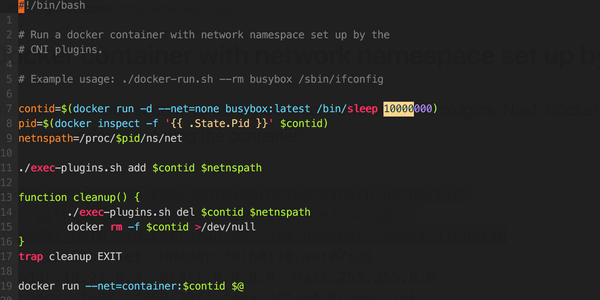
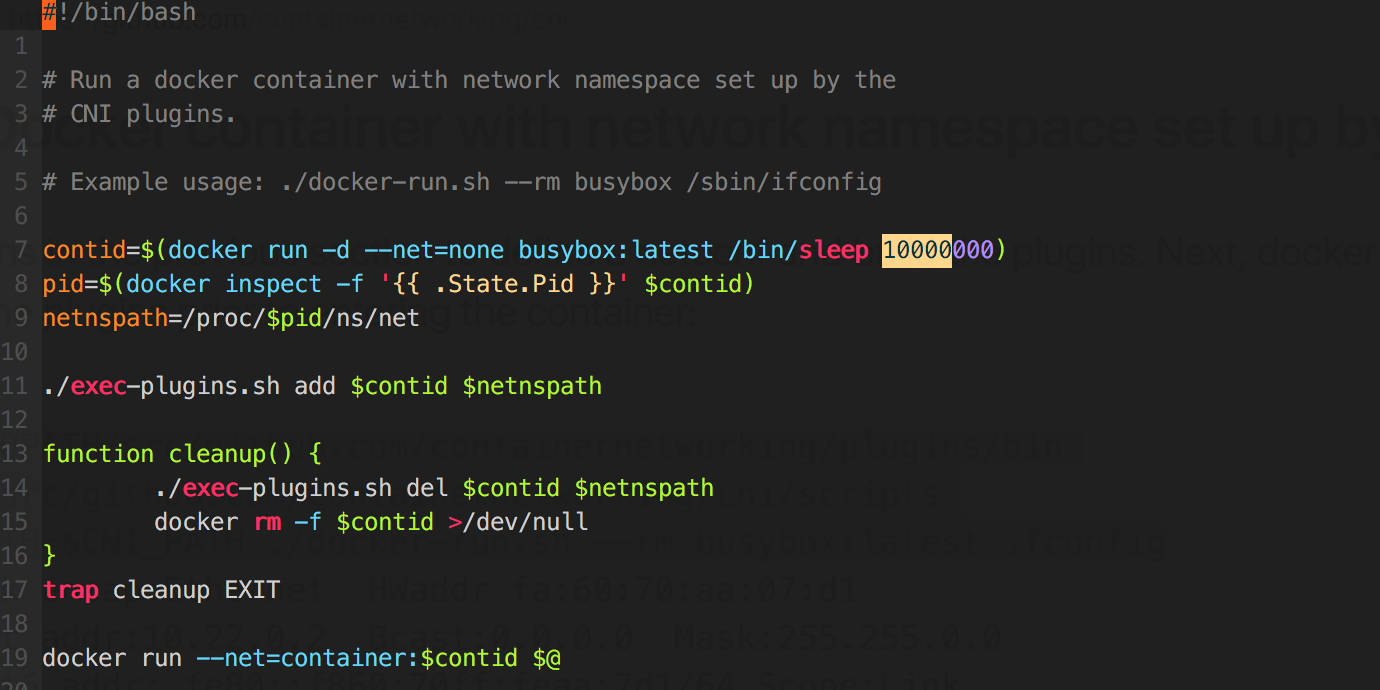
在CNI项目的README中,有如何使用CNI插件创建Docker容器的例子:
创建/etc/cni/net.d下创建networkconfig文件
$ mkdir -p /etc/cni/net.d
$ cat >/etc/cni/net.d/10-mynet.conf <<EOF
	"cniVersion": "0.2.0",
	"name": "mynet",
	"type": "bridge",
	"bridge": "cni0",
	"isGateway": true,
	"ipMasq": true,
	"ipam": {
		"type": "host-local",
		"subnet": "10.22.0.0/16",
		"routes": [
			{ "dst": "0.0.0.0/0" }
$ cat >/etc/cni/net.d/99-loopback.conf <<EOF
	"cniVersion": "0.2.0",
	"type": "loopback"
networkconfig配置信息,最主要包括type和IPAM;如上以bridge的CNI插件为例;
编译CNI插件二进制可执行文件
$ cd $GOPATH/src/github.com/containernetworking/plugins
$ ./build.sh
Building plugins
  flannel
  portmap
  tuning
  bridge
  host-device
  ipvlan
  loopback
  macvlan
  host-local
  sample
创建netns、bridge及veth
$ CNI_PATH=$GOPATH/src/github.com/containernetworking/plugins/bin
$ cd $GOPATH/src/github.com/containernetworking/cni/scripts
$ sudo CNI_PATH=$CNI_PATH ./priv-net-run.sh ifconfig
使用CNI插件创建Docker容器
CNI插件(type:bridge)负责将veth对的一端网络接口插入容器网络命名空间,将veth的另一端连接到网桥;然后,将IP分配给接口,并通过调用适当的IPAM插件来设置与“IP地址管理”一致的路由;
CNI接口
CNI接口定义在:containernetworking/cni/libcni/api.go,CNI接口包括如下几个方法:


同时,在cni/libcni/api.go中,除了CNI接口定义,还定义了如下数据结构:CNIConfig、NetworkConfig、NetworkConfigList、RuntimeConf;
- CNIConfig::主要数据成员是plugin的路径,并实现了CNI接口;
- NetworkConfig和NetworkConfigList:包括在/etc/cni/net.d下面的配置;
-
RuntimeConf:定义了runtimeConf配置;包括:&libcni.RuntimeConf{
ContainerID: podSandboxID.ID,
NetNS: podNetnsPath,
IfName: network.DefaultInterfaceName,
Args: [][2]string{
{"IgnoreUnknown", "1"},
{"K8S_POD_NAMESPACE", podNs},
{"K8S_POD_NAME", podName},
{"K8S_POD_INFRA_CONTAINER_ID", podSandboxID.ID},
},
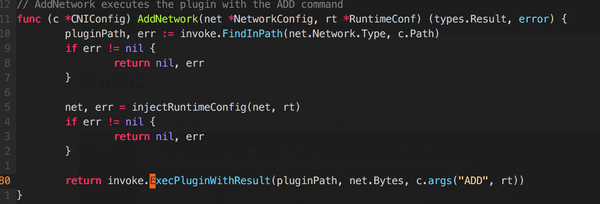
对于CNI接口,以AddNetwork()为例:先从pluginPath获得plugin的binary,然后injectRuntimeConfig()将网络配置注入到networkconfig中,并作为最后plugin执行的输入,然后还会将network的操作(ADD或者DEL)以及RuntimeConf,作为plugin执行时的变量;

Kubelet对CNI的实现
kubelet对CNI的实现的主要代码在:pkg/kubelet/network/cni/cni.go SetUpPod/TearDownPod(创建Pod和销毁Pod)
本篇是基于kubernetes v1.9.1
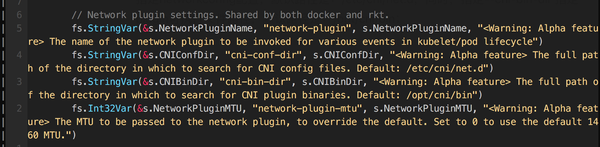
CNI插件是可执行文件,会被kubelet调用。启动kubelet时,指定--network-plugin=cni,同时--cni-conf-dir 指定networkconfig配置,默认路径是:/etc/cni/net.d,并且,--cni-bin-dir 指定plugin可执行文件路径,默认路径是:/opt/cni/bin;
如下是我的实验环境,本地启动了k8s集群,指定了--cni-conf-dir=/etc/cni/net.d --cni-bin-dir=/opt/cni/bin --network-plugin=cni:
/workspace/repo/src/k8s.io/kubernetes/_output/bin/hyperkube kubelet --v=3 --vmodule= --chaos-chance=0.0 --container-runtime=docker --rkt-path= --rkt-stage1-image= --hostname-override=127.0.0.1 --cloud-provider= --cloud-config= --address=127.0.0.1 --kubeconfig /var/run/kubernetes/kubelet.kubeconfig --feature-gates=AllAlpha=false --cpu-cfs-quota=true --enable-controller-attach-detach=true --cgroups-per-qos=true --cgroup-driver=cgroupfs --keep-terminated-pod-volumes=true --eviction-hard=memory.available<100Mi,nodefs.available<10%,nodefs.inodesFree<5% --eviction-soft= --eviction-pressure-transition-period=1m --pod-manifest-path=/var/run/kubernetes/static-pods --fail-swap-on=false --cluster-dns=10.0.0.10 --cluster-domain=cluster.local --cni-conf-dir=/etc/cni/net.d --cni-bin-dir=/opt/cni/bin --network-plugin=cni --port=10250
阅读源代码,发现networkplugin除了上面三个参数,还有network-plugin-mtu参数:

Kubelet入口程序:cmd/kubelet/kubelet.go main
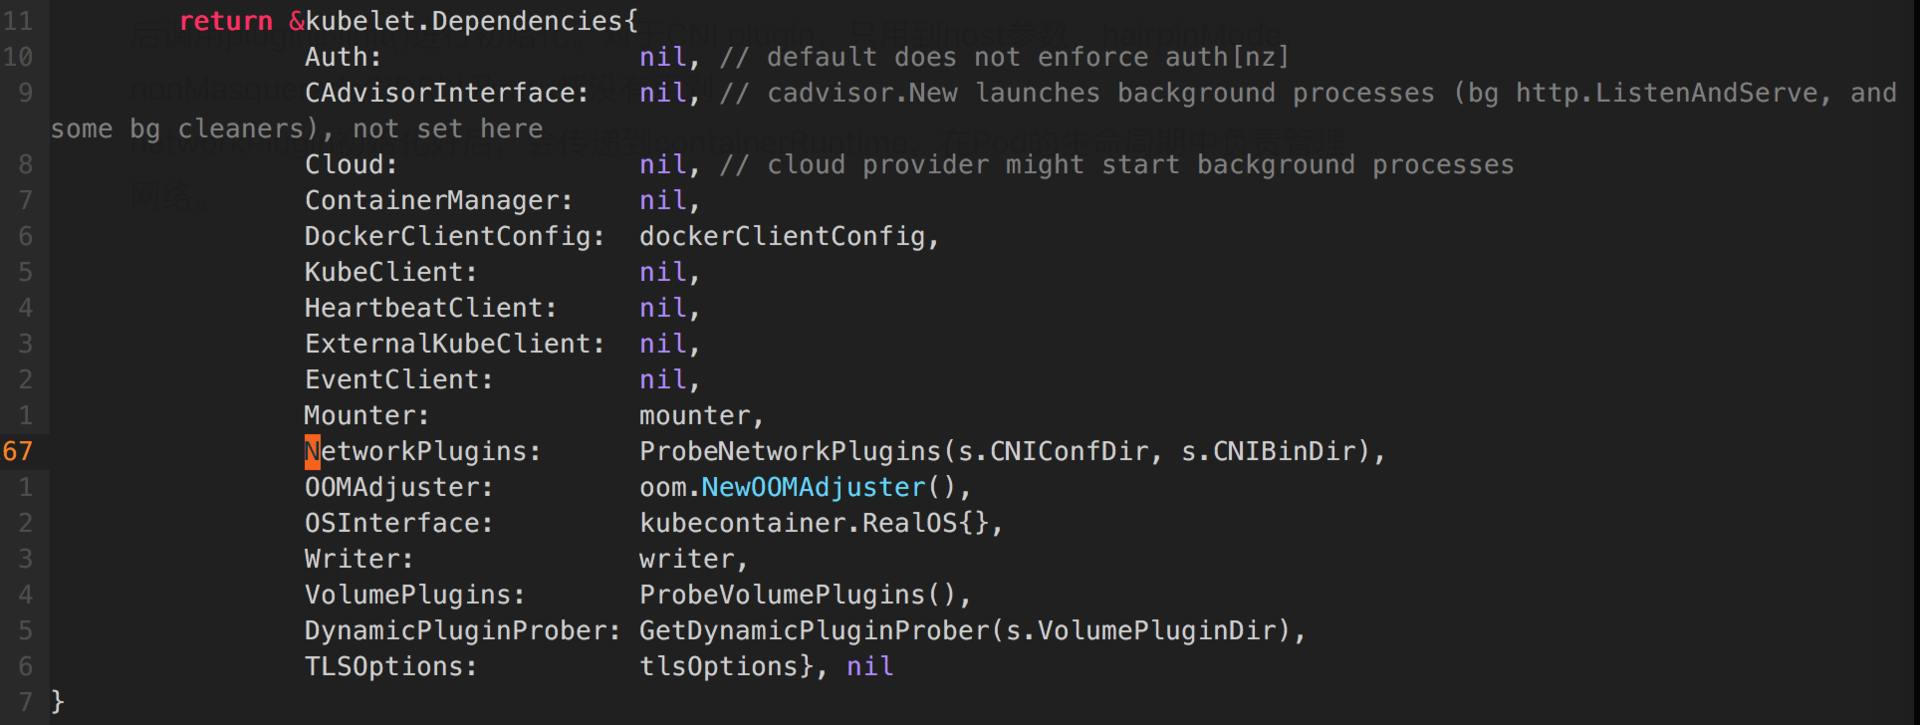
- kubeDeps的构建方法:cmd/kubelet/app/server.go UnsecuredDependencies方法;
- 通过构建kubeDeps对象获得NetworkPlugins信息;kubeDeps对象的数据结构NetworkPlugins是调用方法ProbeNetworkPlugins收集所有Network Plugin;

kubelet启动,cmd/kubelet/app/server.go app.run
- kubelet启动时,调用过程如下:
- ->RunKubelet (cmd/kubelet/app/server.go)
- ->CreateAndInitKubelet(cmd/kubelet/app/server.go)
- ->kubelet.NewMainKubelet(pkg/kubelet/kubelet.go)
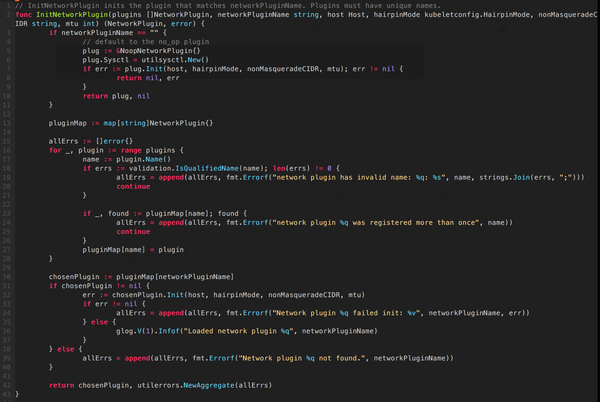
- ->network.InitNetworkPlugin(pkg/kubelet/network/plugins.go)
InitNetworkPlugin时,会根据NetworkPluginName来选择需要的Network Plugin,然后调用plugin的Init进行初始化。

networkPlugin初始化好后,会传递到containerRuntime,在Pod的生命周期中负责管理网络。
使用networkPlugin创建Pod
前提kubernetes本地集群已经启动,通过如下deployment.yaml部署nginx应用:
[root@localhost ~]# cat ~/deployment.yaml
apiVersion: apps/v1 # for versions before 1.9.0 use apps/v1beta2
kind: Deployment
metadata:
  name: nginx-deployment
spec:
  selector:
    matchLabels:
      app: nginx
  replicas: 1 # tells deployment to run 2 pods matching the template
  template: # create pods using pod definition in this template
    metadata:
      # unlike pod-nginx.yaml, the name is not included in the meta data as a unique name is
      # generated from the deployment name
      labels:
        app: nginx
    spec:
      containers:
      - name: nginx
        image: nginx
        ports:
        - containerPort: 80
[root@localhost ~]# k get pods
NAME READY STATUS RESTARTS AGE
nginx-deployment-679dc9c764-2h67x 1/1 Running 0 16m
查看容器网络
通过Docker inspect查看pause容器和Pod中其他容器的信息,我们看不到更多的Networksetting,只能看出Pod中其他容器的NetworkMode,以此判断创建容器时使用了cni插件;
[root@localhost ~]# docker ps -a
CONTAINER ID    IMAGE                         COMMAND         CREATED      STATUS            PORTS       NAMES
8db26b11a64a    nginx                         "nginx -g 'daemon ..." 17 minutes ago   Up 17 minutes                  k8s_nginx_nginx-deployment-679dc9c764-2h67x_default_a561733a-1c21-11e8-96cb-000c29c95f76_0
4d55898503d2    gcr.io/google_containers/pause-amd64:3.0       "/pause"        18 minutes ago   Up 18 minutes
[root@localhost ~]# docker inspect 4d55898503d2
  "NetworkSettings": {
            "Bridge": "",
            "SandboxID": "d3d24b40547962ebbb78b38e28bc76d843f64e10aeb316add94df408be6c73ed",
            "HairpinMode": false,
            "LinkLocalIPv6Address": "",
            "LinkLocalIPv6PrefixLen": 0,
            "Ports": {},
            "SandboxKey": "/var/run/docker/netns/d3d24b405479",
            "SecondaryIPAddresses": null,
            "SecondaryIPv6Addresses": null,
            "EndpointID": "",
            "Gateway": "",
            "GlobalIPv6Address": "",
            "GlobalIPv6PrefixLen": 0,
            "IPAddress": "",
            "IPPrefixLen": 0,
            "IPv6Gateway": "",
            "MacAddress": "",
            "Networks": {
                "none": {
                    "IPAMConfig": null,
                    "Links": null,
                    "Aliases": null,
                    "NetworkID": "55d25f24530b9dfad07f784bb02acc97ff3f72e97c2e10732fcf0a53fbc1a9d8",
                    "EndpointID": "fb3aa3131375a269d09aed10befa5d76b618d946c7cf0797afc11702e724cfbc",
                    "Gateway": "",
                    "IPAddress": "",
                    "IPPrefixLen": 0,
                    "IPv6Gateway": "",
                    "GlobalIPv6Address": "",
                    "GlobalIPv6PrefixLen": 0,
                    "MacAddress": "",
                    "DriverOpts": null
[root@localhost ~]# docker inspect 8db26b11a64a
 "NetworkMode": "container:4d55898503d270066adf4b52b4476163adeefc3f8d6093933e708e0e470de96e",
查看Pod信息
在/etc/cni/net.d下创建networkconfig文件,Pod的IP是 10.22.0.15在期待的IP段内10.22.0.0/16;
[root@localhost ~]# cat /etc/cni/net.d/10-mynet.conf
	"cniVersion": "0.2.0",
	"name": "mynet",
	"type": "bridge",
	"bridge": "cni0",
	"isGateway": true,
	"ipMasq": true,
	"ipam": {
		"type": "host-local",
		"subnet": "10.22.0.0/16",
		"routes": [
			{ "dst": "0.0.0.0/0" }
[root@localhost ~]# k get pods
NAME READY STATUS RESTARTS AGE
nginx-deployment-679dc9c764-2h67x 1/1 Running 0 24m
[root@localhost ~]# k describe pods nginx-deployment-679dc9c764-2h67x
Name:           nginx-deployment-679dc9c764-2h67x
Namespace:      default
Node:           127.0.0.1/127.0.0.1
Start Time:     Tue, 27 Feb 2018 16:52:26 -0800
Labels:         app=nginx