umi 在 react 中的应用
1、简介
UmiJS
读音:(乌米)
UmiJS
是插件化的企业级前端应用框架。官网地址是:
https://
umijs.org
特点:
-
插件化
umi的整个生命周期都是插件化的,甚至其内部实现就是由大量插件组成,比如:pwa、按需加载、一键切换preact、一键兼容 ie9 等等,都是由插件实现。 - 可扩展 ,Umi 实现了完整的生命周期,并使其插件化,Umi 内部功能也全由插件完成。此外还支持插件和插件集,以满足功能和垂直域的分层需求。
- 开箱即用 ,Umi 内置了路由、构建、部署、测试等,仅需一个依赖即可上手开发。并且还提供针对 React 的集成插件集,内涵丰富的功能,可满足日常 80% 的开发需求。
-
约定式路由
类似
next.js的约定式路由,无需再维护一份冗余的路由配置,支持权限、动态路由、嵌套路由等等。
umi的使用条件:
不支持IE8或更低的版本的浏览器
React16.8以下的react不支持
node版本必须在10以上
自定义webpack和自定义路由
2、安装
安装 nodejs
要使用
UmijS
首先要安装
nodejs
环境,在Mac下安装
nodejs
:
brew install nodejs安装 yarn
可以把
yarn
看做了优化了的
npm
,用npm安装yarn。
npm install yarn创建umi项目
yarn create @umijs/umi-app3、目录结构
一个基础的 Umi 项目大致是这样的,
.
├── package.json
├── .umirc.ts
├── .env
├── dist
├── mock
├── public
└── src
    ├── .umi
    ├── layouts/index.tsx
    ├── pages
        ├── index.less
        └── index.tsx
    └── app.ts
根目录
package.json
包含插件和插件集,以
@umijs/preset-
、
@umijs/plugin-
、
umi-preset-
和
umi-plugin-
开头的依赖会被自动注册为插件或插件集。
.umirc.ts
配置文件,包含 umi 内置功能和插件的配置,是否使用约定式路由、layout等。
.env
环境变量。
比如:
PORT=8888
COMPRESS=none
dist 目录
执行
umi build
后,产物默认会存放在这里。
mock 目录
存储 mock 文件,此目录下所有 js 和 ts 文件会被解析为 mock 文件。
public 目录
此目录下所有文件会被 copy 到输出路径。
/src
目录
.umi 目录
临时文件目录,比如入口文件、路由等,都会被临时生成到这里。 不要提交 .umi 目录到 git 仓库,他们会在 umi dev 和 umi build 时被删除并重新生成。
layouts/index.tsx
约定式路由时的全局布局文件。
pages 目录
所有路由组件存放在这里。
app.ts
运行时配置文件,可以在这里扩展运行时的能力,比如修改路由、修改 render 方法等。
4、运行项目
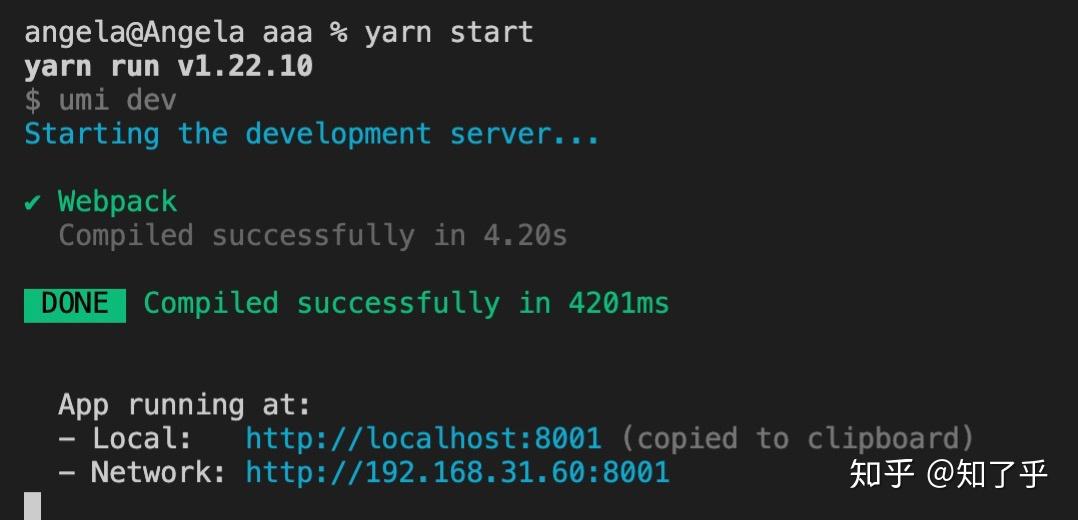
yarn start
访问: http://localhost:8001 (默认端口是8000)
5、分层开发
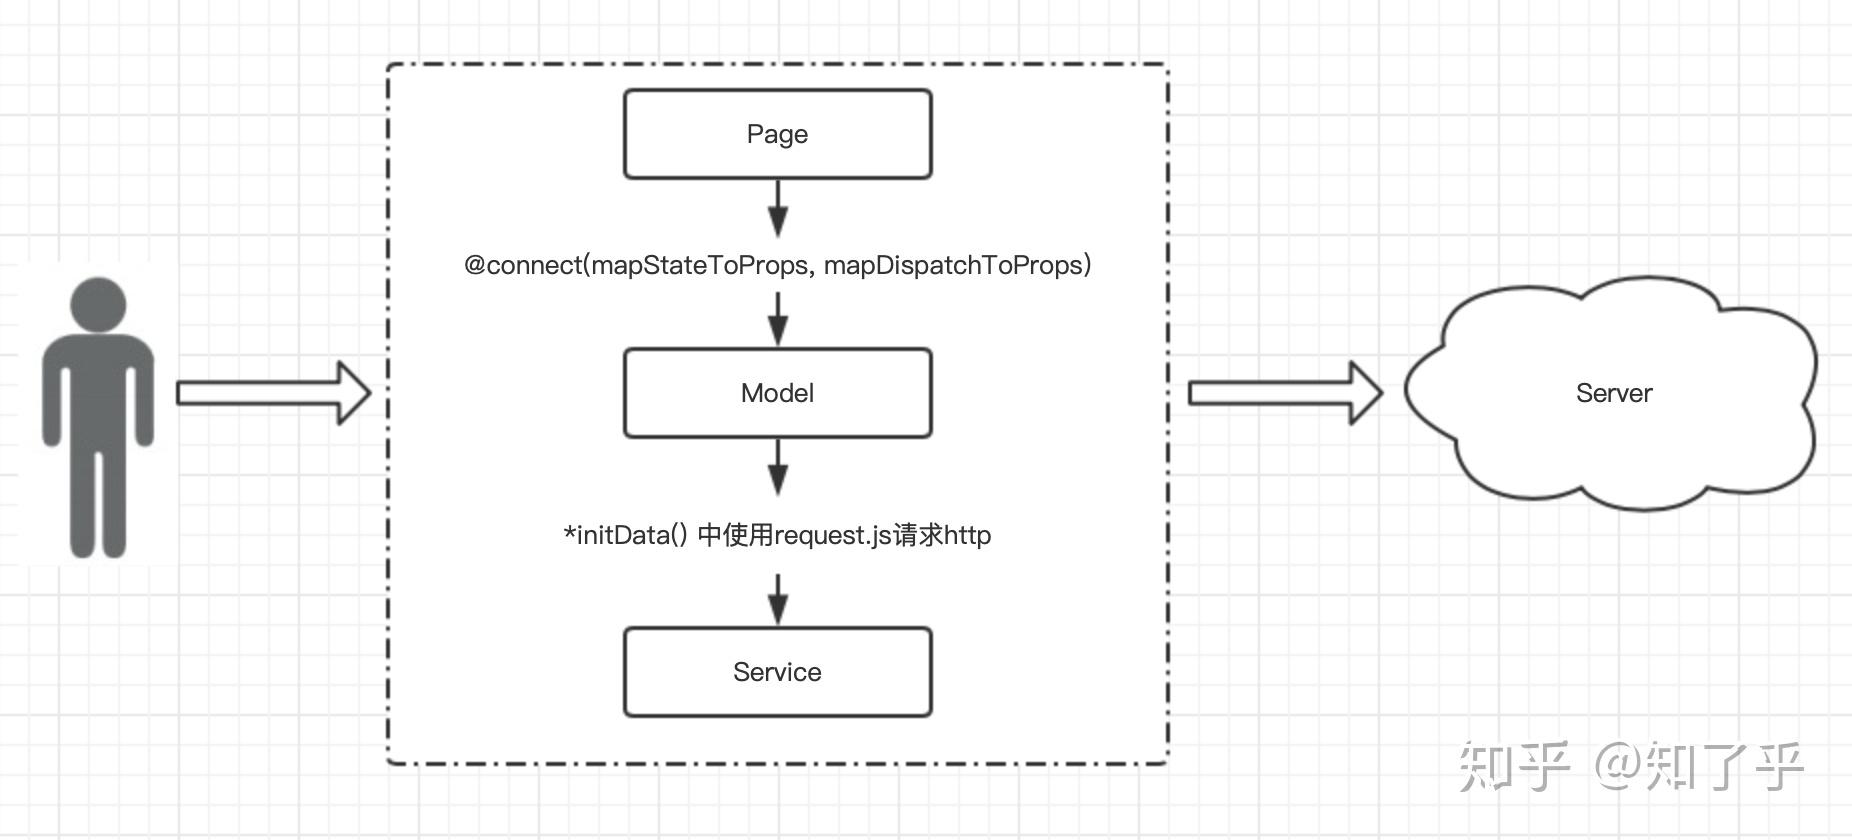
5.1、过程图示

说明:
上图中,左边是用户,中间为前端,右边为后端。我们对前端进行分层,可以分为
Page
、
Model
、
Service
3层。
-
Page负责与用户直接打交道:渲染页面、接受用户的操作输入,侧重于展示型交互 性逻辑。 -
Model负责处理业务逻辑,为 Page 做数据、状态的读写、变换、暂存等。 -
Service负责与 HTTP 接口对接,进行纯粹的数据读写。
其中
Page
层通过
UmiJS
的
umi-plugin-react
插件的
dva
功能,可以调用
Model
层定义的数据和方法;
Model
层通过
import
定义的异步请求函数
request.js
来调用
Service
层;而
Service
层就是去后端请求数据。
5.2、项目开发
5.2.1、添加依赖
添加
umi
的依赖
tyarn add umi --dev
添加
umi-plugin-react
插件
tyarn add umi-plugin-react --dev
添加
.gitignore
文件
node_modules
.umi
在
config/config.js
配置中引入
umi-plugin-react
插件
export default {
    plugins: [
        ['umi-plugin-react', {
            dva: true,
            antd: true
5.2.2、antd基本布局
添加基本布局和样式: 在
layouts
文件目录下创建
index.js
文件,在
index.js
中我们写入:
import { Component } from 'react';
import { Layout } from 'antd';
// Header, Footer, Sider, Content组件在Layout组件模块下
const { Header, Footer, Sider, Content } = Layout;
class BasicLayout extends Component {
  render() {
    return (
      <Layout>
        <Sider width={256} style={{ minHeight: '100vh', color: 'white' }}>
          Sider
        </Sider>
        <Layout >
          <Header style={{ background: '#fff', textAlign: 'center', padding: 0 }}>Header</Header>
          <Content style={{ margin: '24px 16px 0' }}>
            <div style={{ padding: 24, background: '#fff', minHeight: 360 }}>
              {this.props.children}
          </Content>
          <Footer style={{ textAlign: 'center' }}>Ant Design ©2018 Created by Ant UED</Footer>
        </Layout>
    </Layout>
export default BasicLayout;
上面代码中,我们创建了一个三部分的基本布局:Header 、Content 、Footer。然后我们将 Content 替换成 { this.props.children },这样之后我们设置的路由会通过替换 children 变量实现内容的切换。
5.2.3、Service异步请求数据
在 src 目录下创建 utils 目录, 创建 request.js 文件
function checkStatus(response) {
    if (response.status >= 200 && response.status < 300) {
        return response;
    const error = new Error(response.statusText);
    error.response = response;
    throw error;
export default async function request(url, options) {
    const response = await fetch(url, options);
    checkStatus(response);
    return await response.json();
5.2.4、Mock 数据
Mock 数据是前端开发过程中必不可少的一环,是分离前后端开发的关键链路。通过预先跟服务器端约定好的接口,模拟请求数据甚至逻辑,能够让前端开发独立自主,不会被服务端的开发所阻塞。
约定式mock文件
Umi 约定
/mock
文件夹下所有文件为 mock 文件。
比如:
.
├── mock
    ├── api.ts
    └── users.ts
└── src
    └── pages
        └── index.tsx
/mock
下的
api.ts
和
users.ts
会被解析为 mock 文件。
编写 Mock 文件
如果
/mock/api.ts
的内容如下,
export default {
  // 支持值为 Object 和 Array
  'GET /api/users': { users: [1, 2] },
  // GET 可忽略
  '/api/users/1': { id: 1 },
  // 支持自定义函数,API 参考 express@4
  'POST /api/users/create': (req, res) => {
    // 添加跨域请求头
    res.setHeader('Access-Control-Allow-Origin', '*');
    res.end('ok');
然后访问
/api/users
就能得到
{ users: [1,2] }
的响应,其他以此类推。
配置 Mock
详见 配置#mock 。
如何关闭 Mock?
可以通过配置关闭,
export default {
  mock: false,
也可以通过环境变量临时关闭,
$ MOCK=none umi dev引入 Mock.js
Mock.js 是常用的辅助生成模拟数据的三方库,借助他可以提升我们的 mock 数据能力。
比如:
import mockjs from 'mockjs';
export default {
  // 使用 mockjs 等三方库
  'GET /api/tags': mockjs.mock({
    'list|10': [{ name: '@city', 'value|1-10': 10, 'type|0-2': 1 }],
5.3、umi-plugin-react 插件升级
在运行
umi dev
或
umi build
运行或部署应用是,有时候会出现 “Path must be a string”错误。解决方法:
按照官网升级umi-plugin-react的版本。
- ①、 package.json文件
{
  "devDependencies": {
-   "umi-plugin-react": "^1"
+   "@umijs/preset-react": "^1"
}- ②、 config/config.js文件
export default {
- plugins: [
-   ['umi-plugin-react', {
-     dva: {},
-     antd: {},
-     ...
-   }]
+ dva: {},
+ antd: {},
+ ...
}
6、约定式路由
除配置式路由外,Umi 也支持约定式路由。约定式路由也叫文件路由,就是不需要手写配置,文件系统即路由,通过目录和文件及其命名分析出路由配置。
如果没有 routes 配置,Umi 会进入约定式路由模式
,然后分析
src/pages
目录拿到路由配置。
比如以下文件结构:
.
  └── pages
    ├── index.tsx
    └── users.tsx
会得到以下路由配置,
[
  { exact: true, path: '/', component: '@/pages/index' },
  { exact: true, path: '/users', component: '@/pages/users' },
需要注意的是,满足以下任意规则的文件不会被注册为路由,
-
以
.或_开头的文件或目录 -
以
d.ts结尾的类型定义文件 -
以
test.ts、spec.ts、e2e.ts结尾的测试文件(适用于.js、.jsx和.tsx文件) -
components和component目录 -
utils和util目录 -
不是
.js、.jsx、.ts或.tsx文件 - 文件内容不包含 JSX 元素
6.1、动态路由
约定
[]
包裹的文件或文件夹为动态路由。
比如:
-
src/pages/users/[id].tsx会成为/users/:id -
src/pages/users/[id]/settings.tsx会成为/users/:id/settings
举个完整的例子,比如以下文件结构,
.
  └── pages
    └── [post]
      ├── index.tsx
      └── comments.tsx
    └── users
      └── [id].tsx
    └── index.tsx
会生成路由配置,
[
  { exact: true, path: '/', component: '@/pages/index' },
  { exact: true, path: '/users/:id', component: '@/pages/users/[id]' },
  { exact: true, path: '/:post/', component: '@/pages/[post]/index' },
    exact: true,
    path: '/:post/comments',
    component: '@/pages/[post]/comments',
6.2、动态可选路由
约定
[ $]
包裹的文件或文件夹为动态可选路由。
比如:
-
src/pages/users/[id$].tsx会成为/users/:id? -
src/pages/users/[id$]/settings.tsx会成为/users/:id?/settings
举个完整的例子,比如以下文件结构,
.
  └── pages
    └── [post$]
      └── comments.tsx
    └── users
      └── [id$].tsx
    └── index.tsx
会生成路由配置,
[
  { exact: true, path: '/', component: '@/pages/index' },
  { exact: true, path: '/users/:id?', component: '@/pages/users/[id$]' },
    exact: true,
    path: '/:post?/comments',
    component: '@/pages/[post$]/comments',
6.3、嵌套路由
Umi 里约定目录下有
_layout.tsx
时会生成嵌套路由,以
_layout.tsx
为该目录的 layout。layout 文件需要返回一个 React 组件,并通过
props.children
渲染子组件。
比如以下目录结构,
.
└── pages
    └── users
        ├── _layout.tsx
        ├── index.tsx
        └── list.tsx
会生成路由,
[
  { exact: false, path: '/users', component: '@/pages/users/_layout',
    routes: [
      { exact: true, path: '/users', component: '@/pages/users/index' },
      { exact: true, path: '/users/list', component: '@/pages/users/list' },
6.4、全局 layout
约定
src/layouts/index.tsx
为全局路由。返回一个 React 组件,并通过
props.children
渲染子组件。
比如以下目录结构,
.
└── src
    ├── layouts
    │   └── index.tsx
    └── pages
        ├── index.tsx
        └── users.tsx
会生成路由,
[
  { exact: false, path: '/', component: '@/layouts/index',
    routes: [
      { exact: true, path: '/', component: '@/pages/index' },
      { exact: true, path: '/users', component: '@/pages/users' },
一个自定义的全局
layout
如下:
import { IRouteComponentProps } from 'umi'
export default function Layout({ children, location, route, history, match }: IRouteComponentProps) {
  return children
}
6.5、不同的全局 layout
你可能需要针对不同路由输出不同的全局 layout,Umi 不支持这样的配置,但你仍可以在
src/layouts/index.tsx
中对
location.path
做区分,渲染不同的 layout 。
比如想要针对
/login
输出简单布局,
export default function(props) {
  if (props.location.pathname === '/login') {
    return <SimpleLayout>{ props.children }</SimpleLayout>
  return (
      <Header />
      { props.children }
      <Footer />
6.6、404 路由
约定
src/pages/404.tsx
为 404 页面,需返回 React 组件。我用的版本是3.0.1,设置404.tsx页面并不生效,这可能是版本升级导致的问题,解决办法是将404.tsx置于src文件夹中最后一个文件,比如将404.tsx改名为z.tsx。
比如以下目录结构,
.
└── pages
    ├── 404.tsx
    ├── index.tsx
    └── users.tsx
会生成路由,
[
  { exact: true, path: '/', component: '@/pages/index' },
  { exact: true, path: '/users', component: '@/pages/users' },
  { component: '@/pages/404' },
这样,如果访问
/foo
,
/
和
/users
都不能匹配,会 fallback 到 404 路由,通过
src/pages/404.tsx
进行渲染。
6.7、权限路由
通过指定高阶组件
wrappers
达成效果。
如下,
src/pages/user
:
import React from 'react'
function User() {
  return <>user profile</>
User.wrappers = ['@/wrappers/auth']
export default User
然后在
src/wrappers/auth
中,
import { Redirect } from 'umi'
export default (props) => {
  const { isLogin } = useAuth();
  if (isLogin) {
    return <div>{ props.children }</div>;
  } else {
    return <Redirect to="/login" />;
}
这样,访问
/user
,就通过
useAuth
做权限校验,如果通过,渲染
src/pages/user
,否则跳转到
/login
,由
src/pages/login
进行渲染。
6.8、扩展路由属性
支持在代码层通过导出静态属性的方式扩展路由。
比如:
function HomePage() {
  return <h1>Home Page</h1>;
HomePage.title = 'Home Page';
export default HomePage;
其中的
title
会附加到路由配置中。
umi内置了一些api供开发者使用
history:可用于路由跳转,路由监听。
import { history } from 'umi';
// 跳转到指定路由
history.push('/list');
// 带参数跳转到指定路由
history.push('/list?a=b');
history.push({
  pathname: '/list',
  query: {
    a: 'b',
plugin: 运行时插件接口,是 Umi 内置的跑在浏览器里的一套插件体系。
import { plugin, ApplyPluginsType } from 'umi';
// 注册插件
plugin.register({
  apply: { dva: { foo: 1 } },
  path: 'foo',
plugin.register({
  apply: { dva: { bar: 1 } },
  path: 'bar',
dynamic: 封装异步组件。
import { dynamic } from 'umi';
export default dynamic({
  loader: async function() {
