ggplot2作图最全教程(上)


2015年,我开始在组会上汇报自己的实验结果,也是从那时开始使用ggplot2来可视化我的数据。我不太喜欢R base的语法和风格,所以我很快就爱上了ggplot。特别有用的是它的facet函数。最近偶然间看到了Dr. Cédric Scherer写的一篇博客A GGPLOT2 TUTORIAL FOR BEAUTIFUL PLOTTING IN R,原文博客为 https://www. cedricscherer.com/2019/ 08/05/a-ggplot2-tutorial-for-beautiful-plotting-in-r/ ,系统地展示了ggplot2的特性,非常喜欢,现在特意翻译成中文,希望更多的人可以看到,作出漂亮的图表。
如果觉得有用,麻烦记得点一下赞,让更多希望做出漂亮图表的人看到,这也是我写下去的动力。
内容目录
- 准备
- 数据集
- ggplot2包
- 调整坐标轴
- 调整图表标题
- 调整图例(legend)
- 调整背景和网格线(background & grid line)
- 调整页边距
- 做多面板图
- 调整颜色
- 调整主题
- 调整线
- 调整文本
- 调整坐标
- 调整图表类型
- 调整条带
- 调整平滑线
- 做互作图
图片overview

准备
你需要安装以下包来执行代码,完成整个教程。
ggplot2, tidyverse, colorspace, corrr, cowplot, ggdark, ggforce, ggrepel, ggridges, ggsci, ggtext, ggthemes, grid, gridExtra, pathwork, rcarocolor, sicco, showtext, shiny.
交互图表还会用到以下包:
charter, echart4r, ggiraph, highcharter, plotly
# install CRAN packages
install.packages(c("tidyverse", "colorspace", "corrr",  "cowplot",
                   "ggdark", "ggforce", "ggrepel", "ggridges", "ggsci",
                   "ggtext", "ggthemes", "grid", "gridExtra", "patchwork",
                   "rcartocolor", "scico", "showtext", "shiny",
                   "plotly", "highcharter", "echarts4r"))
# install from GitHub since not on CRAN
install.packages(devtools)
devtools::install_github("JohnCoene/charter")
数据集
我们在本教程中使用来自空气污染致发病率和死亡率研究(nmaps)的数据。为了使作图易于管理,我们将数据限制在芝加哥1997-2000年间。关于这个数据集的更多细节,请参考Roger Peng的书《环境流行病学中的统计方法》。
我们可以使用readr包中read_csv()函数将数据导入到R中。为了以后访问数据,我们使用赋值箭头<-将数据存储在一个名为chic的变量中。
文中的数据集链接已经失效,评论区下面知友郭晋生提供的链接可以下载得到:
chic <- readr::read_csv("https://raw.githubusercontent.com/Z3tt/R-Tutorials/master/ggplot2/chicago-nmmaps.csv")
tibble::glimpse(chic)
head(chic, 10)
## # A tibble: 10 x 10
##    city  date       death  temp dewpoint  pm10    o3  time season  year
##    <chr> <date>     <dbl> <dbl>    <dbl> <dbl> <dbl> <dbl> <chr>  <dbl>
##  1 chic  1997-01-01   137  36      37.5  13.1   5.66  3654 Winter  1997
##  2 chic  1997-01-02   123  45      47.2  41.9   5.53  3655 Winter  1997
##  3 chic  1997-01-03   127  40      38    27.0   6.29  3656 Winter  1997
##  4 chic  1997-01-04   146  51.5    45.5  25.1   7.54  3657 Winter  1997
##  5 chic  1997-01-05   102  27      11.2  15.3  20.8   3658 Winter  1997
##  6 chic  1997-01-06   127  17       5.75  9.36 14.9   3659 Winter  1997
##  7 chic  1997-01-07   116  16       7    20.2  11.9   3660 Winter  1997
##  8 chic  1997-01-08   118  19      17.8  33.1   8.68  3661 Winter  1997
##  9 chic  1997-01-09   148  26      24    12.1  13.4   3662 Winter  1997
## 10 chic  1997-01-10   121  16       5.38 24.8  10.4   3663 Winter  1997
ggplot2包
ggplot2是一个基于图形语法的声明式创建图形的系统。你提供数据,告诉ggplot2如何将变量映射到美学(aesthetic),使用什么图形原语,然后它负责处理细节 。
ggplot由几个基本元素构成:
- 数据:作图用的原始数据
- 几何图形 geom_:表示数据的几何形状
- 美学 aes(): 几何或者统计对象的美学,比如位置,颜色,大小,形状等
- 刻度 scale_(): 数据与美学维度之间的映射,比如图形宽度的数据范围,
- 统计转换 stat_: 数据的统计,比如百分位,拟合曲线或者和
- 坐标系统 coord_: 数据的转换
- 面 facet_: 数据图表的排列
- 主题 theme(): 图形的整体视觉默认值,如背景、网格、轴、默认字体、大小和颜色
library(ggplot2)
library(tidyverse)
ggplot2的语法与base r不同。根据基本元素,默认的ggplot需要指定三样东西: 数据,美学和几何形状。我们总是通过调用ggplot(data = df)来定义绘图对象,它只告诉ggplot2我们将处理该数据。在大多数情况下,你可能希望绘制两个变量——一个在x轴上,一个在y轴上,这些是位置美学,因此我们将aes(x = var1, y = var2)添加到ggplot()调用中(是的,aes()代表美学,放到aes内的变量,代表数据变量到位置美学的映射)。然而,也有一些情况需要指定一个甚至三个或更多的变量。
我们在aes()外部指定数据,即chic,并将映射到美学的数据变量(即date和temp)添加到aes()内部 。
g <- ggplot(chic, aes(x = date, y = temp))
当运行时,只会创建一个面板。为什么?这是因为ggplot2不知道我们要如何绘制数据——我们仍然需要提供一个几何图形!
gplot2允许你将当前ggobject赋值给一个变量(在我们的例子中称为g)。稍后你可以通过添加其他层来扩展这个ggobject,要么一次性添加所有层,要么将其赋值给同一个或另一个变量。
有很多很多不同的几何图形(称为geoms,因为每个函数通常都以geom_开头),默认情况下可以添加到ggplot中,扩展包甚至提供更多的几何图形。让我们告诉ggplot2我们想使用哪种图形,例如通过添加geom_point()来创建散点图:
g + geom_point()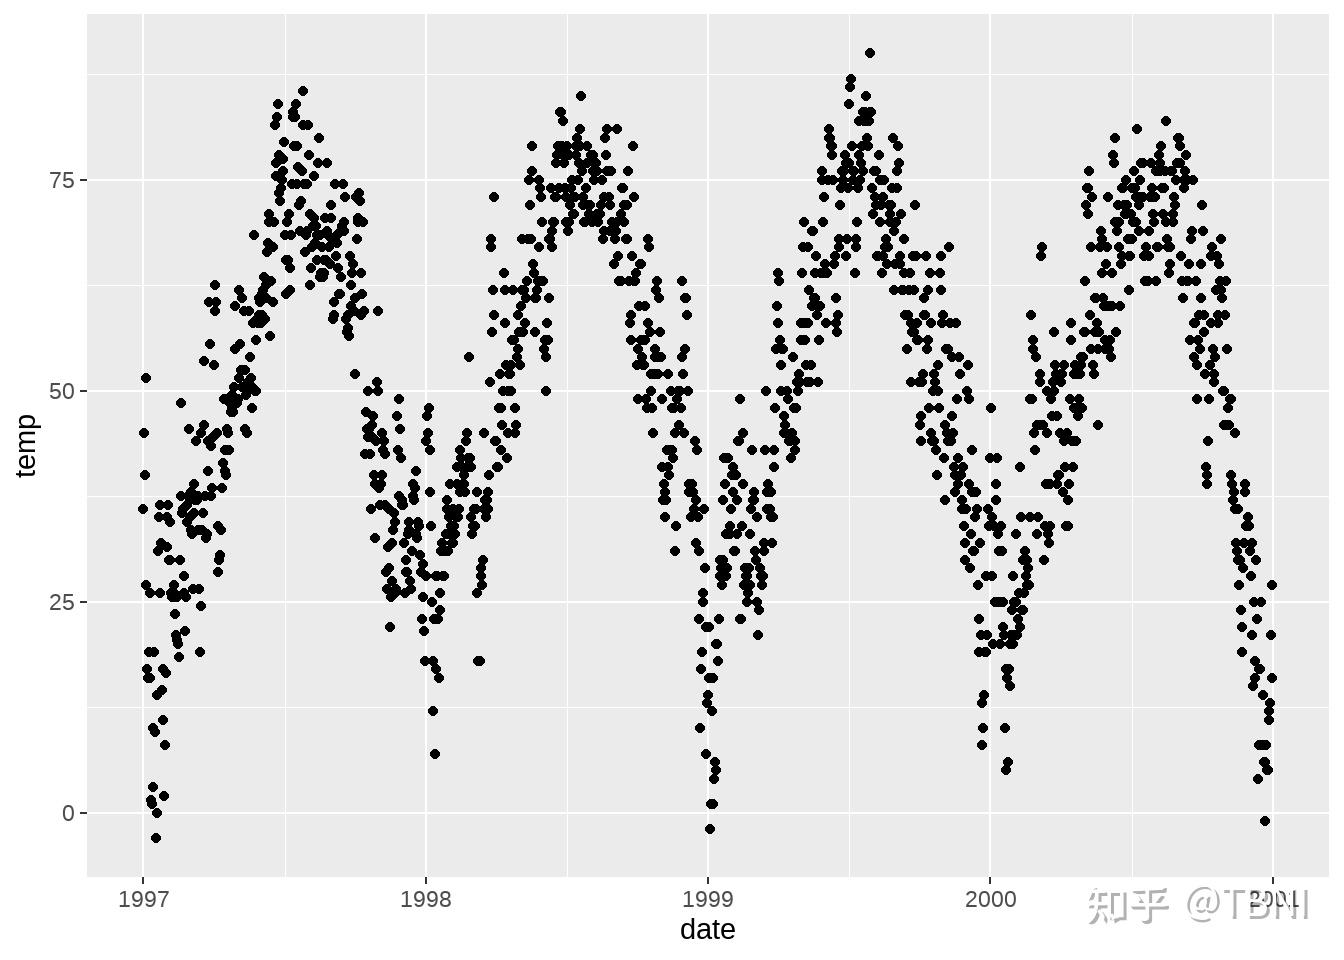
好了!但这些数据也可以被可视化为线形图(不是最优的,但人们总是这样做)。所以我们只需要添加geom_line():

你还可以组合几个几何层——这就是魔法和乐趣的开始!
g + geom_line() + geom_point()
调整几何图形的属性:
在geom_*命令中,你可以操作视觉美学,如点的颜色、形状和大小。让我们把所有的点转换成大的火红色钻石!
g + geom_point(color = "firebrick", shape = "diamond", size = 2)
注意:你可以使用预设颜色或十六进制颜色代码,甚至可以使用RGB()函数来使用RGB/RGBA颜色。
每个geom都有自己的属性(称为参数),相同的参数可能导致不同的变化,这取决于你使用的geom。
g + geom_point(color = "firebrick", shape = "diamond", size = 2) +
    geom_line(color = "firebrick", linetype = "dotted", size = .3)
替换默认的ggplot2主题
为了进一步说明ggplot的多用途性,让我们通过设置一个不同的内置主题(例如theme_bw())来摆脱灰色的默认ggplot2外观——通过调用theme_set()。
theme_set(theme_bw())
g + geom_point(color = "firebrick")
我们还将使用theme()函数来定制主题的特定元素。你还可以找到更多关于如何使用内置主题和如何自定义主题的信息。
调整坐标轴
改变坐标轴的title
让我们给坐标轴加上一些很好的标签。为此我们添加了labs(),为我们想要更改的每个标签提供一个字符串(这里是x和y)。你也可以通过xlab()和ylab() 来改变坐标轴title:
ggplot(chic, aes(x = date, y = temp)) +
  geom_point(color = "firebrick") +
  labs(x = "Year", y = "Temperature (°F)")
ggplot(chic, aes(x = date, y = temp)) +
  geom_point(color = "firebrick") +
  xlab("Year") +
  ylab("Temperature (°F)")
通常你也可以通过添加符号本身来指定符号(这里是“°”),但下面的代码不仅允许添加符号,还可以添加上标:
ggplot(chic, aes(x = date, y = temp)) +
  geom_point(color = "firebrick") +
  labs(x = "Year", y = expression(paste("Temperature (", degree ~ F, ")"^"(Hey, why should we use metric units?!)")))
增加轴和轴标题之间的空间
Theme()是修改特定主题元素(文本、标题、框、符号、背景等)的必要命令。我们将会经常用到它们! 现在我们将修改文本元素。我们可以通过在theme()调用中重写默认的element_text()来改变所有或特定文本元素的属性(这里是axis标题):
ggplot(chic, aes(x = date, y = temp)) +
  geom_point(color = "firebrick") +
  labs(x = "Year", y = "Temperature (°F)") +
  theme(axis.title.x = element_text(vjust = 0, size = 15),
        axis.title.y = element_text(vjust = 2, size = 15))
vjust指的是垂直对齐,它的范围通常在0和1之间,但你也可以指定该范围之外的值。注意,即使我们水平移动y轴上的轴标题,我们也需要指定vjust(从标签的角度来看,这是正确的)。你也可以通过指定两个文本元素的边距来改变距离:
ggplot(chic, aes(x = date, y = temp)) +
  geom_point(color = "firebrick") +
  labs(x = "Year", y = "Temperature (°F)") +
  theme(axis.title.x = element_text(margin = margin(t = 10), size = 15),
        axis.title.y = element_text(margin = margin(r = 10), size = 15))
margin()对象中的标签t和r分别指代top和right。你还可以将这四个边距指定为margin(t, r, b, l)。请注意,我们现在必须更改右边边距来修改y轴上的空间,而不是底部边距。
改变轴标题的美学
同样,我们使用theme()函数并修改元素axis.title.x和axis.title.y。例如,在element_text()中,我们可以覆盖大小、颜色和外观的默认值。
ggplot(chic, aes(x = date, y = temp)) +
  geom_point(color = "firebrick") +
  labs(x = "Year", y = "Temperature (°F)") +
  theme(axis.title = element_text(size = 15, color = "firebrick",
                                  face = "italic"))
face参数可用于使字体加粗或倾斜。
ggplot(chic, aes(x = date, y = temp)) +
  geom_point(color = "firebrick") +
  labs(x = "Year", y = "Temperature (°F)") +
  theme(axis.title.x = element_text(color = "sienna", size = 15),
        axis.title.y = element_text(color = "orangered", size = 15))
调整坐标轴文本美学
类似地,还可以使用axis更改坐标轴文本(这里是数字)的外观。通过文本和/或附属元素axis.text.x和axis.text.y:
ggplot(chic, aes(x = date, y = temp)) +
  geom_point(color = "firebrick") +
  labs(x = "Year", y = "Temperature (°F)") +
  theme(axis.text = element_text(color = "dodgerblue", size = 12),
        axis.text.x = element_text(face = "italic"))
旋转坐标轴文本
指定角度可以旋转任何文本元素。使用hjust和vjust你可以在水平(0 =左,1 =右)和垂直(0 =上,1 =下)调整文本的位置:
ggplot(chic, aes(x = date, y = temp)) +
  geom_point(color = "firebrick") +
  labs(x = "Year", y = "Temperature (°F)") +
  theme(axis.text.x = element_text(angle = 50, vjust = 1, hjust = 1, size = 12))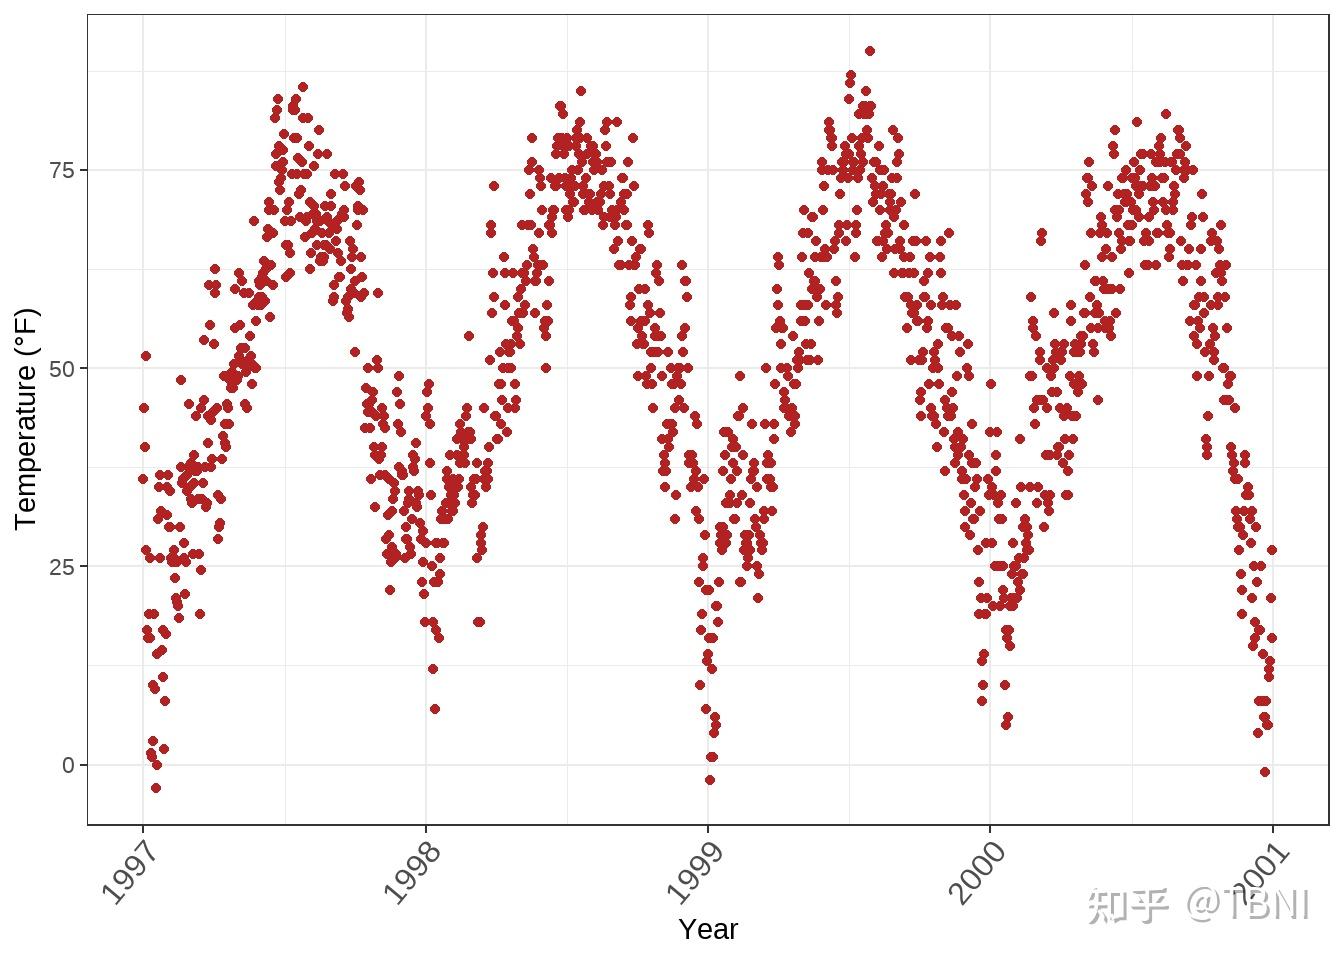
删除坐标轴标题
ggplot(chic, aes(x = date, y = temp)) +
  geom_point(color = "firebrick") +
  labs(x = NULL, y = "")
我们可以使用theme_blank(),但是通过labs()(或xlab())中删除标签要更简单。

限制坐标轴范围
有时你想要放大到更近距离地查看一些数据。你可以在不划分数据的情况下做到这一点:
ggplot(chic, aes(x = date, y = temp)) +
  geom_point(color = "firebrick") +
  labs(x = "Year", y = "Temperature (°F)") +
  ylim(c(0, 50))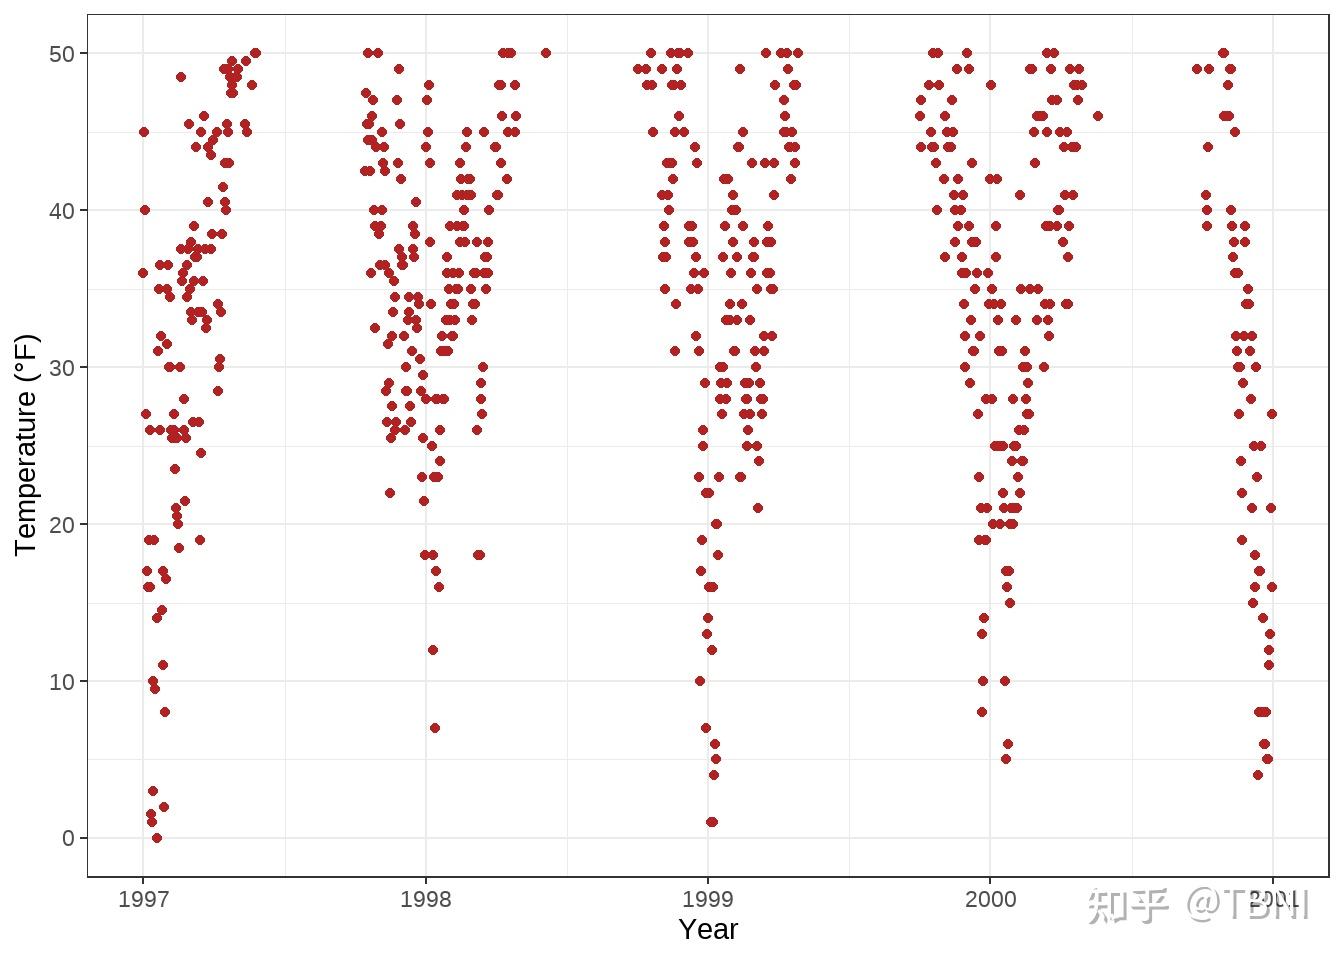
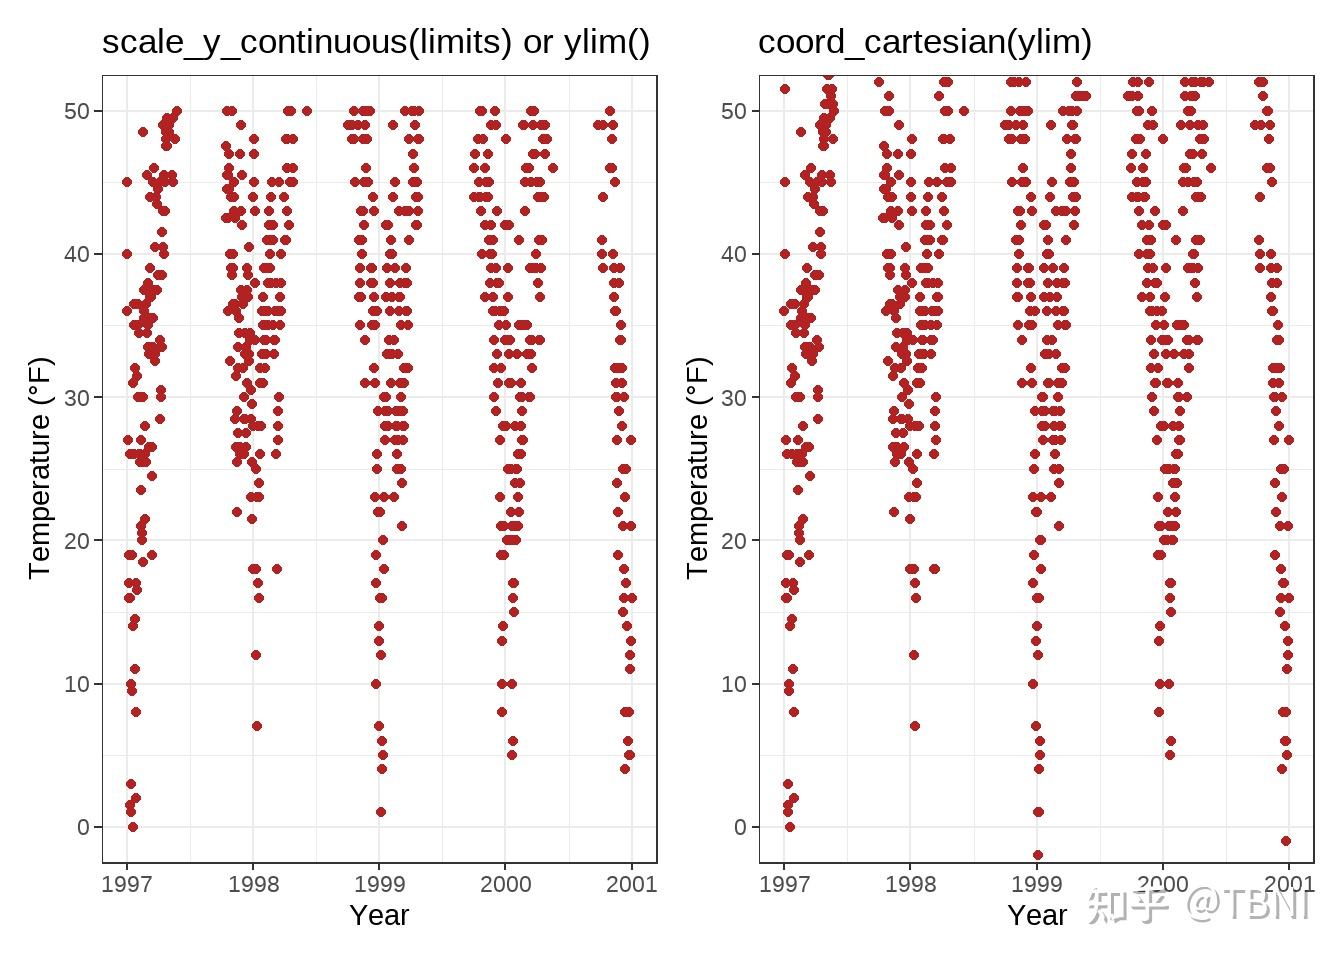
或者,您可以使用scale_y_continuous(limits = c(0,50))或coord_cartesian(ylim = c(0,50))。前者去除范围外的所有数据点,而后者调整可见区域,类似于ylim(c(0,50))。你可能会想:所以最后两者的结果是一样的。但并非如此,有一个重要的区别——比较以下两个图:
使图表从坐标原点开始
library(tidyverse)
chic_high <- dplyr::filter(chic, temp > 25, o3 > 20)
ggplot(chic_high, aes(x = temp, y = o3)) +
  geom_point(color = "darkcyan") +
  labs(x = "Temperature higher than 25°F",
       y = "Ozone higher than 20 ppb") +
  expand_limits(x = 0, y = 0)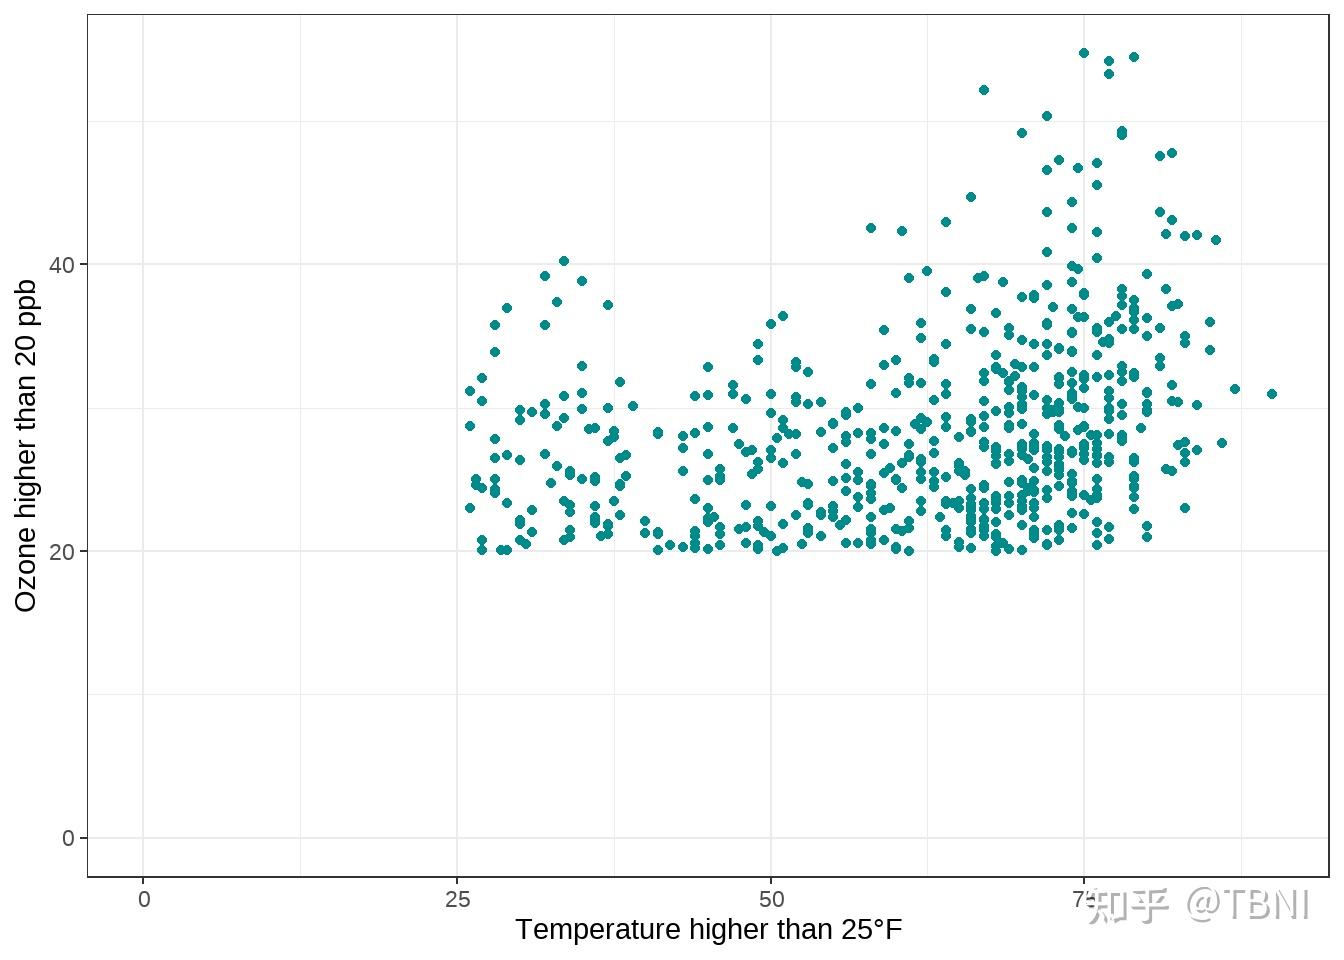
相同比例的坐标轴
为了演示目的,让我们用一些绘制包含随机噪声的温度值与温度值的关系图。coord_equal()是一个坐标系统,其指定的比率表示y轴上的单位数与x轴上的单位数相等。默认ratio = 1,确保x轴上的一个单位与y轴上的一个单位长度相同:
ggplot(chic, aes(x = temp, y = temp + rnorm(nrow(chic), sd = 20))) +
  geom_point(color = "sienna") +
  labs(x = "Temperature (°F)", y = "Temperature (°F) + random noise") +
  xlim(c(0, 100)) + ylim(c(0, 150)) +
  coord_fixed()
高于1的比率会使y轴上的单位比x轴上的单位长,反之亦然:
ggplot(chic, aes(x = temp, y = temp + rnorm(nrow(chic), sd = 20))) +
  geom_point(color = "sienna") +
  labs(x = "Temperature (°F)", y = "Temperature (°F) + random noise") +
  xlim(c(0, 100)) + ylim(c(0, 150)) +
  coord_fixed(ratio = 1/5)
使用函数调整标签
有时稍微修改一下标签是很方便的,比如添加单位或百分号,而不在数据中直接添加这些标签。在这种情况下你可以使用一个函数:
ggplot(chic, aes(x = date, y = temp)) +
  geom_point(color = "firebrick") +
  labs(x = "Year", y = NULL) +
  scale_y_continuous(label = function(x) {return(paste(x, "Degrees Fahrenheit"))})
调整标题
添加标题
我们可以通过ggtitle()函数添加标题:
ggplot(chic, aes(x = date, y = temp)) +
  geom_point(color = "firebrick") +
  labs(x = "Year", y = "Temperature (°F)") +
  ggtitle("Temperatures in Chicago")
或者,你也可以使用labs()函数。在这里你可以添加几个参数,例如副标题,标题和标签(以及如前所示的坐标轴标题)
ggplot(chic, aes(x = date, y = temp)) +
  geom_point(color = "firebrick") +
  labs(x = "Year", y = "Temperature (°F)",
       title = "Temperatures in Chicago",
       subtitle = "Seasonal pattern of daily temperatures from 1997 to 2001",
       caption = "Data: NMMAPS",
       tag = "Fig. 1")
加粗标题,并在基线上添加空格
同样,因为我们想要修改主题的属性,所以我们使用theme()函数,axis.title 和 axis.text来修改字体和边距。以下所有主题元素的修改不仅适用于标题plot.title,还适用于所有其他标签,如plot.subtitle, plot.caption, plot.caption, legend.title, legend.text, axis.title和axis.text。
ggplot(chic, aes(x = date, y = temp)) +
  geom_point(color = "firebrick") +
  labs(x = "Year", y = "Temperature (°F)",
       title = "Temperatures in Chicago") +
  theme(plot.title = element_text(face = "bold",
                                  margin = margin(10, 0, 10, 0),
                                  size = 14))
调整标题位置
一般的对齐方式(左、中、右)是由hjust()控制, hjust是horizontal adjustment的缩写。当然,也可以通过vjust来调整垂直对齐。
ggplot(chic, aes(x = date, y = temp)) +
  geom_point(color = "firebrick") +
  labs(x = "Year", y = NULL,
       title = "Temperatures in Chicago",
       caption = "Data: NMMAPS") +
  theme(plot.title = element_text(hjust = 1, size = 16, face = "bold.italic"))
2019年以来,用户可以根据面板区域(默认)或通过plot.title.position和plot.caption.position指定标题、副标题和标题的对齐方式。在大多数情况下,后者实际上是更好的选择,许多人非常喜欢这个新功能,因为如果y轴标签非常长,对齐后看起来会很糟糕。
(g <- ggplot(chic, aes(x = date, y = temp)) +
  geom_point(color = "firebrick") +
  scale_y_continuous(label = function(x) {return(paste(x, "Degrees Fahrenheit"))}) +
  labs(x = "Year", y = NULL,
       title = "Temperatures in Chicago between 1997 and 2001 in Degrees Fahrenheit",
       caption = "Data: NMMAPS") +
  theme(plot.title = element_text(size = 14, face = "bold.italic"),
        plot.caption = element_text(hjust = 0)))
g + theme(plot.title.position = "plot",
          plot.caption.position = "plot")
标题中使用非传统字体
你还可以使用不同的字体,不仅仅是ggplot提供的默认字体(不同的操作系统会有所不同)。有几个软件包可以帮助你使用安装在你电脑上的字体。在这里,我使用了showtext包,它可以方便地在R图中使用各种类型的字体(TrueType、OpenType、Type 1、web字体等)。在我们加载了包之后,你需要导入必须安装在你电脑上的字体。我经常使用谷歌字体,它可以用font_add_google()函数导入,但你也可以用font_add()添加其他字体。(注意,即使在使用谷歌字体的情况下,你必须安装字体并重启rstudio 以使用字体)
library(showtext)
font_add_google("Playfair Display", ## name of Google font
                "Playfair")  ## name that will be used in R
font_add_google("Bangers", "Bangers")
现在,我们可以使用这些字体家族使用-是的,你猜对了- theme():
ggplot(chic, aes(x = date, y = temp)) +
  geom_point(color = "firebrick") +
  labs(x = "Year", y = "Temperature (°F)",
       title = "Temperatures in Chicago",
       subtitle = "Daily temperatures in °F from 1997 to 2001") +
  theme(plot.title = element_text(family = "Bangers", hjust = .5, size = 25),
        plot.subtitle = element_text(family = "Playfair", hjust = .5, size = 15))
更改多行文本的间距
可以使用lineheight参数来更改行与行之间的间距。在这个例子中,我把线条压在一起(lineheight < 1)。
ggplot(chic, aes(x = date, y = temp)) +
  geom_point(color = "firebrick") +
  labs(x = "Year", y = "Temperature (°F)") +
  ggtitle("Temperatures in Chicago\nfrom 1997 to 2001") +
  theme(plot.title = element_text(lineheight = .8, size = 16))
调整图例
我们将根据季节类别对数据进行颜色编码。或者用更通俗的说法:我们把季节的变化映射到色彩上。ggplot2的一个优点是,当将变量映射到美学时,它会默认添加一个图例。你可以看到,默认情况下,图例标题就是我们在color参数中指定的:
ggplot(chic,
       aes(x = date, y = temp, color = season)) +
  geom_point() +
  labs(x = "Year", y = "Temperature (°F)")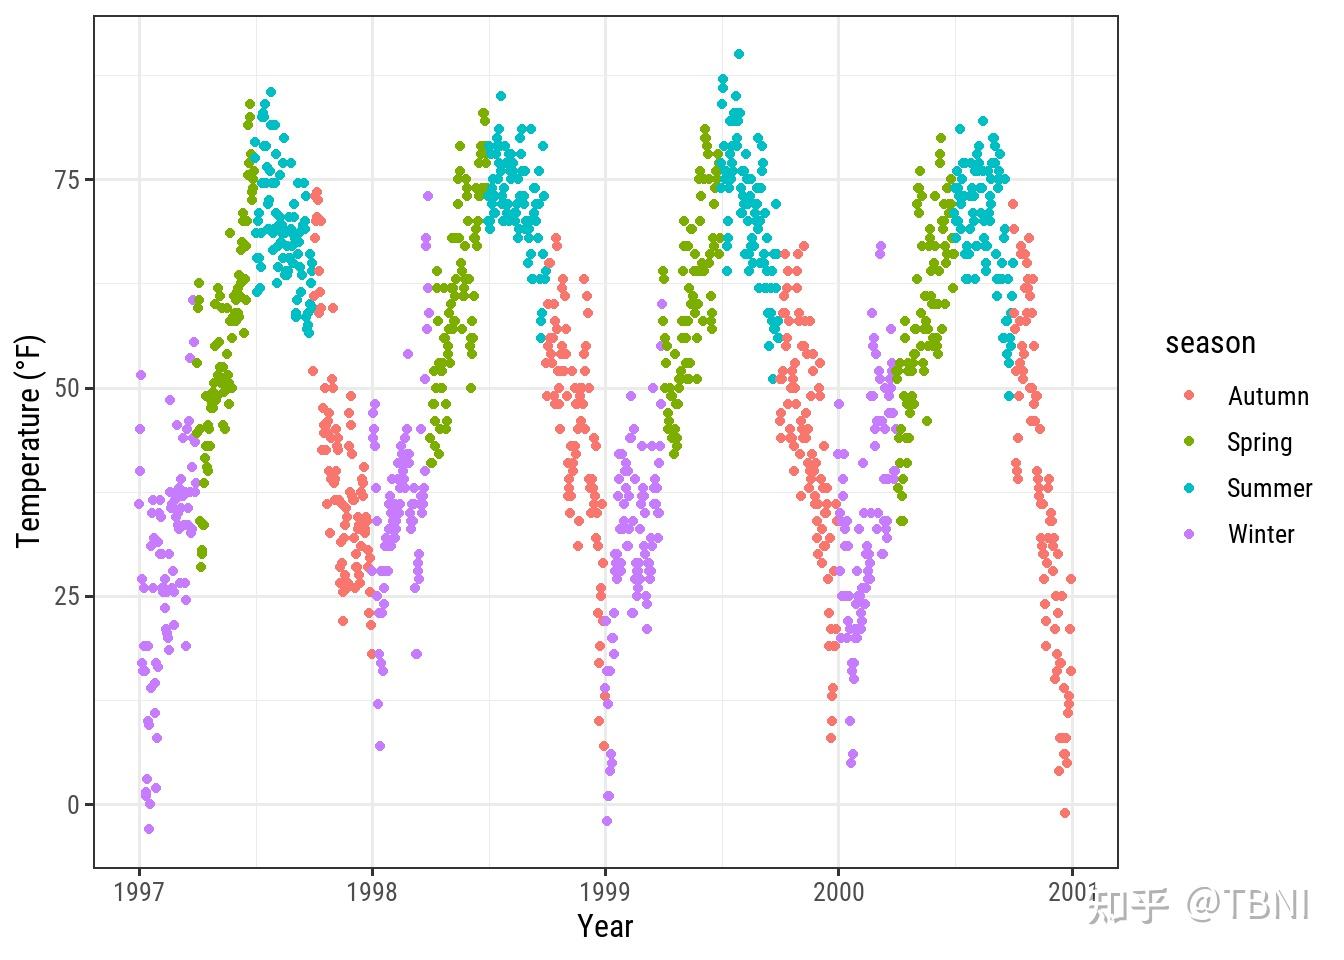
移除图列
非常简单,使用 theme(legend.position = "none"):
ggplot(chic,
       aes(x = date, y = temp, color = season)) +
  geom_point() +
  labs(x = "Year", y = "Temperature (°F)") +
  theme(legend.position = "none")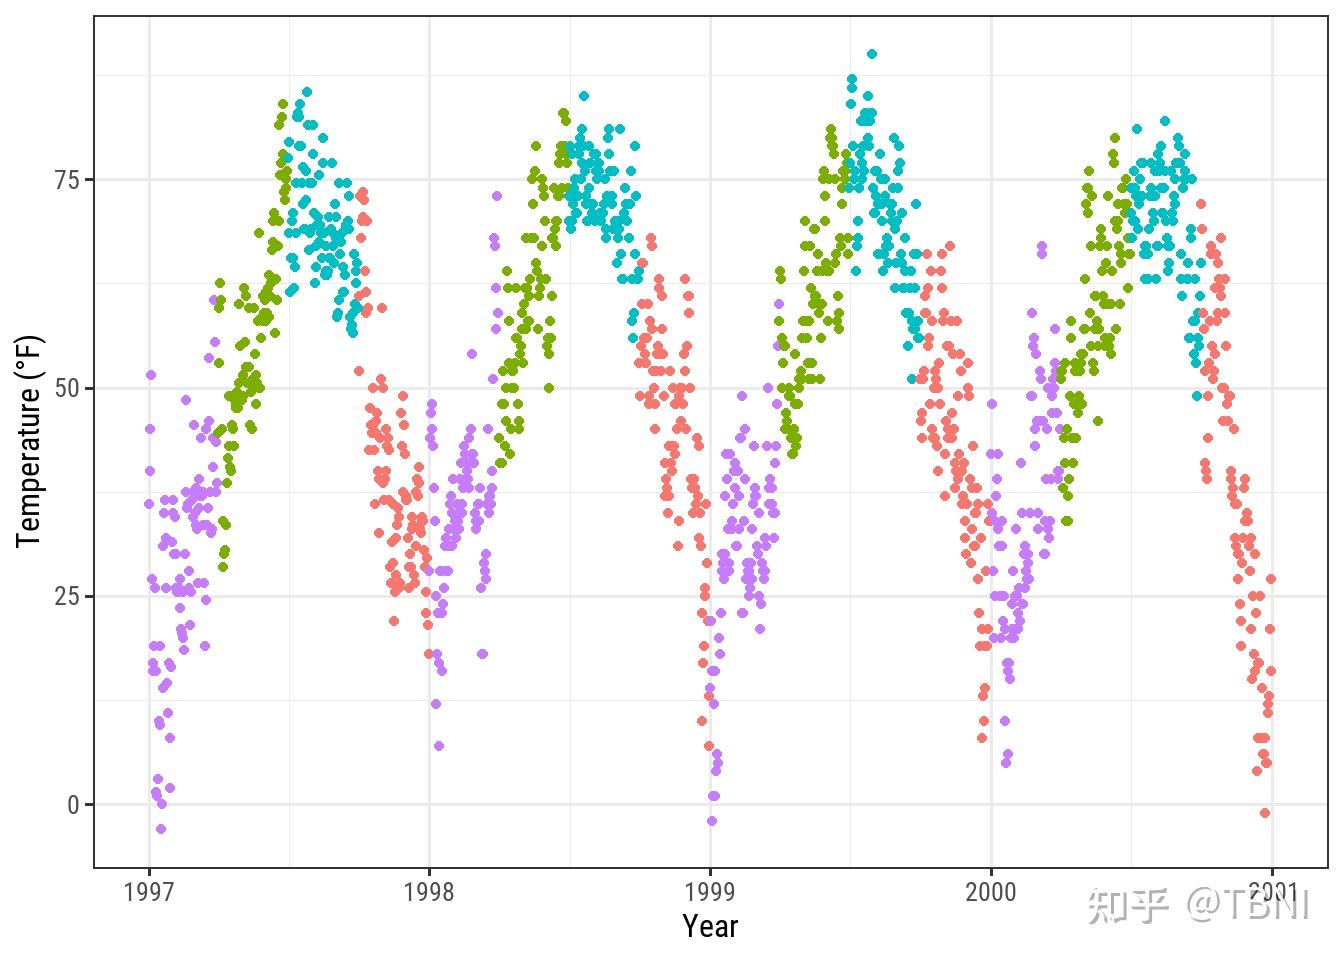
你还可以根据具体情况使用guides(color = "none")或scale_color_discrete(guide = "none")。虽然theme()的更改会一次性删除所有图例,但你可以使用后一种选项会删除特定的图例,同时保留其他图例。例如在这里,我们保留形状的图例,而放弃颜色的图例。
ggplot(chic,
       aes(x = date, y = temp,
           color = season, shape = season)) +
  geom_point() +
  labs(x = "Year", y = "Temperature (°F)") +
  guides(color = "none")
移除图例标题
正如你猜到的,使用element_blank():
ggplot(chic, aes(x = date, y = temp, color = season)) +
  geom_point() +
  labs(x = "Year", y = "Temperature (°F)") +
  theme(legend.title = element_blank())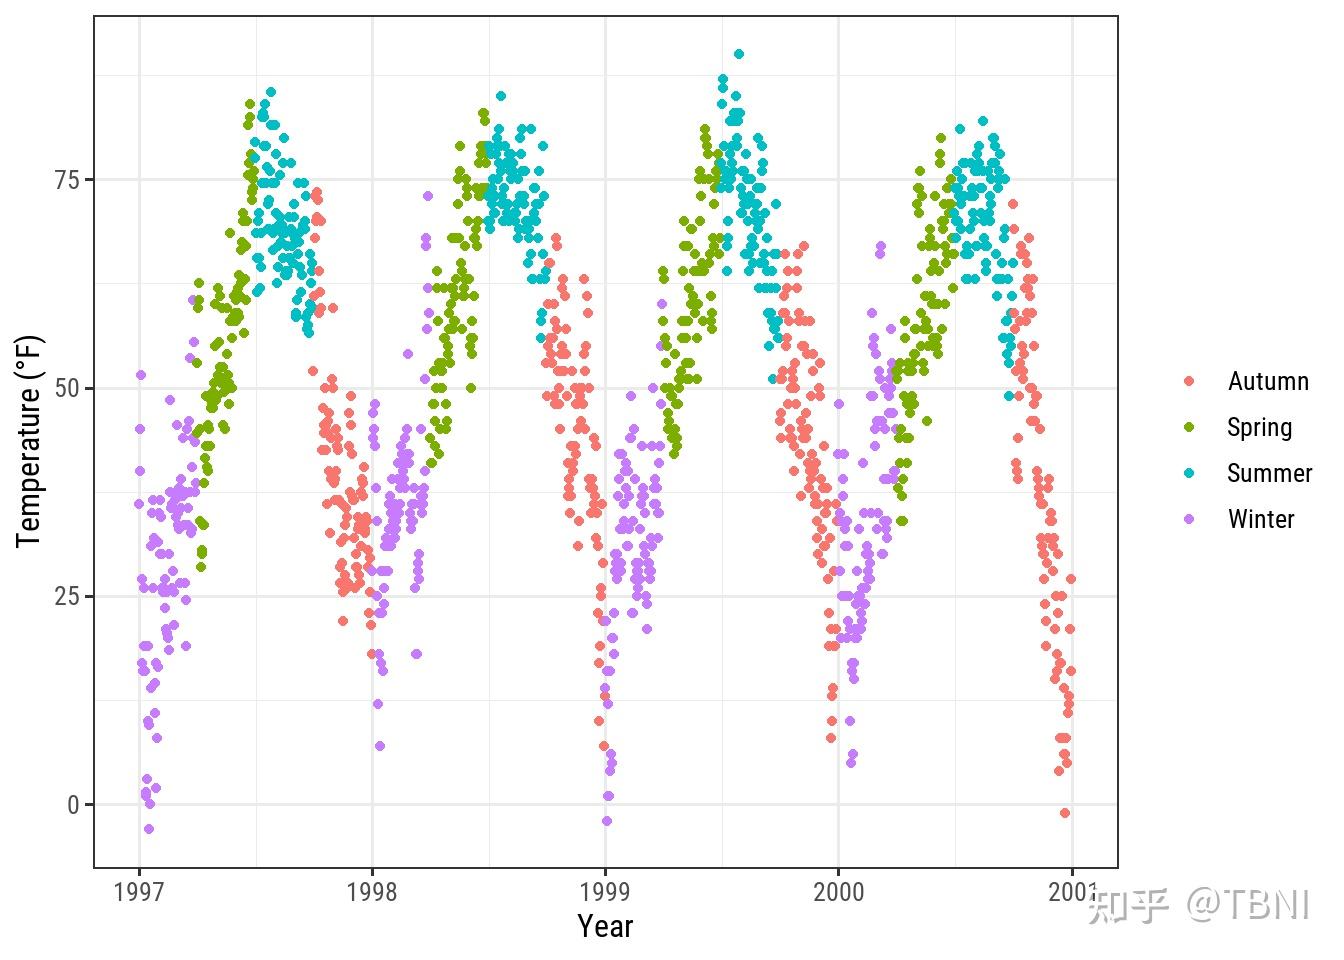
改变图例的位置
如果你不想把图例放在右边,就用 theme中的legend.position 参数。在theme中作为图例的位置可以是’top’, ‘bottom’, ‘left’, ‘right'。
ggplot(chic, aes(x = date, y = temp, color = season)) +
  geom_point() +
  labs(x = "Year", y = "Temperature (°F)") +
  theme(legend.position = "top")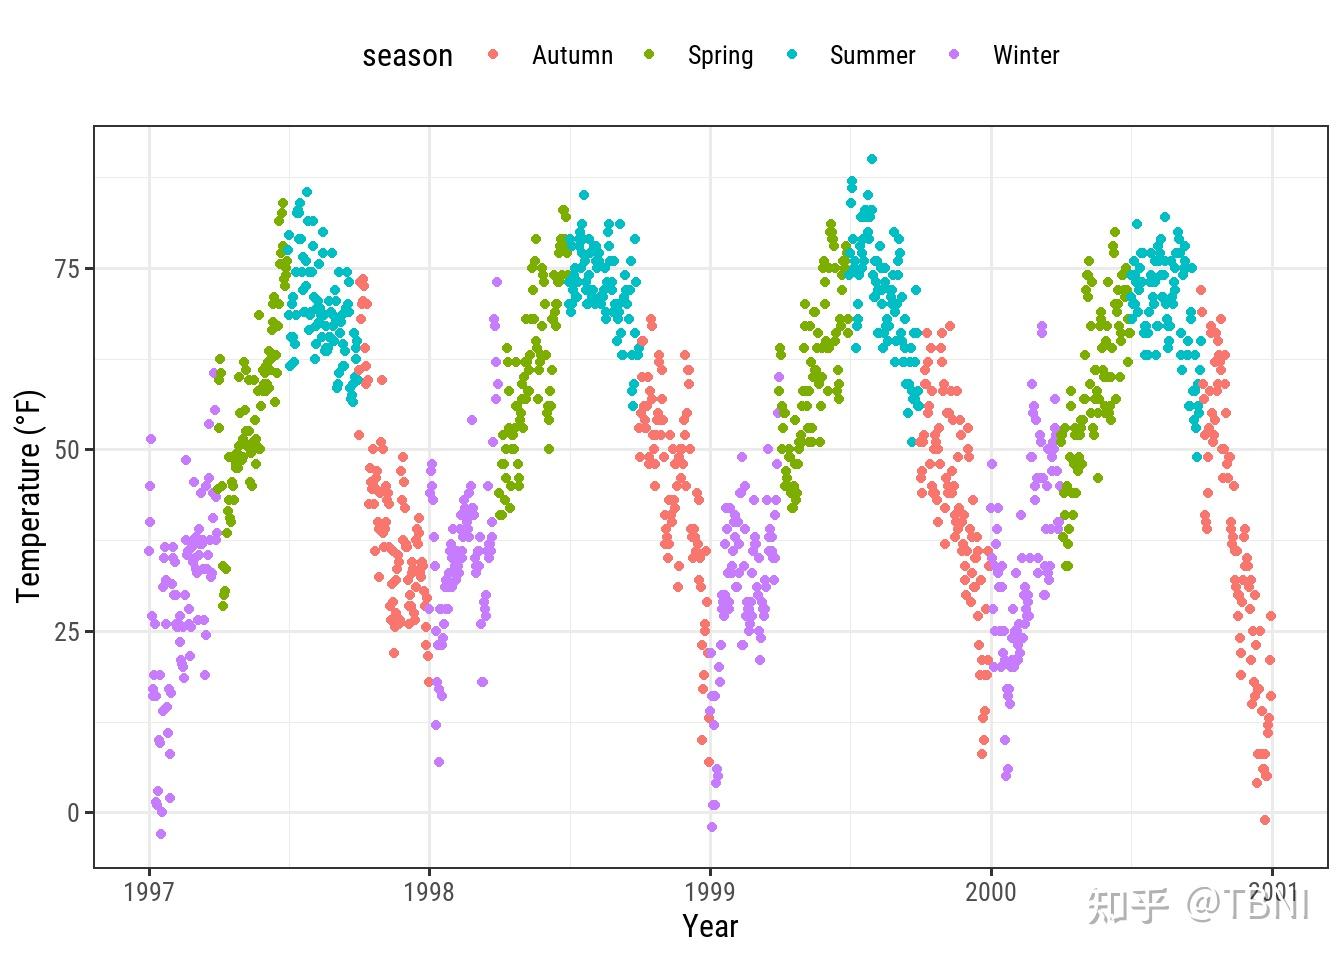
你也可以在面板中指定一个相对的x和y坐标从0(左或下)到1(右或上)的向量:
ggplot(chic, aes(x = date, y = temp, color = season)) +
  geom_point() +
  labs(x = "Year", y = "Temperature (°F)",
       color = NULL) +
  theme(legend.position = c(.15, .15),
        legend.background = element_rect(fill = "transparent"))
改变图例的方向
图例的方向默认是垂直的,但当你选择“top”或“bottom”位置时,是水平的。但你也可以随心所欲地改变方向:
ggplot(chic, aes(x = date, y = temp, color = season)) +
  geom_point() +
  labs(x = "Year", y = "Temperature (°F)") +
  theme(legend.position = c(.5, .97),
        legend.background = element_rect(fill = "transparent")) +
  guides(color = guide_legend(direction = "horizontal"))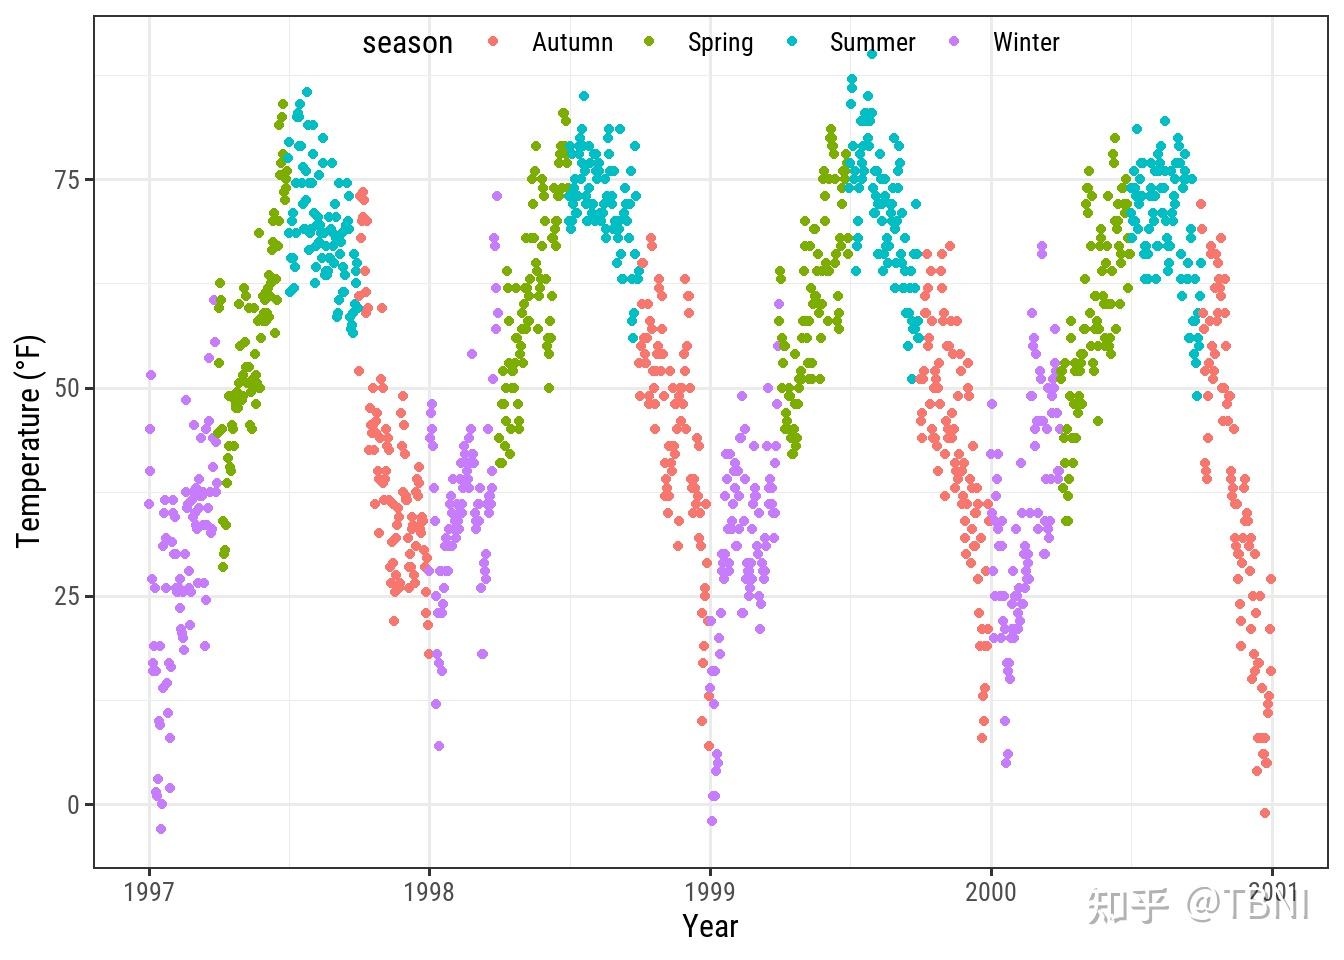
改变图例的风格
你可以通过调整theme中的legend.title来改变图例标题的外观:
ggplot(chic, aes(x = date, y = temp, color = season)) +
  geom_point() +
  labs(x = "Year", y = "Temperature (°F)") +
  theme(legend.title = element_text(family = "Playfair",
                                    color = "chocolate",
                                    size = 14, face = "bold"))
改变图例的标题
改变图例标题的最简单方法是使用labs()层:
ggplot(chic, aes(x = date, y = temp, color = season)) +
  geom_point() +
  labs(x = "Year", y = "Temperature (°F)",
       color = "Seasons\nindicated\nby colors:") +
  theme(legend.title = element_text(family = "Playfair",
                                    color = "chocolate",
                                    size = 14, face = "bold"))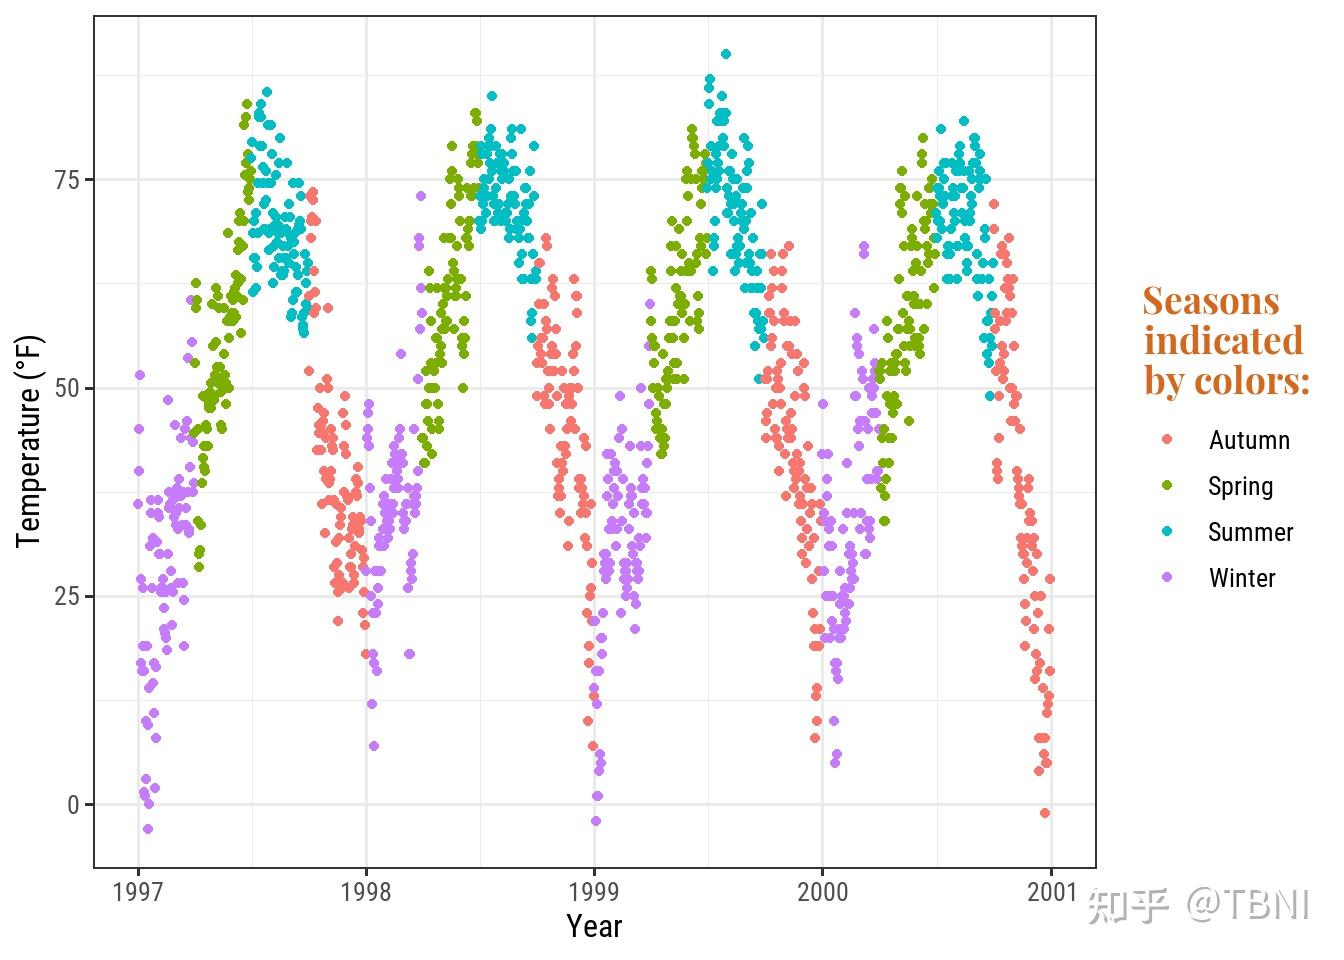
改变图例键值的顺序
我们可以通过改变season的不同level来实现:
chic$season <-
  factor(chic$season,
         levels = c("Winter", "Spring", "Summer", "Autumn"))
ggplot(chic, aes(x = date, y = temp, color = season)) +
  geom_point() +
  labs(x = "Year", y = "Temperature (°F)")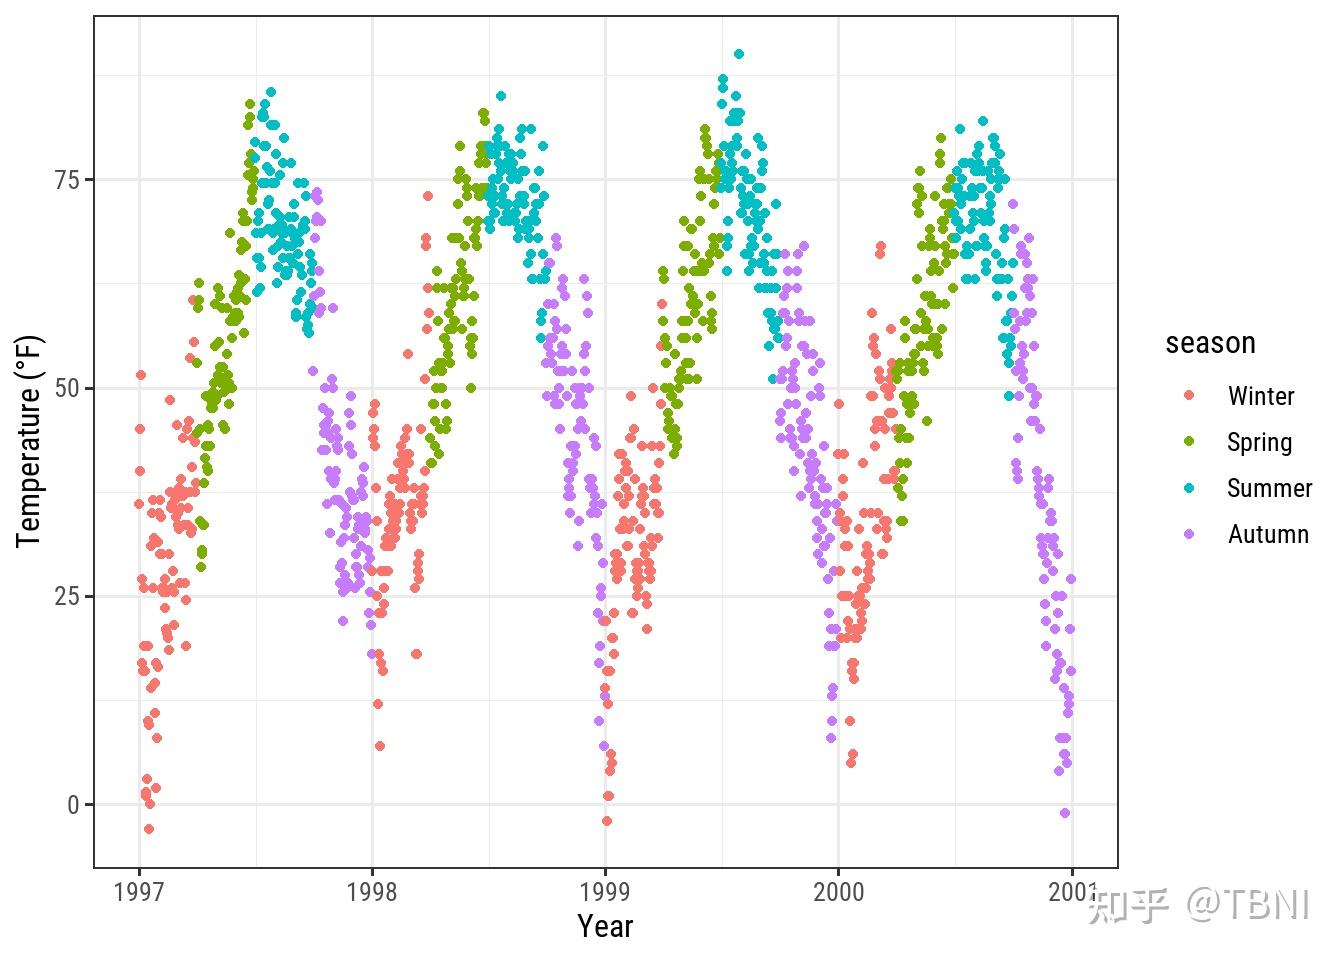
改变图例的标签
在scale_color_discrete()中提供一个名称向量,用月份来替换季节:
ggplot(chic, aes(x = date, y = temp, color = season)) +
  geom_point() +
  labs(x = "Year", y = "Temperature (°F)") +
  scale_color_discrete(
    name = "Seasons:",
    labels = c("Mar—May", "Jun—Aug", "Sep—Nov", "Dec—Feb")
  theme(legend.title = element_text(
    family = "Playfair", color = "chocolate", size = 14, face = 2
  ))
更改图例中的背景
为了改变图例键值的背景色(填充),我们调整theme中legend.key的设置:
ggplot(chic, aes(x = date, y = temp, color = season)) +
  geom_point() +
  labs(x = "Year", y = "Temperature (°F)") +
  theme(legend.key = element_rect(fill = "darkgoldenrod1"),
        legend.title = element_text(family = "Playfair",
                                    color = "chocolate",
                                    size = 14, face = 2)) +
  scale_color_discrete("Seasons:")
如果你想完全去掉它们,可以使用fill = NA或fill = "transparent"。
改变图例符号的大小
图例中的点在默认大小下可能会丢失一些,特别是没有box的情况下。要覆盖默认图层,可以使用guides图层,如下所示:
ggplot(chic, aes(x = date, y = temp, color = season)) +
  geom_point() +
  labs(x = "Year", y = "Temperature (°F)") +
  theme(legend.key = element_rect(fill = NA),
        legend.title = element_text(color = "chocolate",
                                    size = 14, face = 2)) +
  scale_color_discrete("Seasons:") +
  guides(color = guide_legend(override.aes = list(size = 6)))
手动添加图例项(legend items)
ggplot2不会自动添加图例,除非你将外观(颜色,大小等)映射到一个变量。但有时候,我想要一个图例,这样就能清楚地知道你在画什么。
这是默认值:
ggplot(chic, aes(x = date, y = o3)) +
  geom_line(color = "gray") +
  geom_point(color = "darkorange2") +
  labs(x = "Year", y = "Ozone")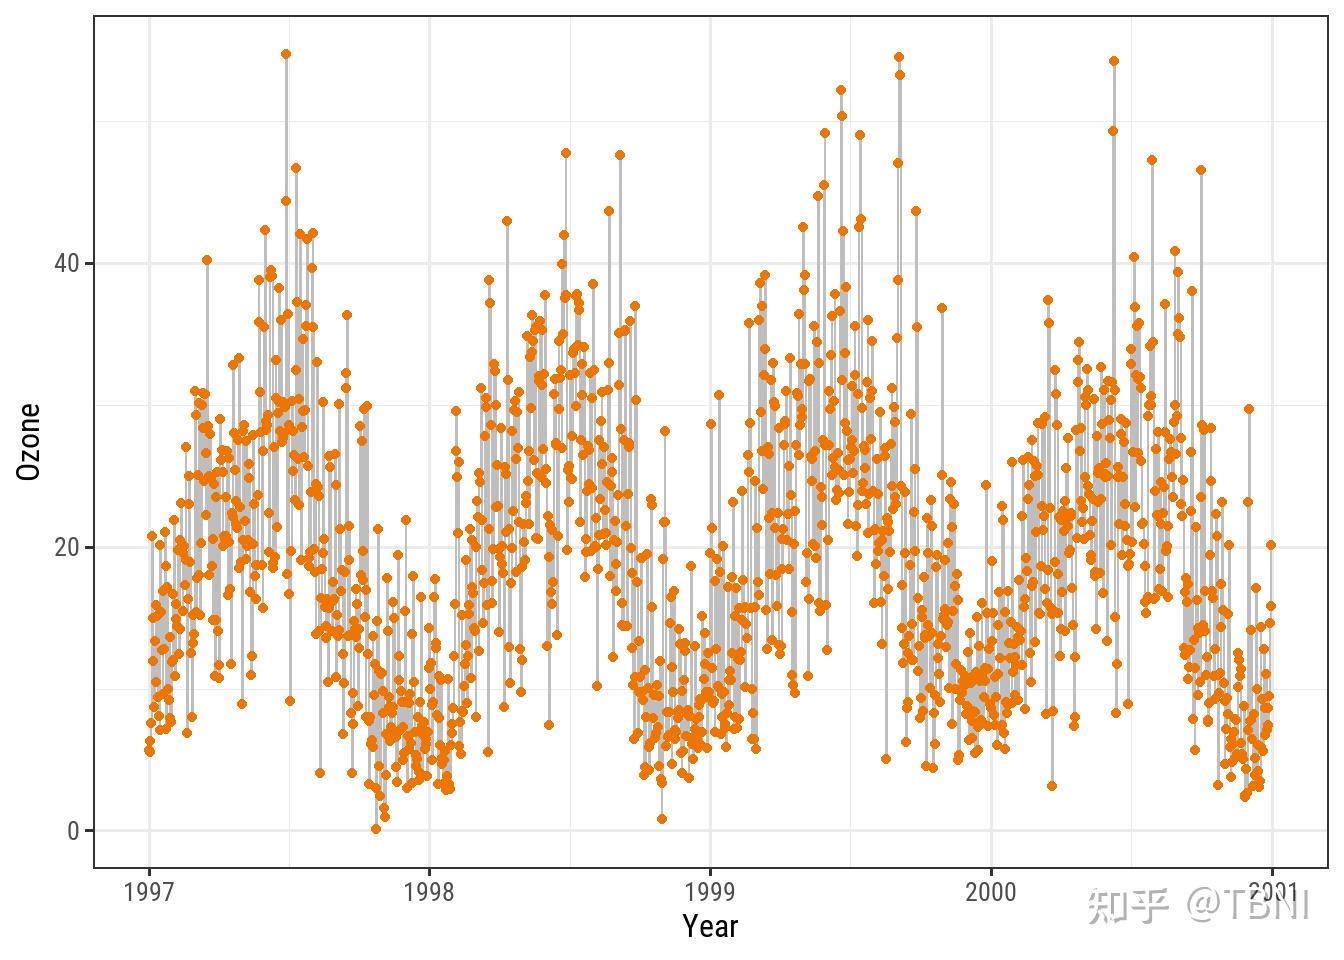
我们可以通过将guide映射到变量来强制生成图例。我们使用aes()映射线和点,我们不是映射到数据集中的一个变量,而是映射到一个字符串(这样我们就得到了每个颜色)。
ggplot(chic, aes(x = date, y = o3)) +
  geom_line(aes(color = "line")) +
  geom_point(aes(color = "points")) +
  labs(x = "Year", y = "Ozone") +
  scale_color_discrete("Type:")
我们已经很接近,但这还不是我们想要的。我们想要灰色和红色! 要更改颜色,我们使用scale_color_manual()。此外,我们使用guide()函数重写了图列中的美学。
瞧!现在,我们有一个带有灰线和橙红点的图,以及一个单独的灰线和一个单独的橙红点作为图例符号:
ggplot(chic, aes(x = date, y = o3)) +
  geom_line(aes(color = "line")) +
  geom_point(aes(color = "points")) +
  labs(x = "Year", y = "Ozone") +
  scale_color_manual(name = NULL,
                     guide = "legend",
                     values = c("points" = "darkorange2",
                                "line" = "gray")) +
  guides(color = guide_legend(override.aes = list(linetype = c(1, 0),
                                                  shape = c(NA, 16))))
使用其他图例风格
就像您在前面的几个例子中看到的那样,像season这样的分类变量的默认图例是guide_legend()。如果你将一个连续变量映射到美学,ggplot2默认将不使用guide_legend(),而是guide_colorbar()(或guide_colourbar()):
ggplot(chic,
       aes(x = date, y = temp, color = temp)) +
  geom_point() +
  labs(x = "Year", y = "Temperature (°F)", color = "Temperature (°F)")
但是,通过使用guide_legend(),你可以强制图例显示离散的颜色,就像分类变量的情况一样:
ggplot(chic,
       aes(x = date, y = temp, color = temp)) +
  geom_point() +
  labs(x = "Year", y = "Temperature (°F)", color = "Temperature (°F)") +
  guides(color = guide_legend())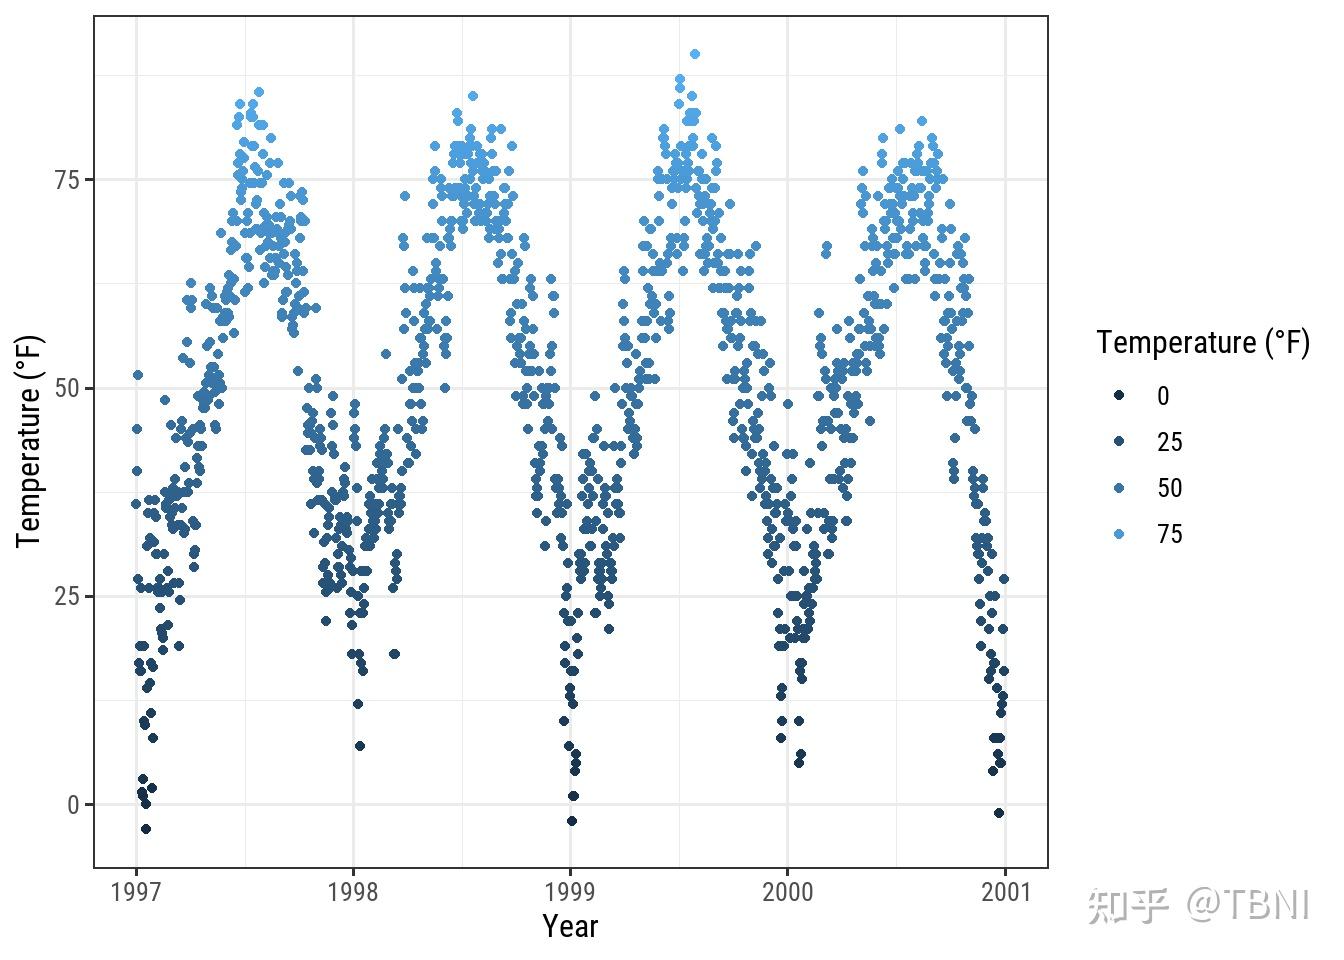
你也可以用 binned scales:
ggplot(chic,
       aes(x = date, y = temp, color = temp)) +
  geom_point() +
  labs(x = "Year", y = "Temperature (°F)", color = "Temperature (°F)") +
  guides(color = guide_bins())
调整背景和网格线
有一些方法可以用一个函数来改变图表的整体外观,但是如果你只是想改变一些元素的 颜色 ,你也可以这样做 。
改变面板背景颜色
要改变面板区域(即绘制数据的区域)的背景颜色(填充),需要调主题theme中的panel.background:
ggplot(chic, aes(x = date, y = temp)) +
  geom_point(color = "#1D8565", size = 2) +
  labs(x = "Year", y = "Temperature (°F)") +
  theme(panel.background = element_rect(
    fill = "#64D2AA", color = "#64D2AA", size = 2)
  )
改变网格线
有两种类型的网格线:一级网格线(major grid line)和二级网格线(minor grid line)。你可以通过覆盖面板的默认值来更改这些。对于每一组网格线,分别使用panel.grid.major和panel.grid.minor。
ggplot(chic, aes(x = date, y = temp)) +
  geom_point(color = "firebrick") +
  labs(x = "Year", y = "Temperature (°F)") +
  theme(panel.grid.major = element_line(color = "gray10", size = .5),
        panel.grid.minor = element_line(color = "gray70", size = .25))
你甚至可以为所有的网格线指定4个不同水平的设置:
ggplot(chic, aes(x = date, y = temp)) +
  geom_point(color = "firebrick") +
  labs(x = "Year", y = "Temperature (°F)") +
  theme(panel.grid.major = element_line(size = .5, linetype = "dashed"),
        panel.grid.minor = element_line(size = .25, linetype = "dotted"),
        panel.grid.major.x = element_line(color = "red1"),
        panel.grid.major.y = element_line(color = "blue1"),
        panel.grid.minor.x = element_line(color = "red4"),
        panel.grid.minor.y = element_line(color = "blue4"))
当然,如果你愿意,你也可以删除一些或所有网格线:
ggplot(chic, aes(x = date, y = temp)) +
  geom_point(color = "firebrick") +
  labs(x = "Year", y = "Temperature (°F)") +
  theme(panel.grid.minor = element_blank())
ggplot(chic, aes(x = date, y = temp)) +
  geom_point(color = "firebrick") +
  labs(x = "Year", y = "Temperature (°F)") +
  theme(panel.grid = element_blank())
改变网格线的间距
你还可以定义一级网格线和二级网格线之间的断点:
ggplot(chic, aes(x = date, y = temp)) +
  geom_point(color = "firebrick") +
  labs(x = "Year", y = "Temperature (°F)") +