Add on 2020-9-24: 可以参考源码
CameraDemo
的file_provider分支上的代码。
以前调用系统相机拍照的时候,流程是这样的
private void takePhoto() {
Intent takePictureIntent = new Intent(MediaStore.ACTION_IMAGE_CAPTURE);
if (takePictureIntent.resolveActivity(getPackageManager()) != null) {
photoFile = ImageUtil.createImageFile();
if (photoFile != null) {
photoURI = Uri.fromFile(photoFile);
takePictureIntent.putExtra(MediaStore.EXTRA_OUTPUT, photoURI);
startActivityForResult(takePictureIntent, TAKE_PHOTO);
然后在onActivityResult方法中处理拍照结果。
@Override
protected void onActivityResult(int requestCode, int resultCode, Intent data) {
super.onActivityResult(requestCode, resultCode, data);
switch (requestCode) {
case TAKE_PHOTO:
if (resultCode == RESULT_OK) {
processTakePhoto(photoFile.getPath());
break;
default:
break;
但是发现在7.0的系统上直接崩溃了,错误如下。
android.os.FileUriExposedException:
file:/
s/20170225_140305187933259.jpg exposed beyond app through
ClipData.Item.getUri()
然后网上搜了一把,是 photoURI = Uri.fromFile(photoFile); 这种创建Uri的方式有问题了,不够安全。需要使用FileProvider来创建Uri.
第一步,指定一个FileProvider。在AndroidManifest.xml中声明一个条目
<manifest xmlns:android="http://schemas.android.com/apk/res/android"
package="com.example.myapp">
<application
<provider
android:name="android.support.v4.content.FileProvider"
android:authorities="com.example.myapp.fileprovider"
android:grantUriPermissions="true"
android:exported="false">
<meta-data
android:name="android.support.FILE_PROVIDER_PATHS"
android:resource="@xml/filepaths" />
</provider>
</application>
</manifest>
com.example.myapp是你的包名
第二步,指定想分享的目录。在res目录下新建一个xml目录,在xml目录下面新建一个xml文件。我新建的文件名叫filepaths.xml
<?xml version="1.0" encoding="utf-8"?>
<paths xmlns:android="http://schemas.android.com/apk/res/android">
<external-path name="hm_DCIM" path="DCIM/camerademo" />
<external-path name="hm_Pictures" path="Pictures/camerademo" />
<files-path name="hm_private_files" path="images" />
<cache-path name="hm_private_cache" path="images" />
<external-files-path name="hm_external_files" path="Pictures" />
<external-cache-path name="hm_external_cache" path="images" />
</paths>
name=“name” URI 路径段,取值会隐藏你分享的目录的名字。比如下面这个
<external-cache-path name="hm_file" path="images" />
会用hm_file 替代/storage/emulated/0/Android/data/com.hm.camerademo/cache/images
path=“path” 你分享的目录的名字
java.lang.IllegalArgumentException: Failed to find configured root that contains /storage/emulated/0/DCIM/camerademo/20170226_110056248725175.jpg错误产生原因。
<external-path name="hm_DCIM" path="DCIM/camerademo" />
<external-path name="hm_Pictures" path="Pictures/camerademo" />
我可以在 external-path目录下指定多个我想分享的目录,两个分享的目录的name取值不应该相同。我把上面两个的name字段都叫 hm_file,然后看看有什么问题。结果就是会报标题上的那个错误,实验一把
<external-path name="hm_file" path="DCIM/camerademo" />
<external-path name
="hm_file" path="Pictures/camerademo" />
然后我生成一个Content URI。
File imageFile = null;
String storagePath;
File storageDir;
String timeStamp = new SimpleDateFormat("yyyyMMdd_HHmmss").format(new Date());
try {
storagePath = Environment.getExternalStorageDirectory().getAbsolutePath()+
File.separator + "DCIM" + File.separator + "camerademo";
storageDir = new File(storagePath);
storageDir.mkdirs();
imageFile = File.createTempFile(timeStamp, ".jpg", storageDir);
Log.e(TAG, imageFile.getAbsolutePath());
} catch (IOException e) {
e.printStackTrace();
return imageFile;
/storage/emulated/0/DCIM/camerademo/20170226_110056248725175.jpg
photoFile = ImageUtil.createImageFile();
photoURI = FileProvider.getUriForFile(this, "com.hm.camerademo.fileprovider", photoFile);
但是报错了。错误如下
java.lang.IllegalArgumentException: Failed to find configured root
that contains
/storage/emulated/0/DCIM/camerademo/20170226_110056248725175.jpg
我把上面生成文件的路径改一下
storagePath = Environment.getExternalStorageDirectory().getAbsolutePath()+
File.separator + "Pictures" + File.separator + "camerademo";
/storage/emulated/0/Pictures/camerademo/20170226_1104551680202685.jpg
/hm_file/20170226_1104551680202685.jpg
上面的问题说明 在filePath.xml 文件中,如果要在同一个存储路径下,指定两个共享的目录,如下所示,那么两个共享路径的name字段取值不应该相同,如果两者相同,那么后面的一行指定的path(/storage/emulated/0/Pictures/camerademo)会覆盖上面一行指定的path(/storage/emulated/0/DCIM/camerademo)
// 共享目录的根目录都是 /storage/emulated/0/
<external-path name="hm_file" path="DCIM/camerademo" />
<external-path name="hm_file" path="Pictures/camerademo" />
第三步 为一个文件生成 Content URI
File imageFile = null;
String storagePath;
File storageDir;
String timeStamp = new SimpleDateFormat("yyyyMMdd_HHmmss").format(new Date());
try {
storagePath = App.getInstance().getExternalFilesDir(Environment.DIRECTORY_PICTURES).getAbsolutePath();
storageDir = new File(storagePath);
storageDir.mkdirs();
imageFile = File.createTempFile(timeStamp, ".jpg", storageDir);
} catch (IOException e) {
e.printStackTrace();
Uri photoURI = FileProvider.getUriForFile(this, "com.hm.camerademo.fileprovider", imageFile );
com.hm.camerademo.fileprovider
要和在AndroidManifest.xml中指定的一样。不然会报错。
第四步 分享一个 Content URI
这个例子中我们是向系统的相机传递一个Uri
photoURI = FileProvider.getUriForFile(this, "com.hm.camerademo.fileprovider", photoFile);
Log.e(TAG, photoURI.getPath());
takePictureIntent.putExtra(MediaStore.EXTRA_OUTPUT, photoURI);
startActivityForResult(takePictureIntent, TAKE_PHOTO);
最后附上两张图,图片来自参考文档2
图一:使用Uri.fromFile()的方式生成一个Uri
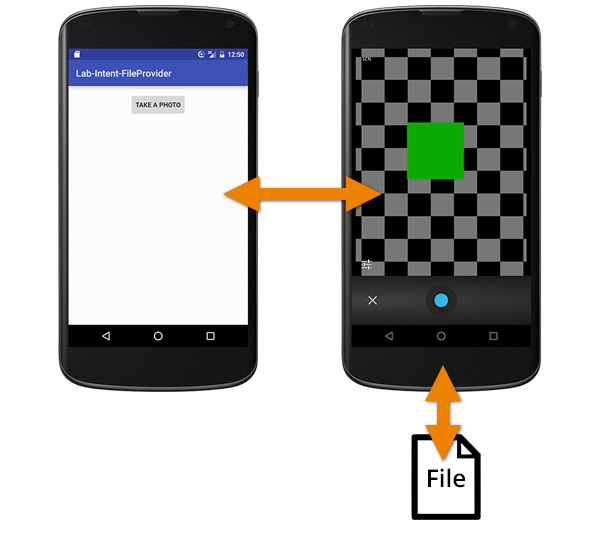
图一:使用FileProvider.getUriForFile(this, “com.hm.camerademo.fileprovider”, photoFile);的方式生成一个Uri
参考链接:
首先扯点别的:今天不上班,在家里和剑宗喝了点酒,和同学聊了会天,也是挺开心,现在学会习。以前调用系统相机拍照的时候,流程是这样的 private void takePhoto() { Intent takePictureIntent = new Intent(MediaStore.ACTION_IMAGE_CAPTURE); if (takePictureIntent
在使用pip3的时候,错误信息如下:
WARNING: pip is configured with locations that require TLS/SSL, however the ssl module in Python is not available.
网上的方法都是在CentOS下进行的,而我用的是Deepin系统,也就是基于Ubuntu/Debian的发行版。
而且网上的某些方法用./configure –with-ssl这条命令是无效的,下面给出解决问题的方案。
出现这种错误可以在Modules/Setup中,Ctrl + F查找字符串SSL,
将找到的第一个SSL下面的命
About
The original name of this program is "C++check" but it was later changed to "cppcheck".
Manual
A manual is available online:
http://cppcheck.sourceforge.net/manual.pdf
Compiling
Any C++11 compiler should work. For compilers with partial C++11 support it may work. If
your compiler has the C++11 features that are available in Visual Studio 2010 then it
will work. If nullptr is not supported by your compiler then this can be emulated using
the header lib/cxx11emu.h.
To build the GUI, you need Qt.
When building the command line tool, PCRE is optional. It is used if you build with rules.
There are multiple compilation choices:
* qmake - cross platform build tool
* cmake - cross platform build tool
* Windows: Visual Studio
* Windows: Qt Creator + mingw
* gnu make
* g++ 4.6 (or later)
* clang++
qmake
=====
You can use the gui/gui.pro file to build the GUI.
cd gui
qmake
Visual Studio
=============
Use the cppcheck.sln file. The file is configured for Visual Studio 2013, but the platform
toolset can be changed easily to older or newer versions. The solution contains platform
targets for both x86 and x64.
To compile with rules, select "Release-PCRE" or "Debug-PCRE" configuration.
pcre.lib (pcre64.lib for x64 builds) and pcre.h are expected to be in /extlibs then.
Qt Creator + mingw
==================
The PCRE dll is needed to build the CLI. It can be downloaded here:
http://software-download.name/pcre-library-windows/
gnu make
========
Simple build (no dependencies):
The recommended release build is:
make SRCDIR=build CFGDIR=cfg HAVE_RULES=yes
Flags:
SRCDIR=build : Python is used to optimise cppcheck
CFGDIR=cfg : Specify folder where .cfg files are found
HAVE_RULES=yes : Enable rules (pcre is required if this is used)
g++ (for experts)
=================
If you just want to build Cppcheck without dependencies then you can use this command:
g++ -o cppcheck -std=c++0x -include lib/cxx11emu.h -Iexternals/tinyxml -Ilib cli/*.cpp lib/*.cpp externals/tinyxml/*.cpp
If you want to use --rule and --rule-file then dependencies are needed:
g++ -o cppcheck -std=c++0x -include lib/cxx11emu.h -lpcre -DHAVE_RULES -Ilib -Iexternals/tinyxml cli/*.cpp lib/*.cpp externals/tinyxml/*.cpp
mingw
=====
The "LDFLAGS=-lshlwapi" is needed when building with mingw
mingw32-make LDFLAGS=-lshlwapi
other compilers/ide
===================
1. Create a empty project file / makefile.
2. Add all cpp files in the cppcheck cli and lib folders to the project file / makefile.
3. Compile.
Cross compiling Win32 (CLI) version of Cppcheck in Linux
sudo apt-get install mingw32
make CXX=i586-mingw32msvc-g++ LDFLAGS="-lshlwapi"
mv cppcheck cppcheck.exe
Webpage
http://cppcheck.sourceforge.net/
最近在测试FileProvider相关功能的时候,在从自定义相册选择图片通过FileProvider来获取content uri的时候程序突然崩溃了,报出了
Failed to find configured root that contains xxxx
复制代码的错误,一开始以为是自己的配置出错了,但是参照官方文档改来改去仍然没有任何作用,通过绞尽脑汁地排查,终于发现了错误原因,并找到了正确的...
手机调用摄像头时报java.lang.IllegalArgumentException: Failed to find configured root that contains /storage/emulated/0/PictureSelector/CameraImage/PictureSelector_20200724_091008.JPEG
出现这种情况,有可能是你配置provider的资源文件写错了
刚开始我的file_path文件是这样写的
<?xml version="1.0" enco
生成的文件路径跟指定的path不匹配问题
getExternalCacheDir()生成的路径为
/storage/emulated/0/Android/data/com.ruhai.yibei/cache/
File mFile;
Uri mImageUri;
private void openCamera() {
//创建文件用于保存图片
mFile = new File(getExternalCacheDir(), "i
<?xml version="1.0" encoding="utf-8"?>
<!-- 因为Android 7.0不允许intent带有file://的URI离开自身的应用了,要不然会抛出FileUriExposedException,所以要进行配置-->
<!-- 例子:设备小米Android8.1.0
"/storage...
文件显示存储在storage/emulated/0中,可是在DDMS中找不到emulate目录下0这个文件夹。
但是在emulated同目录下的sdcard0后面可以看到有个箭头指向了/storage/emulated/legacy ,我们看到legacy指向了 /mnt/shell/emulated/0。
所以得出结果,/mnt/shell/emulated/0里面的文件就是我们找的s
### 回答1:
/build_dir/host/automake-1.15/.configured' failed是一个错误信息,意思是构建目录中的automake-1.15版本的配置文件失败了。
automake是一个自动构建工具,用于生成Makefile.in文件。配置文件负责设置构建过程中的各种参数和选项。如果配置文件生成失败,将会导致构建过程无法进行。
这个错误可能由于多种原因引起,例如构建环境中缺少依赖的软件包、文件系统权限不足或是配置文件本身存在问题等。
为了解决这个问题,我们可以尝试以下几个步骤:
1. 检查依赖软件包是否已安装:在构建过程中,可能需要依赖其他软件包。我们可以使用包管理器来检查这些依赖的软件包是否已正确安装。
2. 确保文件系统权限:检查构建目录及其父目录的权限设置。如果没有足够的权限,配置文件生成可能会失败。尝试使用sudo或管理员权限运行构建过程。
3. 检查配置文件是否正确:如果配置文件本身存在问题,可以尝试查看详细的错误日志,找出具体的配置错误,并进行相应的修复。
4. 更新automake版本:如果当前使用的automake版本较旧,可以尝试更新到最新版本,以解决已知的问题和错误。
总之,解决/build_dir/host/automake-1.15/.configured' failed错误需要仔细检查并确认构建环境和配置文件的正确性,并采取适当的措施来修复问题。
### 回答2:
这个错误提示是在构建目录下运行Automake 1.15的时候出现了问题。可能有以下几个原因导致此错误:
1. automake-1.15版本未正确安装:请确保已经正确安装了automake-1.15版本,并且安装路径正确。可以通过运行命令`automake --version`来检查版本是否正确安装。
2. .configured文件权限问题:请确保.build_dir/host/automake-1.15/目录下的.configured文件具有足够的权限,以便Automake可以正确读取和写入该文件。可以使用`ls -l .configured`命令来检查文件权限,并通过`chmod`命令为文件设置正确的权限。
3. 构建环境配置问题:请确保构建环境的配置正确,包括路径设置、依赖库安装等。可能需要检查相关的环境变量和配置文件,确保构建目录下的automake-1.15可以正确访问相关的依赖项。
4. 构建目录下的配置文件错误:检查.build_dir/host/automake-1.15/目录下的配置文件是否正确,可能存在错误的配置项导致运行失败。可以尝试删除此目录并重新运行构建脚本,以生成正确的配置文件。
如果以上方法都无效,建议查看具体的错误信息以及生成的日志文件,以便更准确地定位问题并解决。可以结合相关的构建指南或者开发文档来排查这个错误。
Attempt to invoke interface method 'java.lang.Object[] java.util.Collection.toArray()' on a null obj
leilifengxingmw:

