[root@lvs ~]
> "name": "John Doe"
"_index" : "customer",
"_type" : "doc",
"_id" : "1",
"_version" : 1,
"result" : "created",
"_shards" : {
"total" : 2,
"successful" : 2,
"failed" : 0
"_seq_no" : 0,
"_primary_term" : 1
上面的代码会将指定文档的ID索引到客户索引中,其ID为1。如果我们再对另一个(或相同)文档执行上述命令,Elasticsearch将替换(即重新索引)一个新文档。
我这里对相同的文档执行命令,把John Doe改成我的名字
curl -X PUT "localhost:9200/customer/doc/1?pretty&pretty" -H 'Content-Type: application/json' -d'
"name": "suzijian"
[root@lvs ~]
"name": "suzijian"
"_index" : "customer",
"_type" : "doc",
"_id" : "1",
"_version" : 2,
"result" : "updated",
"_shards" : {
"total" : 2,
"successful" : 2,
"failed" : 0
"_seq_no" : 1,
"_primary_term" : 1
如果我们使用新的id,那么将创建一个新的文档,这里我创建一个叫lanxinyu的文档
curl -X PUT "localhost:9200/customer/doc/2?pretty&pretty" -H 'Content-Type: application/json' -d'
"name": "lanxinyu"
尽管Elasticsearch实际上并未在后台进行就地更新。每当我们进行更新时,Elasticsearch都会删除旧文档,然后在一个快照中将应用了更新的新文档编入索引。
示例一: 更新 id 为1文档的名字
curl -X POST "localhost:9200/customer/doc/1/_update?pretty&pretty" -H 'Content-Type: application/json' -d'
"doc": { "name": "Jane Doe" }
名称字段更改为“ Jane Doe”并同时向其添加年龄字段来更新我们之前的文档(ID为1):
curl -X POST "localhost:9200/customer/doc/1/_update?pretty&pretty" -H 'Content-Type: application/json' -d'
"doc": { "name": "Jane Doe", "age": 20 }
[root@lvs ~]
> "doc": { "name": "Jane Doe", "age": 20 }
"_index" : "customer",
"_type" : "doc",
"_id" : "1",
"_version" : 4,
"result" : "updated",
"_shards" : {
"total" : 2,
"successful" : 2,
"failed" : 0
"_seq_no" : 3,
"_primary_term" : 1
还可以使用简单的脚本对数据进行修改
curl -X POST "localhost:9200/customer/doc/1/_update?pretty&pretty" -H 'Content-Type: application/json' -d'
"script" : "ctx._source.age += 5"
[root@lvs ~]
> "script" : "ctx._source.age += 5"
"_index" : "customer",
"_type" :
"doc",
"_id" : "1",
"_version" : 5,
"result" : "updated",
"_shards" : {
"total" : 2,
"successful" : 2,
"failed" : 0
"_seq_no" : 4,
"_primary_term" : 1
删除文档非常简单。此示例显示了如何删除ID为2的先前客户:
curl -X DELETE "localhost:9200/customer/doc/2?pretty&pretty"
[root@lvs ~]
"_index" : "customer",
"_type" : "doc",
"_id" : "2",
"_version" : 5,
"result" : "deleted",
"_shards" : {
"total" : 2,
"successful" : 2,
"failed" : 0
"_seq_no" : 4,
"_primary_term" : 1
批量操作使用_bulkAPI
以下调用在一个批量操作中为两个文档(ID 1-John Doe和ID 2-Jane Doe)建立了索引
curl -X POST "localhost:9200/customer/doc/_bulk?pretty&pretty" -H 'Content-Type: application/json' -d'
{"index":{"_id":"1"}}
{"name": "John Doe" }
{"index":{"_id":"2"}}
{"name": "Jane Doe" }
本示例在一个批量操作中更新第一个文档(ID为1),然后删除第二个文档(ID为2):
curl -X POST "localhost:9200/customer/doc/_bulk?pretty&pretty" -H 'Content-Type: application/json' -d'
{"update":{"_id":"1"}}
{"doc": { "name": "John Doe becomes Jane Doe" } }
{"delete":{"_id":"2"}}
上面请注意,对于删除操作,在其后没有相应的源文档,因为删除仅需要删除文档的ID。
批量API不会因其中一项操作失败而失败。如果单个操作由于任何原因而失败,它将继续处理其后的其余操作。批量API返回时,它将为每个操作提供状态(以发送顺序相同),以便您可以检查特定操作是否失败。
先把数据导下来,跟着官方文档走
复制这里的连接地址,把数据导入
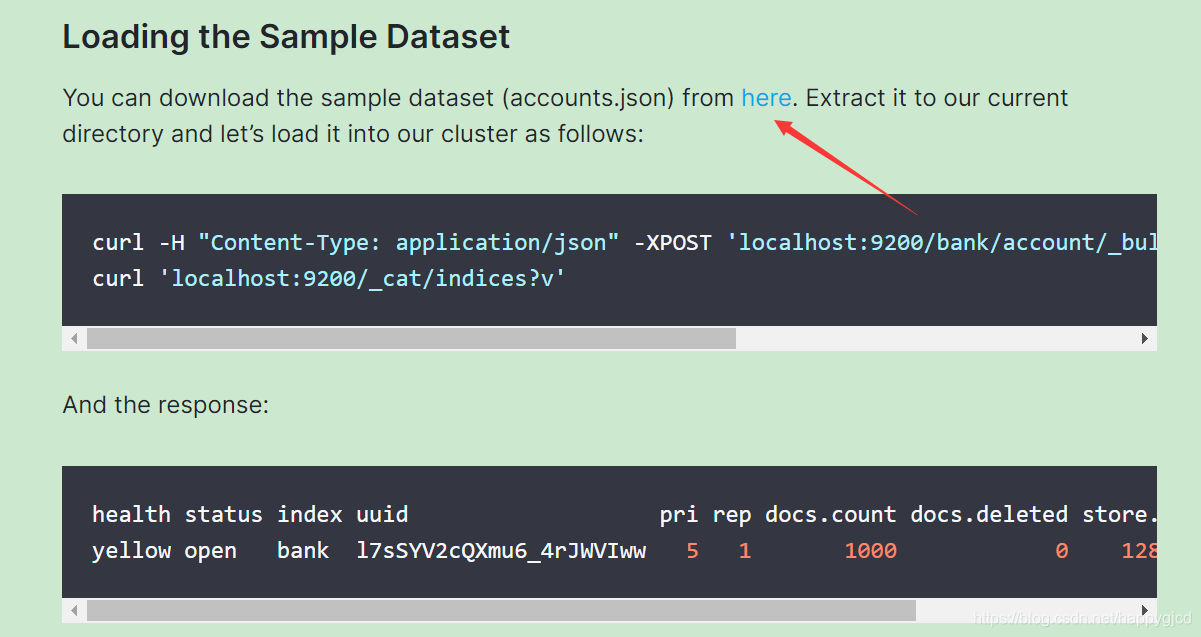
wget https://github.com/elastic/elasticsearch/blob/master/docs/src/test/resources/accounts.json?raw=true
如果在GitHub上吧数据下载下来后,不是account.json,需要重命令一下
mv accounts.json\?raw\=true accounts.json
然后创建索引并导入数据
curl -H "Content-Type: application/json" -XPOST '10.10.31.8:9200/bank/account/_bulk?pretty&refresh' --data-binary "@accounts.json"
调用_search查询接口,一般以key,value形式查询,这里q=*表示查询所有
curl -X GET "localhost:9200/bank/_search?q=*&sort=account_number:asc&pretty&pretty"
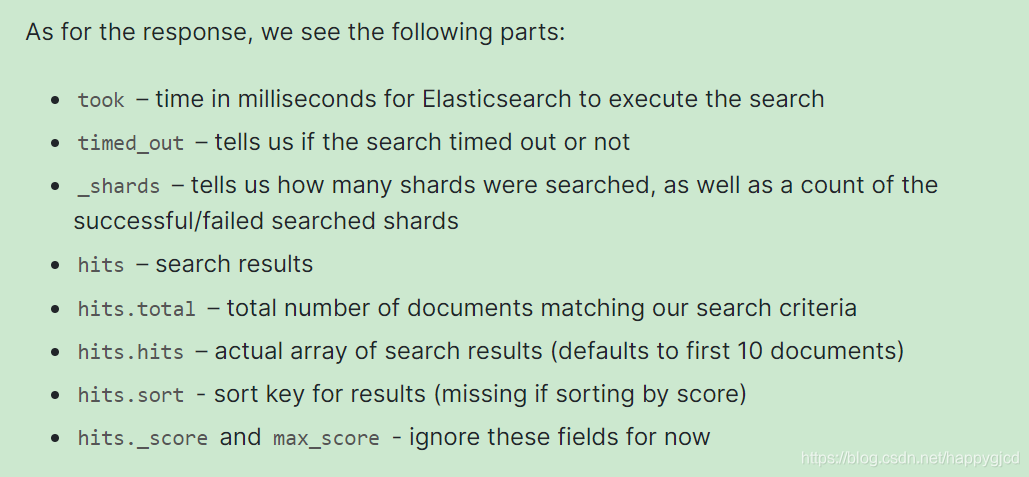
部分数据如下
"took" : 63,
"timed_out" : false,
"_shards" : {
"total" : 5,
"successful" : 5,
"skipped" : 0,
"failed" : 0
"hits" : {
"total" : 1000,
"max_score" : null,
"hits" : [ {
"_index" : "bank",
"_type" : "account",
"_id" : "0",
"sort": [0],
"_score" : null,
"_source" : {"account_number":0,"balance":16623,"firstname":"Bradshaw","lastname":"Mckenzie","age":29,"gender":"F","address":"244 Columbus Place","employer":"Euron","email":"bradshawmckenzie@euron.com","city":"Hobucken","state":"CO"}
}, {
"_index" : "bank",
"_type" : "account",
"_id" : "1",
"sort": [1],
"_score" : null,
"_source" : {"account_number":1,"balance":39225,"firstname":"Amber","lastname":"Duke","age":32,"gender":"M","address":"880 Holmes Lane","employer":"Pyrami","email":"amberduke@pyrami.com","city":"Brogan","state":"IL"}
}, ...
官方文档解释
使用 json 风格的查询API,match_all查询出所有,并使用account_number进行排序
这种json风格的查询语句,叫做DSL语法
curl -X GET "localhost:9200/bank/_search?pretty" -H 'Content-Type: application/json' -d'
"query": { "match_all": {} },
"sort": [
{ "account_number": "asc" }
指定查询多少条数据吗,查询一条数据,如果不指定,默认查询10条
curl -X GET "localhost:9200/bank/_search?pretty" -H 'Content-Type: application/json' -d'
"query": { "match_all": {} },
"size": 1
从第10条开始查,查10条
curl -X GET "localhost:9200/bank/_search?pretty" -H 'Content-Type: application/json' -d'
"query": { "match_all": {} },
"from": 10,
"size": 10
curl -X GET "localhost:9200/bank/_search?pretty" -H 'Content-Type: application/json' -d'
"query": { "match_all": {} },
"sort": { "balance": { "order": "desc" } }
现在,我们已经了解了一些基本的搜索参数,下面让我们进一步探讨一下Query DSL。首先让我们看一下返回的文档字段。默认情况下,完整的JSON文档将作为所有搜索的一部分返回。这称为来源(_source搜索结果中的字段)。如果我们不希望返回整个源文档,则可以只返回源中的少数几个字段。
下面查询只返回"account_number", "balance"两个字段
curl -X GET "localhost:9200/bank/_search?pretty" -H 'Content-Type: application/json' -d'
"query": { "match_all": {} },
"_source": ["account_number", "balance"],
match针对某个字段进行查询,返回编号为20的用户
curl -X GET "localhost:9200/bank/_search?pretty" -H 'Content-Type: application/json' -d'
"query": { "match": { "account_number": 20 } }
[root@lvs ~]
> "query": { "match": { "account_number": 20 } }
"took" : 64,
"timed_out" : false,
"_shards" : {
"total" : 5,
"successful" : 5,
"skipped" : 0,
"failed" : 0
"hits" : {
"total" : 1,
"max_score" : 1.0,
"hits" : [
"_index" : "bank",
"_type" : "account",
"_id" : "20",
"_score" : 1.0,
"_source" : {
"account_number" : 20,
"balance" : 16418,
"firstname" : "Elinor",
"lastname" : "Ratliff",
"age" : 36,
"gender" : "M",
"address" : "282 Kings Place",
"employer" : "Scentric",
"email" : "elinorratliff@scentric.com",
"city" : "Ribera",
"state" : "WA"
返回address中包含mail,类似于通配,有mail的就返回,而且不区分大小写
curl -X GET "localhost:9200/bank/_search?pretty" -H 'Content-Type: application/json' -d'
"query": { "match": { "address": "mill" } }
本示例组成两个match查询,并返回地址中包含“ mill”和“ lane”的所有帐户:
该bool must子句指定了将文档视为匹配项必须为真的所有查询。
must有点类似and的意思,必须所有条件都满足的都返回
curl -X GET "localhost:9200/bank/_search?pretty" -H 'Content-Type: application/json' -d'
"query": {
"bool": {
"must": [
{ "match": { "address": "mill" } },
{ "match": { "address": "lane" } }
should关键字类似或的意思,或就是,只要其中的一个条件满足,就返回
curl -X GET "localhost:9200/bank/_search?pretty" -H 'Content-Type: application/json' -d'
"query": {
"bool": {
"should": [
{ "match": { "address": "mill" } },
{ "match": { "address": "lane" } }
must_not
本示例组成两个match查询,并返回地址中既不包含“ mill”也不包含“ lane”的所有帐户:
curl -X GET "localhost:9200/bank/_search?pretty" -H 'Content-Type: application/json' -d'
"query": {
"bool": {
"must_not": [
{ "match": { "address": "mill" } },
{ "match": { "address": "lane" } }
我们可以在查询中同时组合must,should和must_not的bool子句。此外,我们可以bool在任何这些bool子句中编写查询,以模仿任何复杂的多级布尔逻辑。
curl -X GET "localhost:9200/bank/_search?pretty" -H 'Content-Type: application/json' -d'
"query": {
"bool": {
"must": [
{ "match": { "age": "40" } }
"must_not": [
{ "match": { "state": "ID" } }
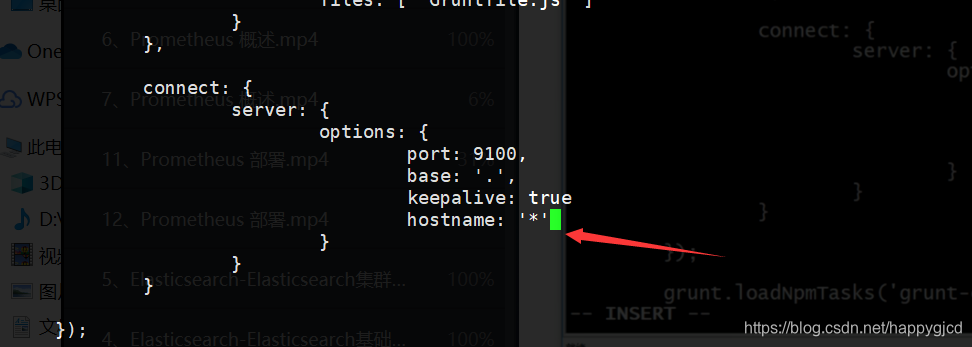
增加这个配置
接口:http://localhost:9200/index_demo/_analyze。接口: http://localhost:9200/_cat/indices?接口: http://localhost:9200/index_demo。接口: http://localhost:9200/index_demo。接口: http://localhost:9200/index_demo。接口:http://localhost:9200/index_demo。1. 创建索引(索引名为 index_demo)
{ “term”: { “date”: “2014-09-01” }}
{ “term”: { “public”: true }}
{ “term”: { “tag”: “full_text” }}
完整的例子, hostname 字段完全匹配成 xxx 的数据:
"query"
上一篇分享了如何在windows下搭建了一个分布式ES集群,这一篇来入门下DSL开发。
ES支持JSON格式的查询,叫做DSL(domain specific language)。
常用数据类型:text、keyword、number、array、range、boolean、date、geo_point、ip、nested、object
Github 地址:https://github.com/elastic/elasticsearch-py/blob/master/docs/index.rst
官网地址:https://elasticsearch-py.readthedocs.io/en/latest/index.html
Python-ElasticSearch,python对ES进行写入、更新、删除、搜索:h...

