

PyTorch-24h 03_图像分类

PyTorch图像分类案例。
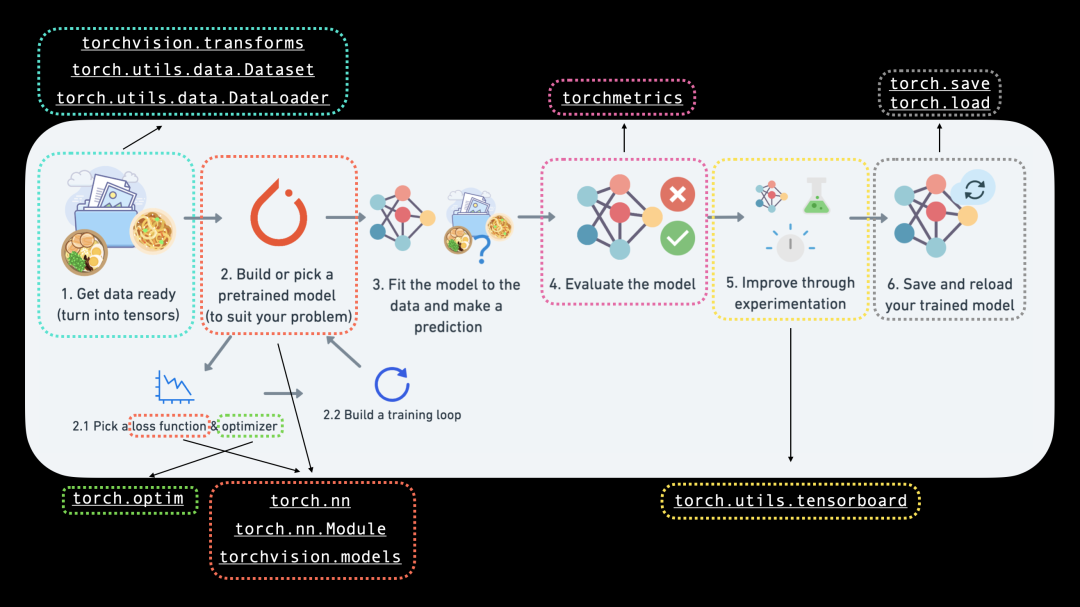
0. PyTorch中的CV模块
|
PyTorch module |
What does it do? |
|---|---|
|
torchvision |
包含经常用于计算机视觉问题的数据集、模型架构和图像转换。 |
|
torchvision.datasets |
在这里,您将找到许多示例计算机视觉数据集,用于解决图像分类、对象检测、图像字幕、视频分类等一系列问题。它还包含一系列用于制作自定义数据集的基类. |
|
torchvision.models |
该模块包含在 PyTorch 中实现的性能良好且常用的计算机视觉模型架构,您可以将它们用于您自己的问题。 |
|
torchvision.transforms |
在与模型一起使用之前,通常需要对图像进行转换(转换为数字/处理/增强),常见的图像转换可以在此处找到。 |
|
torch.utils.data.Dataset |
PyTorch 的基础数据集类. |
|
torch.utils.data.DataLoader |
在数据集上创建 Python 可迭代对象(数据集从 torch.utils.data.Dataset创建)。 |
注意:
torch.utils.data.Dataset和torch.utils.data.DataLoader类不仅适用于 PyTorch 中的计算机视觉,它们还能够处理许多不同类型的数据。
1. 加载数据

FashionMNIST 示例
torchvision.datasets
包含许多示例数据集,可用于练习编写计算机视觉代码。FashionMNIST 就是其中之一。它有 10 个不同的图像类别(不同类型的服装),用于多分类问题。torchvision已经内置了该数据集,可以通过torchvision.datasets加载。
#导入相关库
import torch
from torch import nn
import torchvision
from torchvision import datasets
from torchvision.transforms import ToTensor
import matplotlib.pyplot as plt# Setup training data
train_data = datasets.FashionMNIST(
root="data", # where to download data to?
train=True, # get training data
download=True, # download data if it doesn't exist on disk
transform=ToTensor(), # images come as PIL format, we want to turn into Torch tensors
target_transform=None # you can transform labels as well
# Setup testing data
test_data = datasets.FashionMNIST(
root="data",
train=False, # get test data
download=True,
transform=ToTensor()
)查看训练集的第一个数据:
image, label = train_data[0]
image, label
image.shape # torch.Size([1, 28, 28])
image的shape是
[1, 28, 28]
,具体而言:
[color_channels=1, height=28, width=28]
,color_channels=1 意味着图像是灰度图。
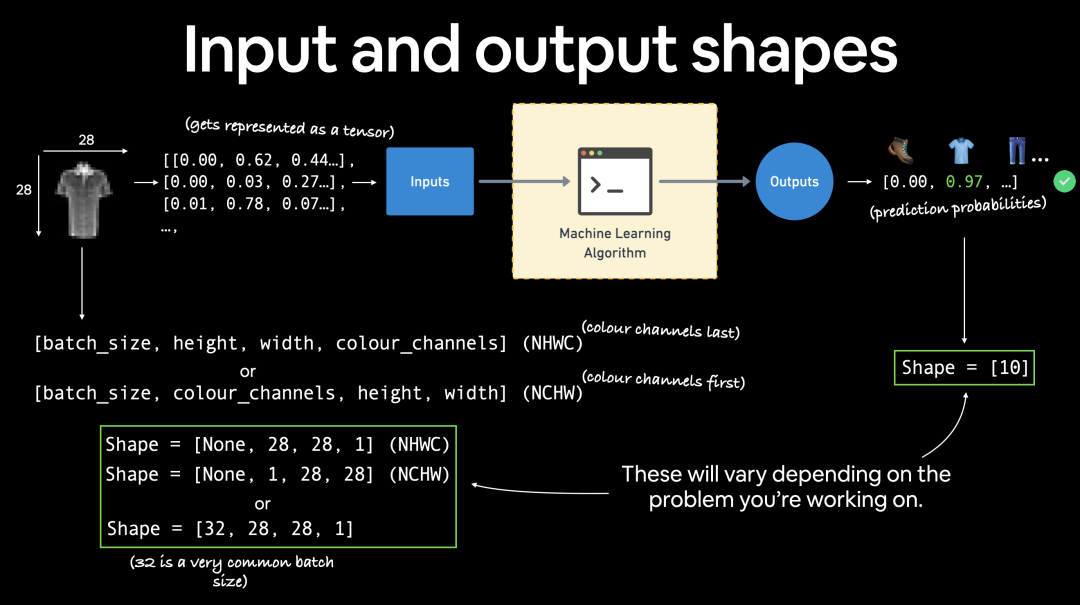
PyTorch 通常接受
NCHW
(通道优先)作为许多操作符的默认设置。
N
代表
图像数量
可视化数据:利用matplotlib显示图片
import matplotlib.pyplot as plt
image, label = train_data[0]
print(f"Image shape: {image.shape}")
plt.imshow(image.squeeze()) # image shape is [1, 28, 28] (colour channels, height, width)
plt.title(label);
使用
cmap
参数显示灰度图:
plt.imshow(image.squeeze(), cmap="gray")
plt.title(class_names[label]);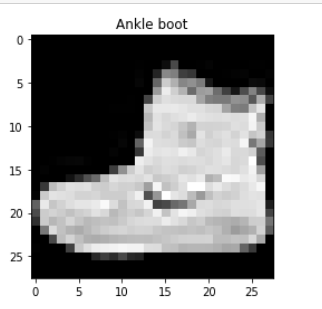
可以再多显示几个图片:
# Plot more images
torch.manual_seed(42)
fig = plt.figure(figsize=(9, 9))
rows, cols = 4, 4
for i in range(1, rows * cols + 1):
    random_idx = torch.randint(0, len(train_data), size=[1]).item()
    img, label = train_data[random_idx]
    fig.add_subplot(rows, cols, i)
    plt.imshow(img.squeeze(), cmap="gray")
    plt.title(class_names[label])
    plt.axis(False);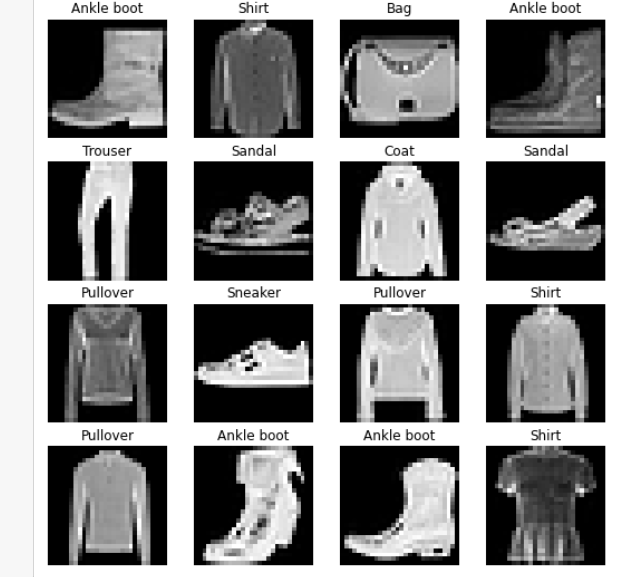
2. 准备数据
现在我们已经准备好了一个数据集。下一步是使用
torch.utils.data.DataLoader
装载数据集。
DataLoader
有助于将数据加载到模型中,用于训练和推理。它将一个大的“数据集”变成了一个个 Python 可迭代的小块。这些较小的块称为
batches
或
mini-batches
,可以通过
batch_size
参数设置。
使用batch_size计算效率更高。在理想情况下,您可以一次对所有数据进行前向传递和后向传递。但是一旦你开始使用较大的数据集,除非你有无限的计算能力,否则将它们分成批次会更容易。它还为您的模型提供了更多改进的机会。使用 mini-batch (数据的一小部分),梯度下降在每个 epoch 中执行的频率更高(每个 mini-batch 一次,而不是每个epoch一次)。
batch_size
(批量大小)应该为多少? 32 通常很好 ,但由于这是一个
超参数
,您可以尝试所有不同类型的值,通常使用 2 的幂(例如 32、64、128、256、512)。
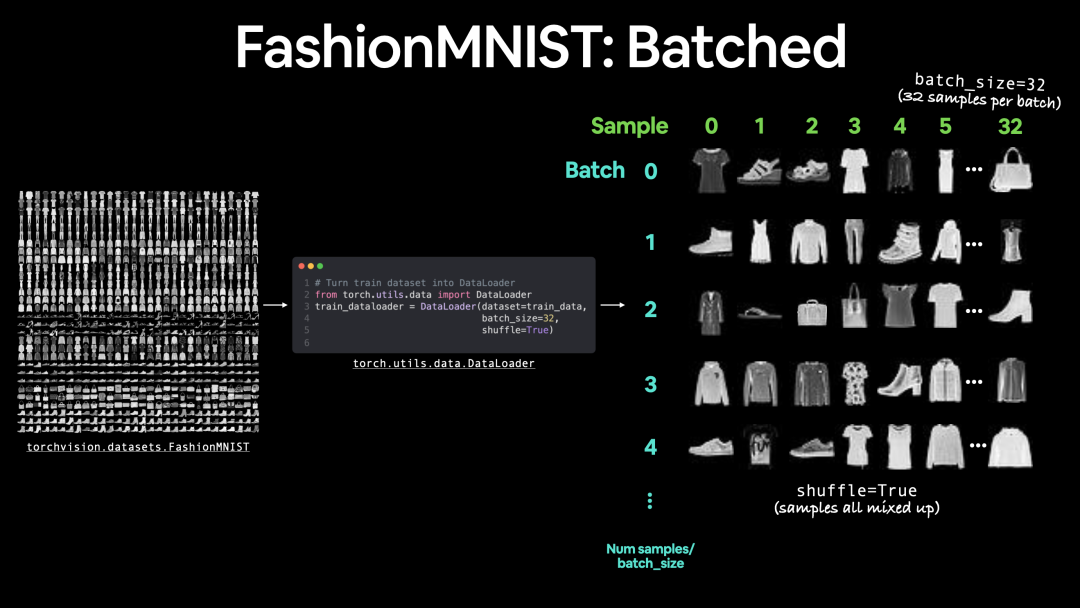
批处理 FashionMNIST,批处理大小为 32 并打开随机取数。
为训练集和测试集创建“DataLoader”。
from torch.utils.data import DataLoader
# Setup the batch size hyperparameter
BATCH_SIZE = 32
# Turn datasets into iterables (batches)
train_dataloader = DataLoader(train_data, # dataset to turn into iterable
    batch_size=BATCH_SIZE, # how many samples per batch?
    shuffle=True # shuffle data every epoch?
test_dataloader = DataLoader(test_data,
    batch_size=BATCH_SIZE,
    shuffle=False # don't necessarily have to shuffle the testing data
# Let's check out what we've created
print(f"Dataloaders: {train_dataloader, test_dataloader}")
print(f"Length of train dataloader: {len(train_dataloader)} batches of {BATCH_SIZE}")
print(f"Length of test dataloader: {len(test_dataloader)} batches of {BATCH_SIZE}")查看dataloader里的东西:
train_features_batch, train_labels_batch = next(iter(train_dataloader))
train_features_batch.shape, train_labels_batch.shape
# (torch.Size([32, 1, 28, 28]), torch.Size([32]))3. Model 0:基线模型
数据已加载并准备好!是时候通过继承
nn.Module
来构建
基线模型
了。
基线模型
是您能想象到的最简单的模型之一。将基线模型看作起点,并尝试使用后续更复杂的模型对其进行改进。我们的基线模型将包含两个
nn.Linear()
层。
因为我们正在处理二维的图像数据,所以我们还需要
nn.Flatten()
将图像变成一维张量。
from torch import nn
class FashionMNISTModelV0(nn.Module):
    def __init__(self, input_shape: int, hidden_units: int, output_shape: int):
        super().__init__()
        self.layer_stack = nn.Sequential(
            nn.Flatten(), # neural networks like their inputs in vector form
            nn.Linear(in_features=input_shape, out_features=hidden_units), # in_features = number of features in a data sample (784 pixels)
            nn.Linear(in_features=hidden_units, out_features=output_shape)
    def forward(self, x):
return self.layer_stack(x)接下来创建模型,训练模型:
torch.manual_seed(42)
# Need to setup model with input parameters
model_0 = FashionMNISTModelV0(input_shape=784, # one for every pixel (28x28)
    hidden_units=10, # how many units in the hiden layer
    output_shape=len(class_names) # one for every class
model_0.to("cpu") # keep model on CPU to begin with import requests
from pathlib import Path
# Download helper functions from Learn PyTorch repo (if not already downloaded)
if Path("helper_functions.py").is_file():
print("helper_functions.py already exists, skipping download")
else:
print("Downloading helper_functions.py")
# Note: you need the "raw" GitHub URL for this to work
request = requests.get("https://raw.githubusercontent.com/mrdbourke/pytorch-deep-learning/main/helper_functions.py")
with open("helper_functions.py", "wb") as f:
f.write(request.content)
# Import accuracy metric
from helper_functions import accuracy_fn # Note: could also use torchmetrics.Accuracy()
# Setup loss function and optimizer
loss_fn = nn.CrossEntropyLoss() # this is also called "criterion"/"cost function" in some places
optimizer = torch.optim.SGD(params=model_0.parameters(), lr=0.1)
from timeit import default_timer as timer
def print_train_time(start: float, end: float, device: torch.device = None):
total_time = end - start
print(f"Train time on {device}: {total_time:.3f} seconds")
return total_time
from tqdm.auto import tqdm
# Set the seed and start the timer
torch.manual_seed(42)
train_time_start_on_cpu = timer()
# Set the number of epochs (we'll keep this small for faster training times)
epochs = 3
# Create training and testing loop
for epoch in tqdm(range(epochs)):
    print(f"Epoch: {epoch}\n-------")
    ### Training
    train_loss = 0
    # Add a loop to loop through training batches
    for batch, (X, y) in enumerate(train_dataloader):
        model_0.train()
        y_pred = model_0(X)
        loss = loss_fn(y_pred, y)
        train_loss += loss # accumulatively add up the loss per epoch
        optimizer.zero_grad()
        loss.backward()
        optimizer.step()
        # Print out how many samples have been seen
        if batch % 400 == 0:
            print(f"Looked at {batch * len(X)}/{len(train_dataloader.dataset)} samples")
    # Divide total train loss by length of train dataloader (average loss per batch per epoch)
    train_loss /= len(train_dataloader)
    ### Testing
    # Setup variables for accumulatively adding up loss and accuracy
    test_loss, test_acc = 0, 0
    model_0.eval()
    with torch.inference_mode():
        for X, y in test_dataloader:
            # 1. Forward pass
            test_pred = model_0(X)
            # 2. Calculate loss (accumatively)
            test_loss += loss_fn(test_pred, y) # accumulatively add up the loss per epoch
            # 3. Calculate accuracy (preds need to be same as y_true)
            test_acc += accuracy_fn(y_true=y, y_pred=test_pred.argmax(dim=1))
        # Calculations on test metrics need to happen inside torch.inference_mode()
        # Divide total test loss by length of test dataloader (per batch)
        test_loss /= len(test_dataloader)
        # Divide total accuracy by length of test dataloader (per batch)
        test_acc /= len(test_dataloader)
    ## Print out what's happening
    print(f"\nTrain loss: {train_loss:.5f} | Test loss: {test_loss:.5f}, Test acc: {test_acc:.2f}%\n")
# Calculate training time
train_time_end_on_cpu = timer()
total_train_time_model_0 = print_train_time(start=train_time_start_on_cpu,
                                           end=train_time_end_on_cpu,
device=str(next(model_0.parameters()).device))4. 评估model0
torch.manual_seed(42)
def eval_model(model: torch.nn.Module,
               data_loader: torch.utils.data.DataLoader,
               loss_fn: torch.nn.Module,
               accuracy_fn):
    """Returns a dictionary containing the results of model predicting on data_loader.
    Args:
        model (torch.nn.Module): A PyTorch model capable of making predictions on data_loader.
        data_loader (torch.utils.data.DataLoader): The target dataset to predict on.
        loss_fn (torch.nn.Module): The loss function of model.
        accuracy_fn: An accuracy function to compare the models predictions to the truth labels.
    Returns:
        (dict): Results of model making predictions on data_loader.
    loss, acc = 0, 0
    model.eval()
    with torch.inference_mode():
        for X, y in data_loader:
            # Make predictions with the model
            y_pred = model(X)
            # Accumulate the loss and accuracy values per batch
            loss += loss_fn(y_pred, y)
            acc += accuracy_fn(y_true=y,
                                y_pred=y_pred.argmax(dim=1)) # For accuracy, need the prediction labels (logits -> pred_prob -> pred_labels)
        # Scale loss and acc to find the average loss/acc per batch
        loss /= len(data_loader)
        acc /= len(data_loader)
    return {"model_name": model.__class__.__name__, # only works when model was created with a class
            "model_loss": loss.item(),
            "model_acc": acc}
# Calculate model 0 results on test dataset
model_0_results = eval_model(model=model_0, data_loader=test_dataloader,
    loss_fn=loss_fn, accuracy_fn=accuracy_fn
model_0_results5. model1:增加非线性
尝试通过添加非线性改善模型model0:
# Create a model with non-linear and linear layers
class FashionMNISTModelV1(nn.Module):
    def __init__(self, input_shape: int, hidden_units: int, output_shape: int):
        super().__init__()
        self.layer_stack = nn.Sequential(
            nn.Flatten(), # flatten inputs into single vector
            nn.Linear(in_features=input_shape, out_features=hidden_units),
            nn.ReLU(),
            nn.Linear(in_features=hidden_units, out_features=output_shape),
            nn.ReLU()
    def forward(self, x: torch.Tensor):
return self.layer_stack(x)但是训练后发现,效果不如基线模型。
这是机器学习中需要注意的事情,有时你认为应该工作的事情却没有。然后你认为可能行不通的事情发生了。
它一半是科学,一半是艺术。
从表面上看,我们的模型似乎在训练数据上过拟合。过度拟合意味着我们的模型很好地学习了训练数据,但这些模式并没有推广到测试数据。修复过度拟合的两个主要方法包括:
- 1. 使用更小或不同的模型(某些模型比其他模型更适合某些类型的数据)。
- 2. 使用更大的数据集(数据越多,模型学习可概括模式的机会就越大)。
尝试搜索“防止机器学习过度拟合的方法”,看看其它方法。现在,让我们看看第 1 点:使用不同的模型。
6. model2:卷积神经网络(CNN )
好吧,是时候让事情更上一层楼了。是时候创建一个卷积神经网络(CNN)。CNN 以其在视觉数据中寻找模式的能力而闻名。由于我们正在处理视觉数据,让我们看看使用 CNN 模型是否可以改进我们的基线。
我们将要使用的 CNN 模型称为 TinyVGG,来自 CNN Explainer 网站。它遵循卷积神经网络的典型结构:
输入层->[卷积层->激活层->池化层]->输出层
其中
[卷积层->激活层->池化层]
的内容可以放大并重复多次,具体取决于要求。
# Create a convolutional neural network
class FashionMNISTModelV2(nn.Module):
    Model architecture copying TinyVGG from:
    https://poloclub.github.io/cnn-explainer/
    def __init__(self, input_shape: int, hidden_units: int, output_shape: int):
        super().__init__()
        self.block_1 = nn.Sequential(
            nn.Conv2d(in_channels=input_shape,
                      out_channels=hidden_units,
                      kernel_size=3, # how big is the square that's going over the image?
                      stride=1, # default
                      padding=1),# options = "valid" (no padding) or "same" (output has same shape as input) or int for specific number
            nn.ReLU(),
            nn.Conv2d(in_channels=hidden_units,
                      out_channels=hidden_units,
                      kernel_size=3,
                      stride=1,
                      padding=1),
            nn.ReLU(),
            nn.MaxPool2d(kernel_size=2,
                         stride=2) # default stride value is same as kernel_size
        self.block_2 = nn.Sequential(
            nn.Conv2d(hidden_units, hidden_units, 3, padding=1),
            nn.ReLU(),
            nn.Conv2d(hidden_units, hidden_units, 3, padding=1),
            nn.ReLU(),
            nn.MaxPool2d(2)
        self.classifier = nn.Sequential(
            nn.Flatten(),
            # Where did this in_features shape come from?
            # It's because each layer of our network compresses and changes the shape of our inputs data.
            nn.Linear(in_features=hidden_units*7*7,
                      out_features=output_shape)
    def forward(self, x: torch.Tensor):
        x = self.block_1(x)
        # print(x.shape)
        x = self.block_2(x)
        # print(x.shape)
        x = self.classifier(x)
        # print(x.shape)
        return x
torch.manual_seed(42)
model_2 = FashionMNISTModelV2(input_shape=1,
    hidden_units=10,
    output_shape=len(class_names)).to(device)
model_27. 比较模型
import pandas as pd
compare_results = pd.DataFrame([model_0_results, model_1_results, model_2_results])
compare_results
# Visualize our model results
compare_results.set_index("model_name")["model_acc"].plot(kind="barh")
plt.xlabel("accuracy (%)")
plt.ylabel("model");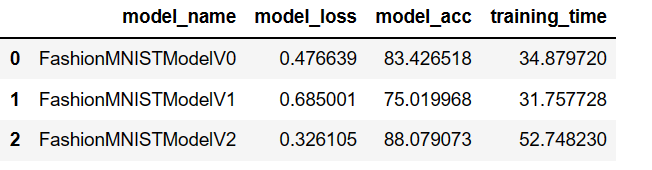
8. 混淆矩阵
有许多不同的评估指标可以用于分类问题。
最直观的一种是混淆矩阵。
混淆矩阵向您显示您的分类模型在预测和真实标签之间的关系。主对角线上的是分类正确的数量。例如,第一行第一列表示的是真实标签和预测标签都是T-shirt/top
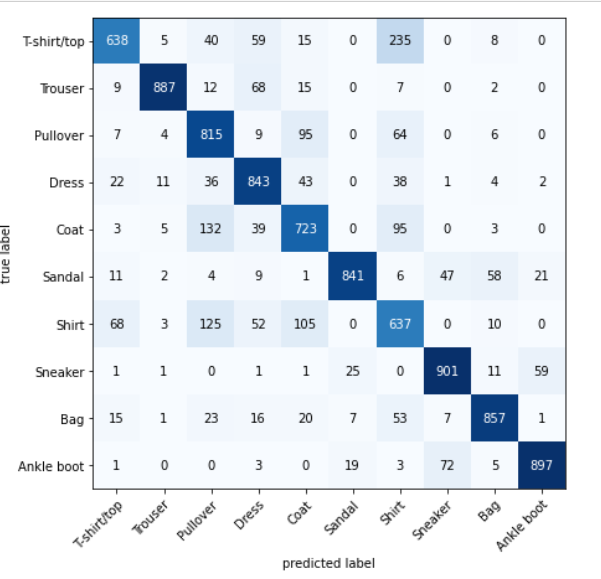
要制作混淆矩阵,我们将经历三个步骤:
- 1. 使用我们经过训练的模型“model_2”进行预测。
-
2. 使用
torch.ConfusionMatrix制作混淆矩阵。 -
3. 使用
mlxtend.plotting.plot_confusion_matrix()绘制混淆矩阵。
让我们从使用我们训练好的模型进行预测开始。
# Import tqdm for progress bar
from tqdm.auto import tqdm
# 1. Make predictions with trained model
y_preds = []
model_2.eval()
with torch.inference_mode():
  for X, y in tqdm(test_dataloader, desc="Making predictions"):
    # Send data and targets to target device
    X, y = X.to(device), y.to(device)
    # Do the forward pass
    y_logit = model_2(X)
    # Turn predictions from logits -> prediction probabilities -> predictions labels
    y_pred = torch.softmax(y_logit.squeeze(), dim=0).argmax(dim=1)
    # Put predictions on CPU for evaluation
    y_preds.append(y_pred.cpu())
# Concatenate list of predictions into a tensor
y_pred_tensor = torch.cat(y_preds)!pip install -q torchmetrics -U mlxtend
# Import mlxtend upgraded version
import mlxtend
print(mlxtend.__version__)
assert int(mlxtend.__version__.split(".")[1]) >= 19 # should be version 0.19.0 or higher
from torchmetrics import ConfusionMatrix
from mlxtend.plotting import plot_confusion_matrix
# 2. Setup confusion matrix instance and compare predictions to targets
confmat = ConfusionMatrix(num_classes=len(class_names))
confmat_tensor = confmat(preds=y_pred_tensor,
                         target=test_data.targets)
# 3. Plot the confusion matrix
fig, ax = plot_confusion_matrix(
    conf_mat=confmat_tensor.numpy(), # matplotlib likes working with NumPy
    class_names=class_names, # turn the row and column labels into class names
    figsize=(10, 7)
);9. 保存和加载模型
保存模型到文件中。
from pathlib import Path
# Create models directory (if it doesn't already exist), see: https://docs.python.org/3/library/pathlib.html#pathlib.Path.mkdir
MODEL_PATH = Path("models")
MODEL_PATH.mkdir(parents=True, # create parent directories if needed
                 exist_ok=True # if models directory already exists, don't error
# Create model save path
MODEL_NAME = "03_pytorch_computer_vision_model_2.pth"
MODEL_SAVE_PATH = MODEL_PATH / MODEL_NAME
# Save the model state dict
print(f"Saving model to: {MODEL_SAVE_PATH}")
torch.save(obj=model_2.state_dict(), # only saving the state_dict() only saves the learned parameters
           f=MODEL_SAVE_PATH)
# Create a new instance of FashionMNISTModelV2 (the same class as our saved state_dict())
# Note: loading model will error if the shapes here aren't the same as the saved version
loaded_model_2 = FashionMNISTModelV2(input_shape=1,
                                    hidden_units=10, # try changing this to 128 and seeing what happens
                                    output_shape=10)
# Load in the saved state_dict()
loaded_model_2.load_state_dict(torch.load(f=MODEL_SAVE_PATH))
# Send model to GPU
loaded_model_2 = loaded_model_2.to(device)
# Evaluate loaded model
torch.manual_seed(42)
loaded_model_2_results = eval_model(
    model=loaded_model_2,