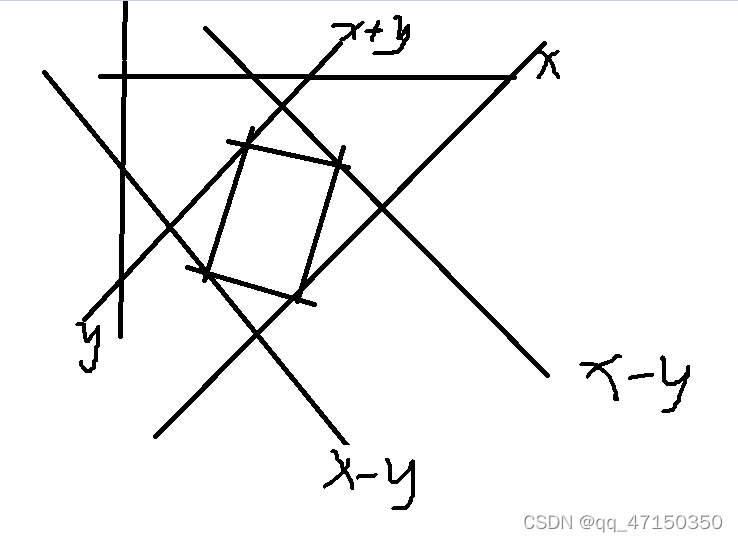
1、下面是使用方法一实现的顶点定位
import numpy as np
import cv2
def get4points(img: np.ndarray, thed, n):
:param img the color image which shape is [height, width, depth]
:return 4 point locations in list or tuple, for example: [[x1, y1], [x2, y2], [x3, y3], [x4, y4]]
gray = cv2.cvtColor(img,cv2.COLOR_BGR2GRAY)
ret, binary = cv2.threshold(gray,thed,255,cv2.THRESH_BINARY)
contours, hierarchy = cv2.findContours(
binary,
cv2.RETR_LIST,
cv2.CHAIN_APPROX_SIMPLE)
len_list = []
for i in range(len(contours)):
len_list.append(len(contours[i]))
sy = np.argsort(np.array(len_list))[-n]
sum_list = []
dif_list = []
for i in contours[sy]:
sum = i[0][0]+i[0][1]
sum_list.append(sum)
dif_list.append(i[0][0]-i[0][1])
id_lb = np.argsort(np.array(sum_list))
id_lb2 = np.argsort(np.array(dif_list))
lu_id , rd_id = id_lb[0] , id_lb[-1]
ld_id , ru_id = id_lb2[0] , id_lb2[-1]
points = np.array([contours[sy][lu_id][0],contours[sy][rd_id][0],contours[sy][ld_id][0],contours[sy][ru_id][0]])
return points , contours , sy
2、下面是使用方法2实现的顶点定位
def getpoints(binary: np.ndarray , num: int ):
contours, hierarchy = cv2.findContours(
binary,
cv2.RETR_LIST,
cv2.CHAIN_APPROX_SIMPLE)
x_list = []
for i in contours:
x_sum = 0
for kk in i:
x_sum += kk[0][0]
x_av = x_sum/len(i)
x_list.append(x_av)
sy = np.argsort(np.array(x_list))[num]
cnt = contours[sy]
rect = cv2.minAreaRect(cnt)
box = cv2.boxPoints(rect)
return box , contours , sy
def findpoints(points):
point_y=sorted(points,key=lambda t:t[1])
lu, ru =sorted(point_y[:2],key=lambda t:t[0])
ld, rd =sorted(point_y[2:],key=lambda t:t[0])
return [list(lu), list(ld), list(ru),list(rd)]
3、下面是一些展示代码
def show_points(img , points):
point_size = 8
point_color = (0, 0, 255)
thickness = 4
points_list = [tuple(i) for i in np.int32(points).reshape(-1,2)]
for point in points_list:
cv2.circle(img, point, point_size, point_color, thickness)
img = cv2.resize(img,(808,808))
cv2.imshow('img',img)
cv2.waitKey(0)
cv2.destroyAllWindows()
def show_Contour(img , contours , sy):
cv2.drawContours(img, contours , sy , (25, 254, 0), 4)
img = cv2.resize(img,(808,808))
cv2.imshow('img',img)
cv2.waitKey(0)
cv2.destroyAllWindows()
一、问题的引入opencv在图像处理方面有着非常强大的功能,当我们需要使用opencv进行一些图像的矫正工作时,我们通常需要找到原图的一些关键点,然后计算变换后的图像坐标,最后通过仿射变换或者透视变换获得自己想要的矫正图像,比如将一张拍歪了的纸进行矫正,我们的首要任务就是找到原图的一些关键点,通常的做法就是找纸张的4个顶点。二、问题的解决方法第一步我们肯定要找到纸张相应的矩形轮廓,这里可以二值化再找,也可以使用一些算子查找,而本文的重点是解决怎样根据矩形轮廓去确定它具体的4个顶点的位置。方法一:使
#include "Math.h"
#define max_corners 4#define C CV_PI /3
int Otsu(IplImage* src);int main(int argc, char*argv[])
IplImage* img = cvL
轮廓检测引言
在计算机视觉中,轮廓检测是一个十分重要的任务。与边缘不同,图像中的轮廓包含更多的实际意义。OpenCV提供了 findContours() 函数和 drawContours() 函数实现轮廓的检测和绘制————————————————————OpenCV轮廓检测的例子# -*- coding:utf-8 -*-import cv2# Step1. 读入图像
image = cv2.i
1. 通过`cv2.findContours()`函数找到轮廓并筛选出矩形轮廓。
2. 计算矩形轮廓的面积,筛选出面积最大的矩形轮廓。
3. 使用`cv2.approxPolyDP()`函数对矩形轮廓进行多边形逼近,得到一个近似的多边形轮廓。
4. 对多边形轮廓进行排序,找到左上角、右上角、右下角、左下角四个顶点。
下面是一个示例代码:
``` python
import cv2
import numpy as np
# 读取图像并转为灰度图像
img = cv2.imread("test.png")
gray = cv2.cvtColor(img, cv2.COLOR_BGR2GRAY)
# 对图像进行二值化处理
_, thresh = cv2.threshold(gray, 127, 255, cv2.THRESH_BINARY)
# 查找轮廓
contours, _ = cv2.findContours(thresh, cv2.RETR_EXTERNAL, cv2.CHAIN_APPROX_SIMPLE)
# 筛选矩形轮廓
rect_contours = []
for contour in contours:
area = cv2.contourArea(contour)
if area > 1000:
perimeter = cv2.arcLength(contour, True)
approx = cv2.approxPolyDP(contour, 0.02 * perimeter, True)
if len(approx) == 4:
rect_contours.append(approx)
# 计算面积最大的矩形轮廓
max_area = 0
max_contour = None
for contour in rect_contours:
area = cv2.contourArea(contour)
if area > max_area:
max_area = area
max_contour = contour
# 对多边形轮廓进行排序,找到四个顶点
top_left = None
top_right = None
bottom_right = None
bottom_left = None
if max_contour is not None:
points = max_contour.reshape(4, 2)
rect = np.zeros((4, 2), dtype=np.float32)
s = points.sum(axis=1)
rect[0] = points[np.argmin(s)]
rect[2] = points[np.argmax(s)]
diff = np.diff(points, axis=1)
rect[1] = points[np.argmin(diff)]
rect[3] = points[np.argmax(diff)]
top_left = rect[0]
top_right = rect[1]
bottom_right = rect[2]
bottom_left = rect[3]
# 在图像上绘制矩形和顶点
cv2.drawContours(img, [max_contour], 0, (0, 255, 0), 2)
cv2.circle(img, tuple(top_left), 5, (0, 0, 255), -1)
cv2.circle(img, tuple(top_right), 5, (0, 0, 255), -1)
cv2.circle(img, tuple(bottom_right), 5, (0, 0, 255), -1)
cv2.circle(img, tuple(bottom_left), 5, (0, 0, 255), -1)
# 显示结果
cv2.imshow("Result", img)
cv2.waitKey(0)
在这个示例中,我们首先读取图像并将其转为灰度图像,在二值化处理后查找轮廓。然后筛选出面积最大的矩形轮廓,并对其进行多边形逼近。接下来对多边形轮廓进行排序,找到四个顶点,并在图像上绘制矩形和顶点。
请注意,在实际应用中,由于图像中可能会有多个矩形轮廓,需要根据实际情况进行筛选和排序,以确保找到正确的顶点。


